| Auteur |
Message |
|
cabbie
|
Sujet du message: Kwikasfaki  Publié: Publié: 19 Jan 2012, 22:16 |
|
Inscrit le: 19 Jan 2012, 20:34
Messages: 135
|
[quote="cabbie"]This is what I have so far: Gary's drag bike H2 motor 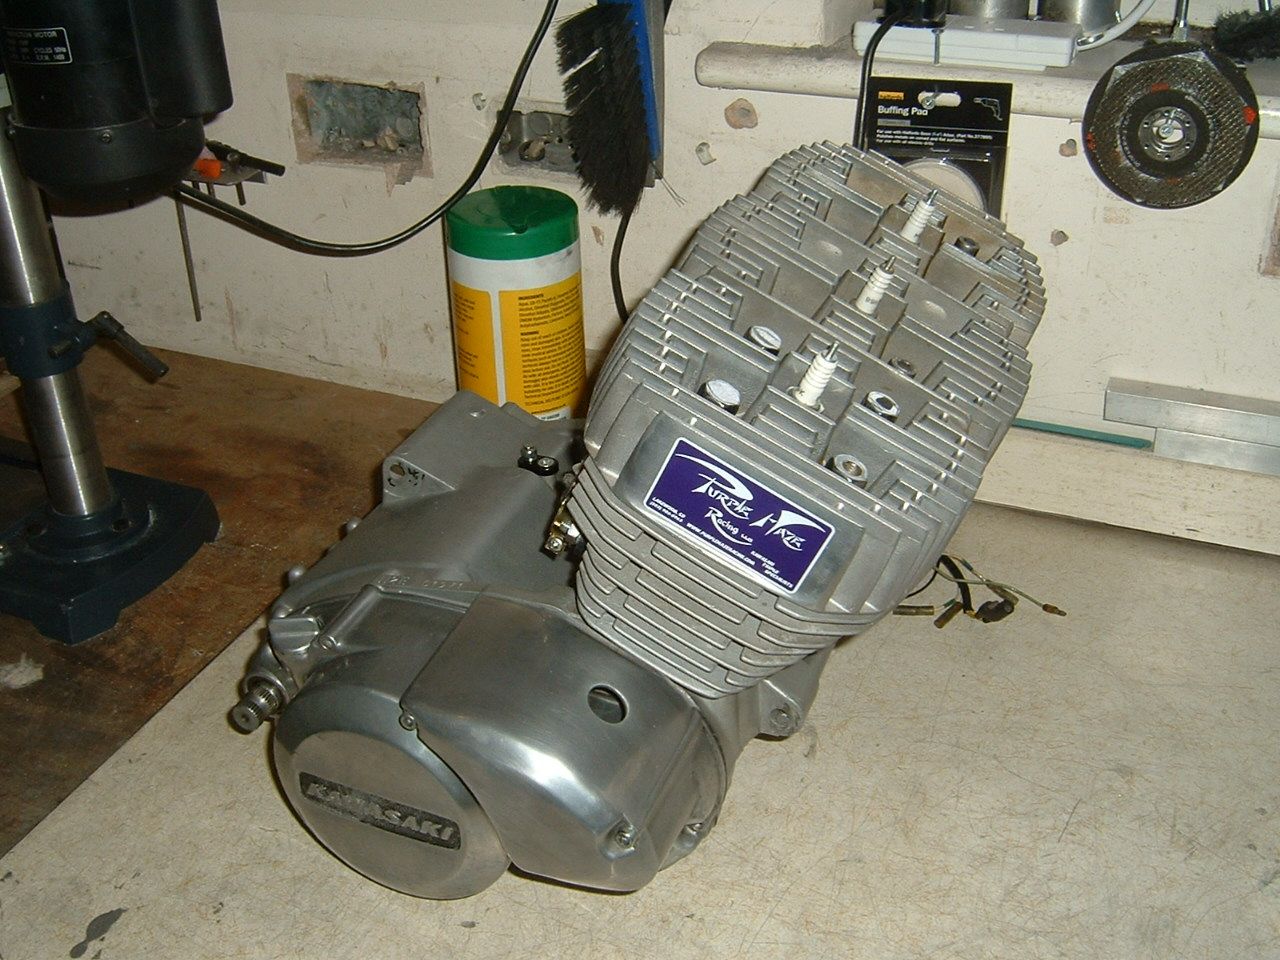 A gsxr 400 frame and Aprilia swinger 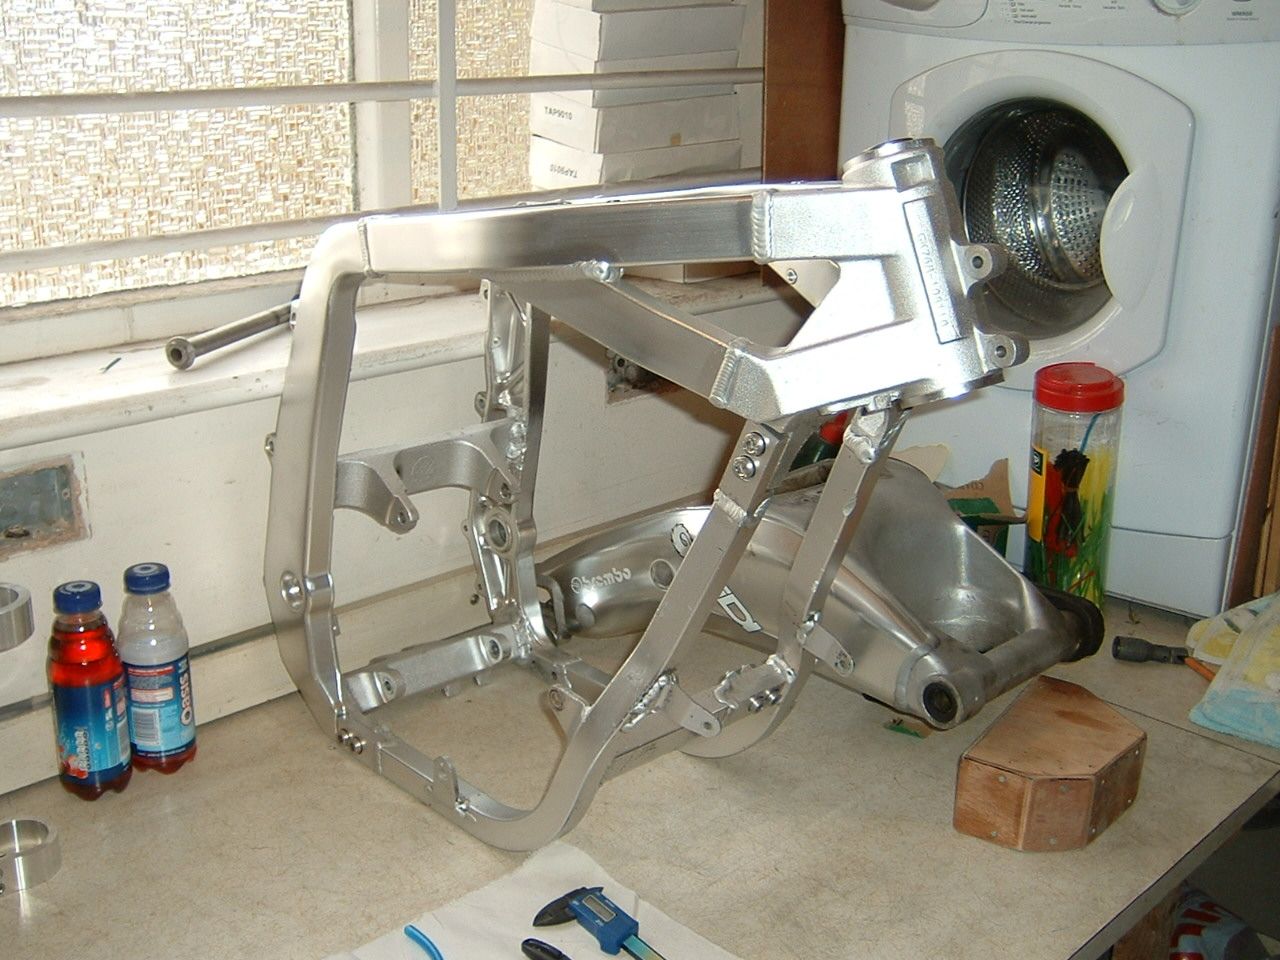 Dymag alloy wheels 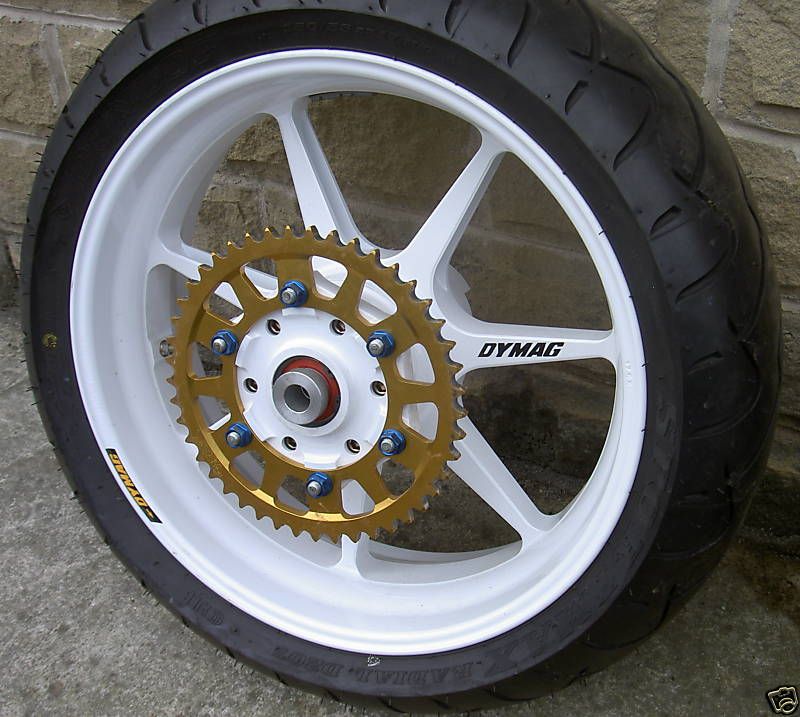 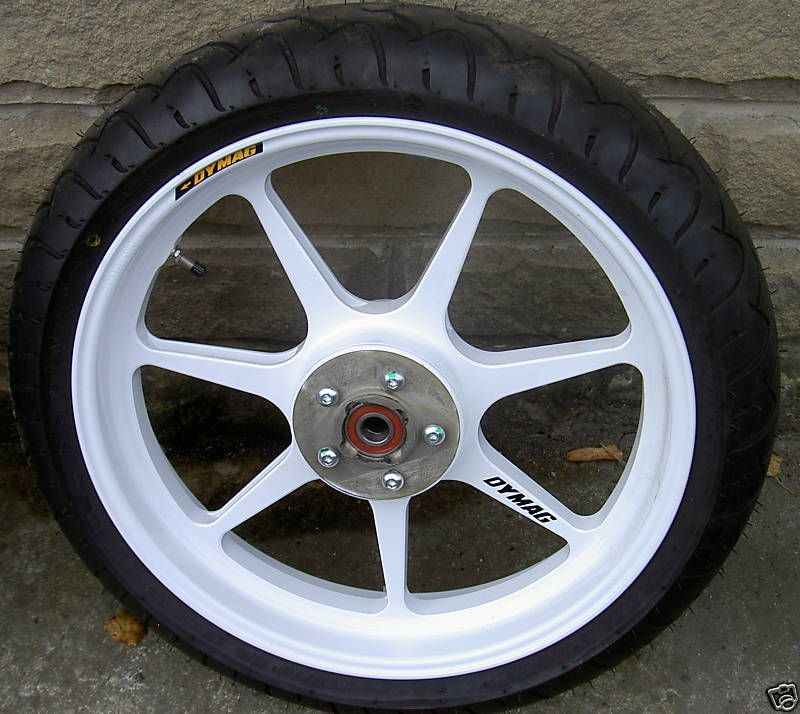 And here are the yokes I had made to order by "Billet Bike Bits" 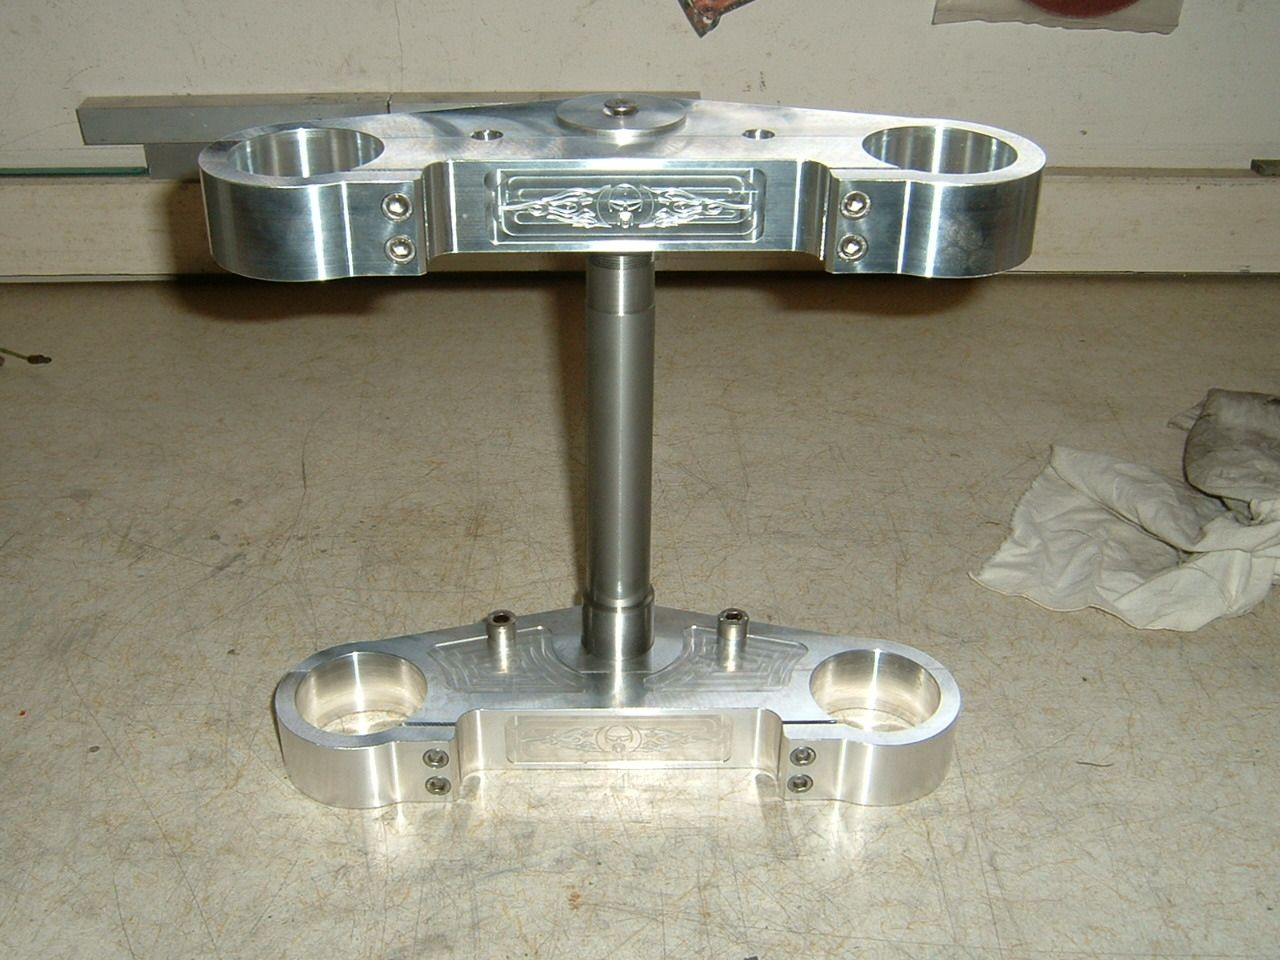 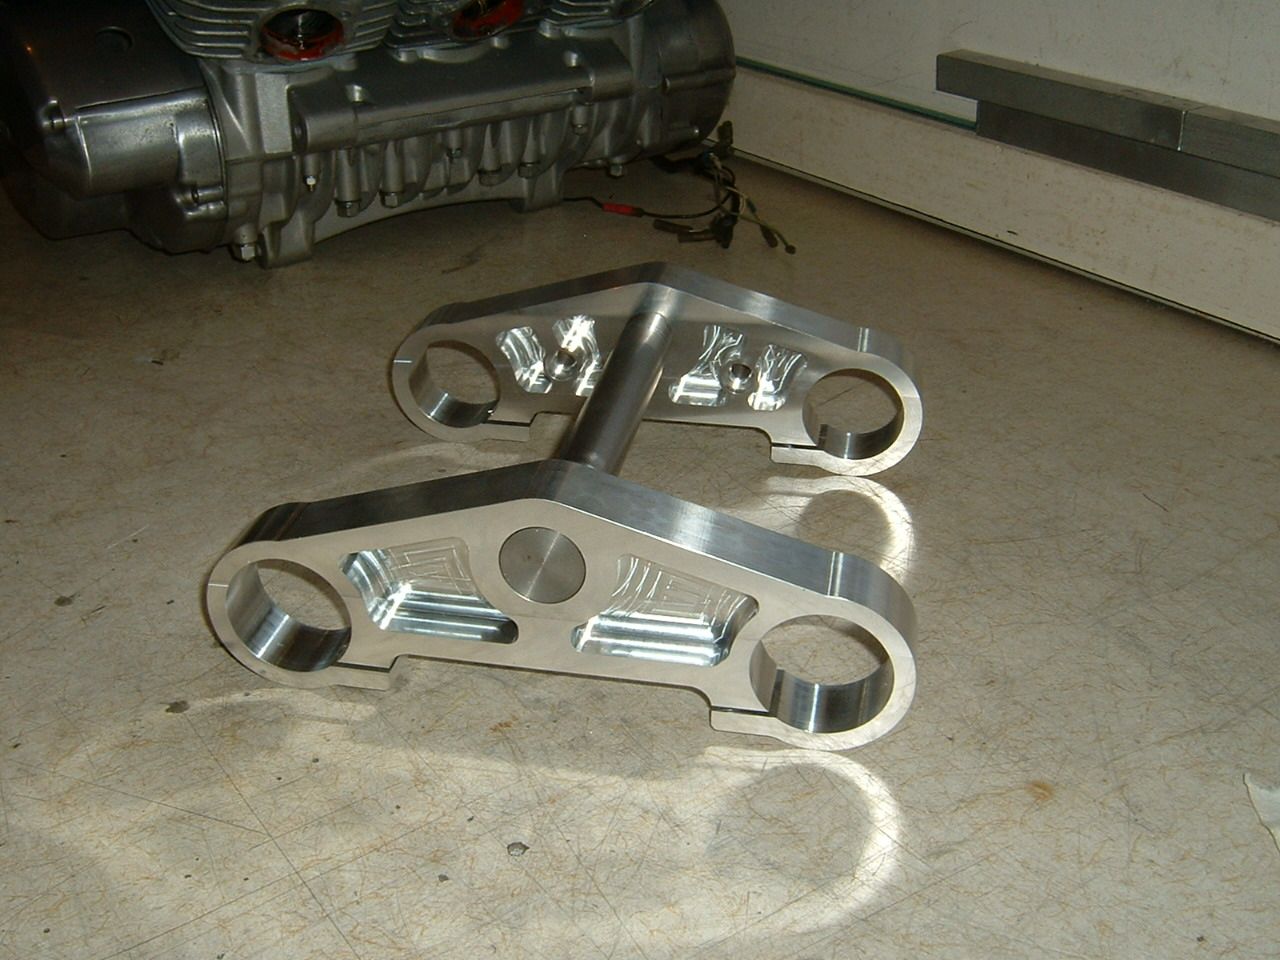 [quote="cabbie"]Thought I'd make a start on the rolling chassis, there are two problems to get round: 1, the rear wheel is off a gsxr 1100 that uses a 20mm axle, the swing arm is off a YZF R6 that uses a 30mm axle, I'll need to make reducing bushes to fit the chain adjusters 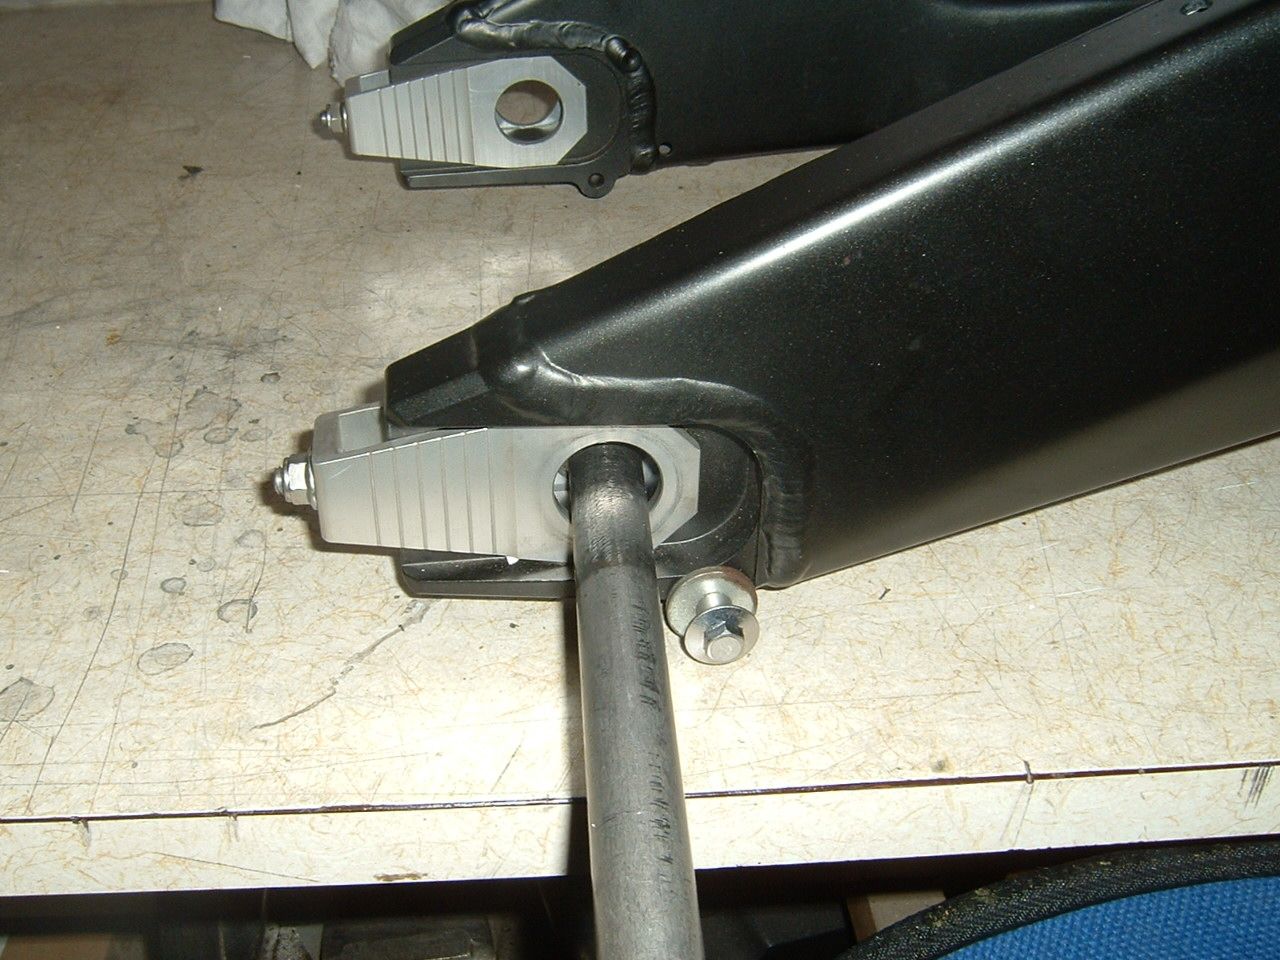 2, the R6 swing arm is 25mm wider than the gsxr 400 frame, this will need a lot of fabrication, I intend to cut the pivot section off the R6 arm and weld on a gsxr 400 swing arm pivot section (I got a gsxr 400 swing arm with the frame) 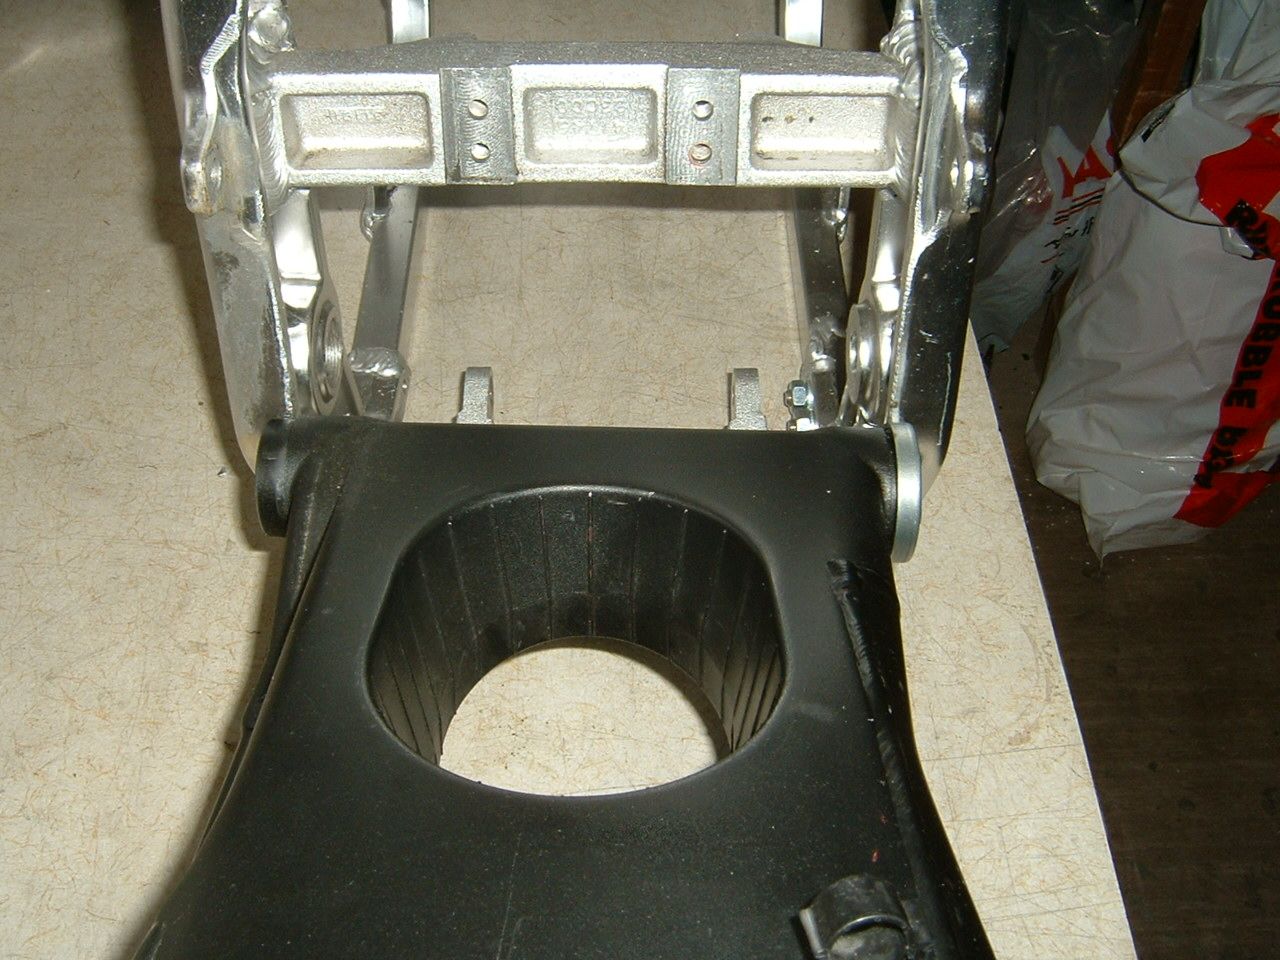
|
|
| Haut |
|
 |
|
flexi
|
Sujet du message: Re: Kwikasfaki Publié: 19 Jan 2012, 22:18 |
|
| Advanced Member |
 |
Inscrit le: 26 Nov 2011, 01:31
Messages: 4715
|
|
| Haut |
|
|
|
cabbie
|
Sujet du message: Re: Kwikasfaki Publié: 19 Jan 2012, 22:18 |
|
Inscrit le: 19 Jan 2012, 20:34
Messages: 135
|
I made the reducing bushes for the R6 swing arm 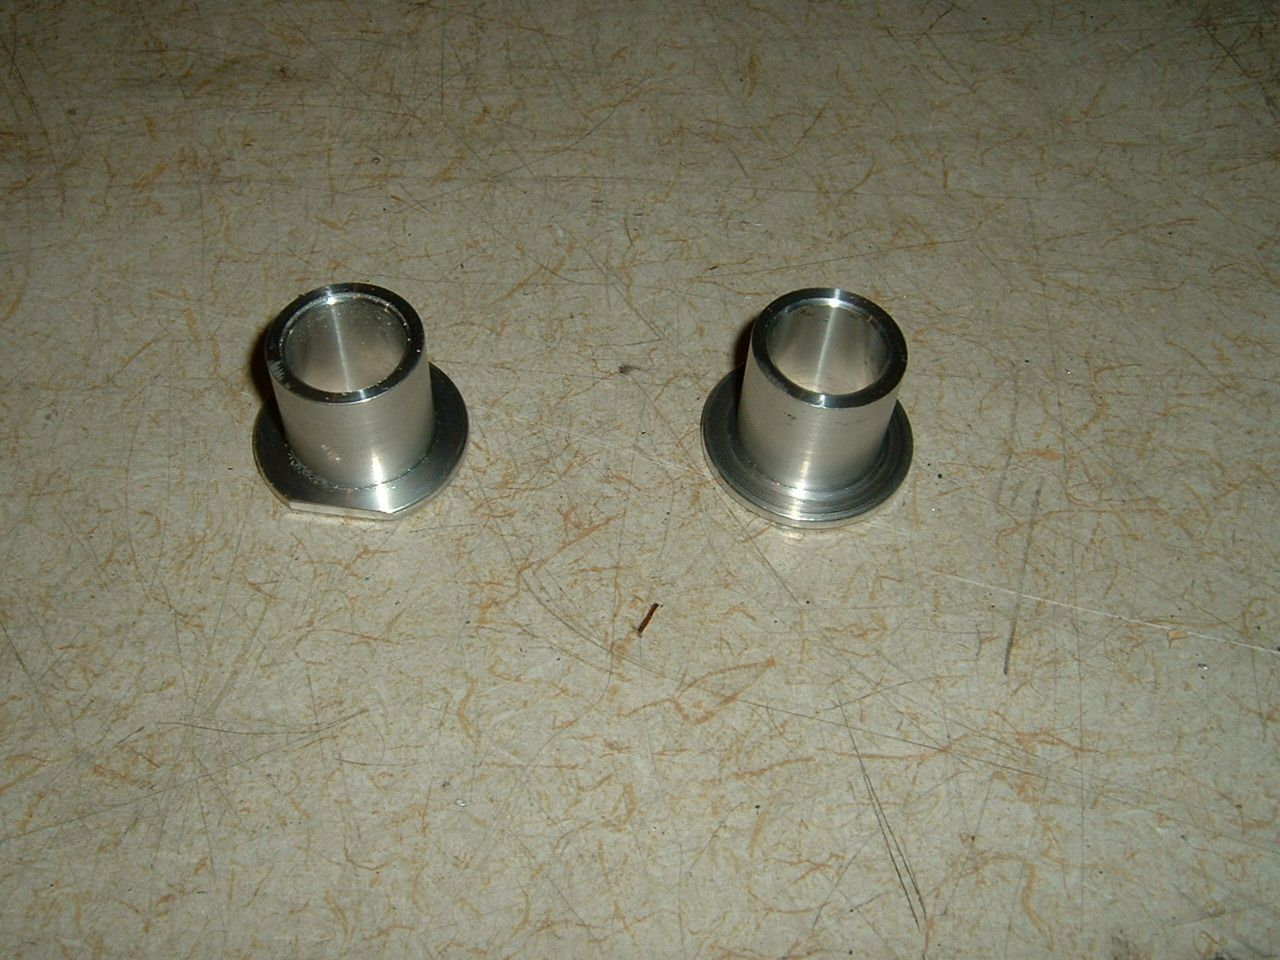 The forks are back from FireFox racing full rebuilt with Ohlins internals, re-valved and anodised etc etc 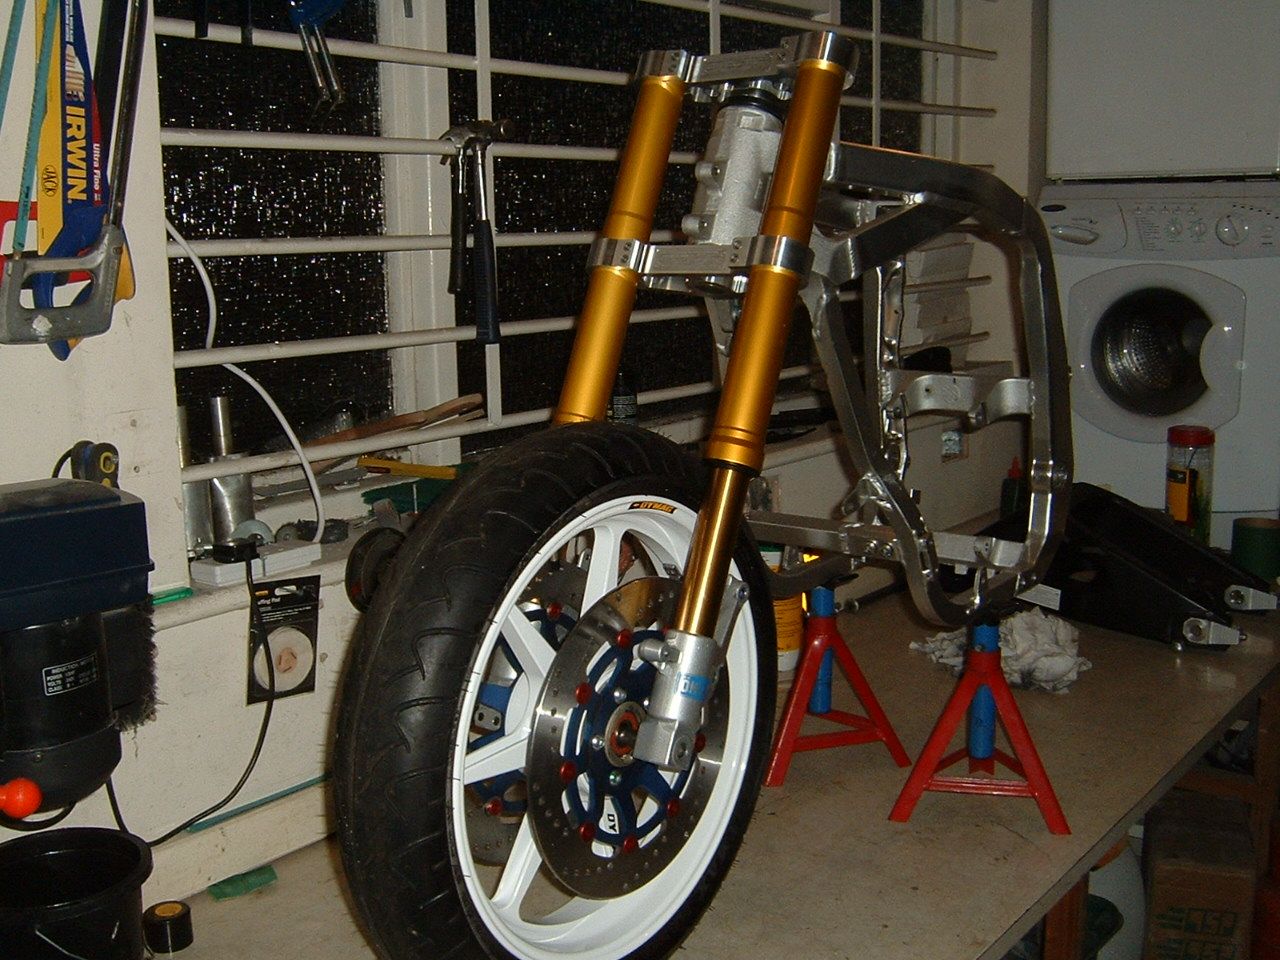 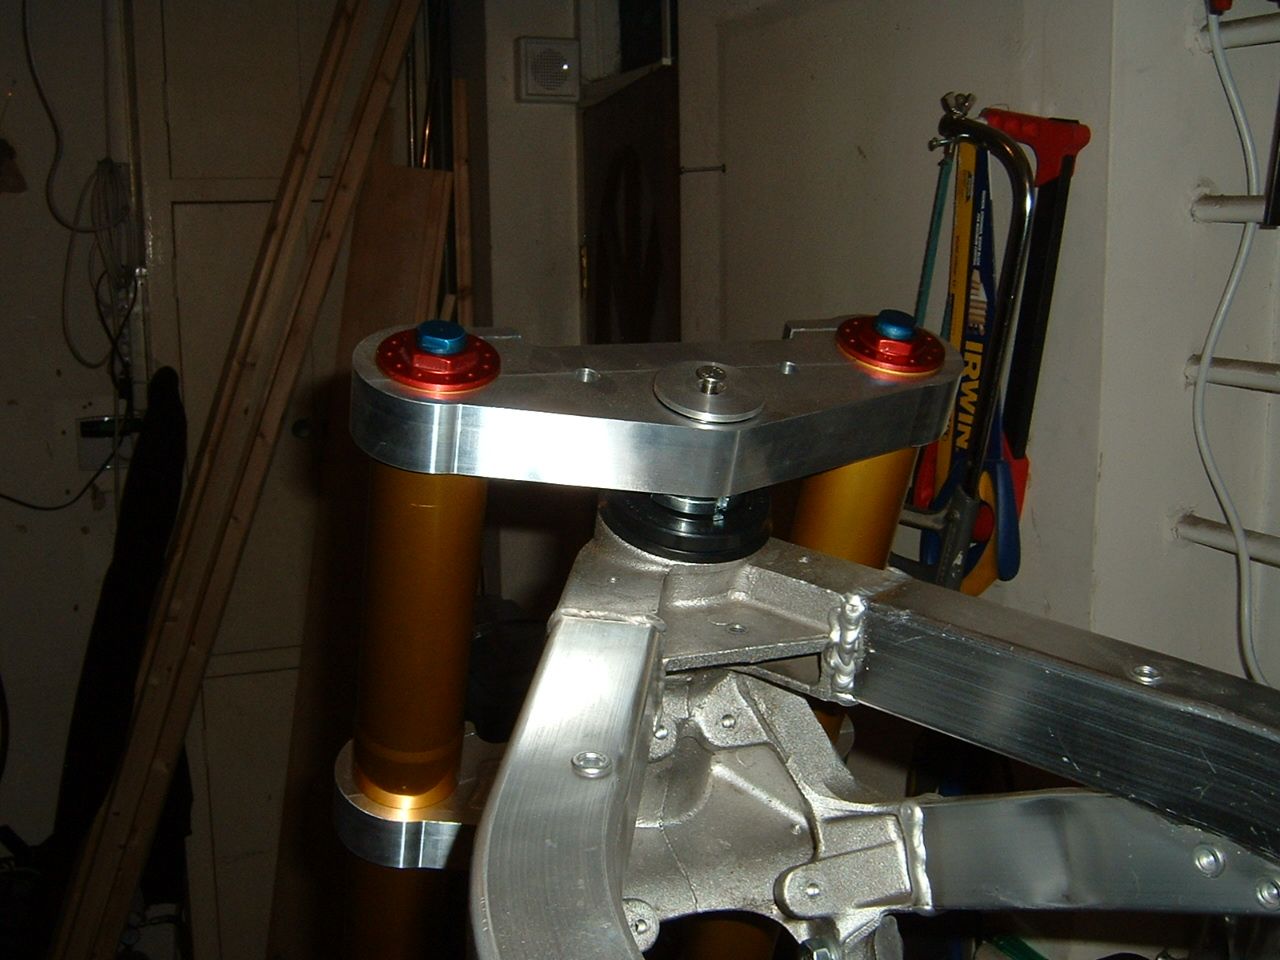 I got Brembo calipers, just need two adapter plates to mount the on. 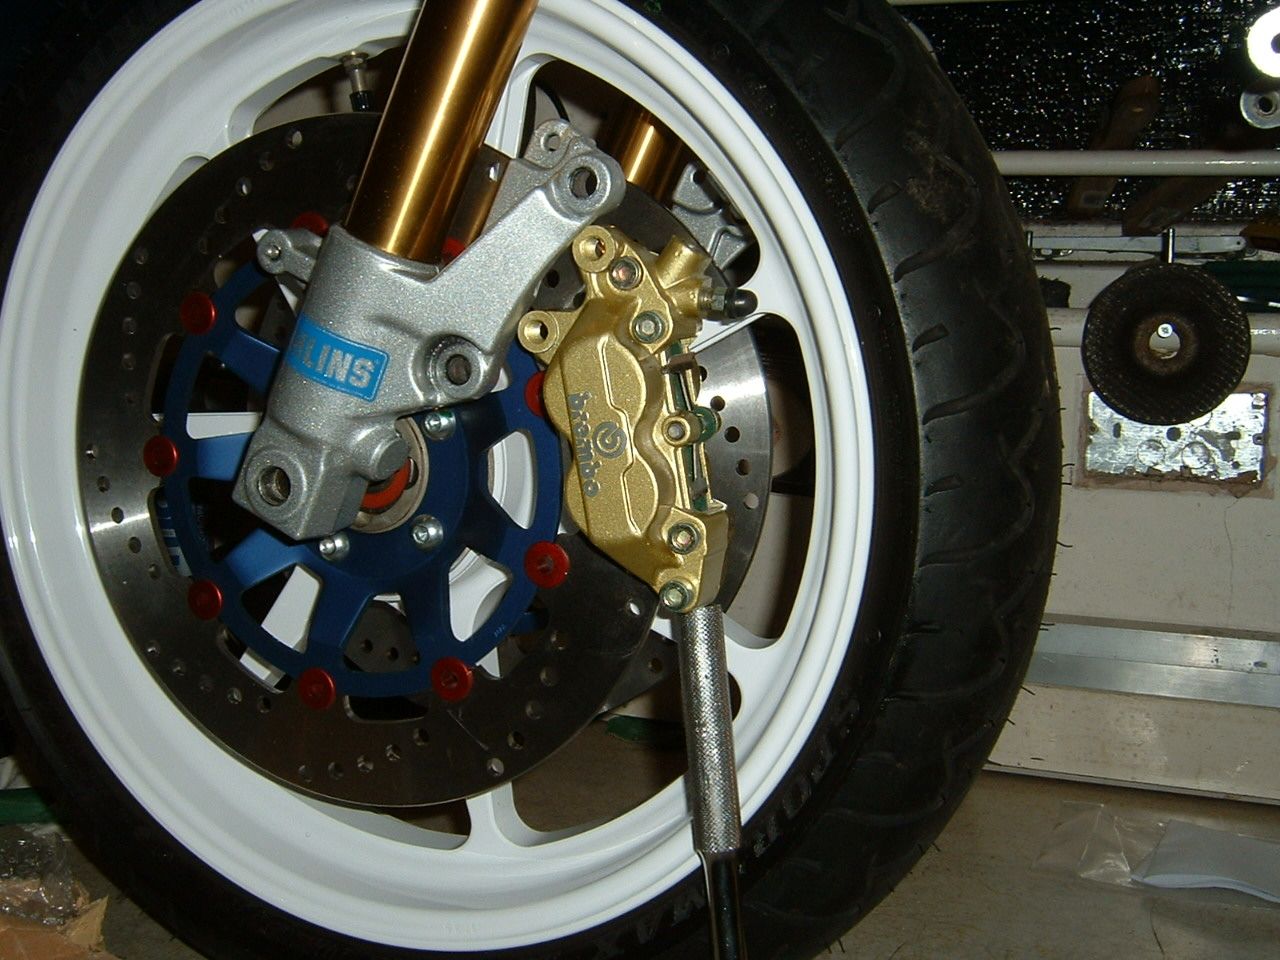 Now I wasn't sure how to build this but I've thought for some time and decided to go with no light, no clocks or anything electrical, I had this box made in the states to control the engine ignition etc so this is the wiring loom/harness 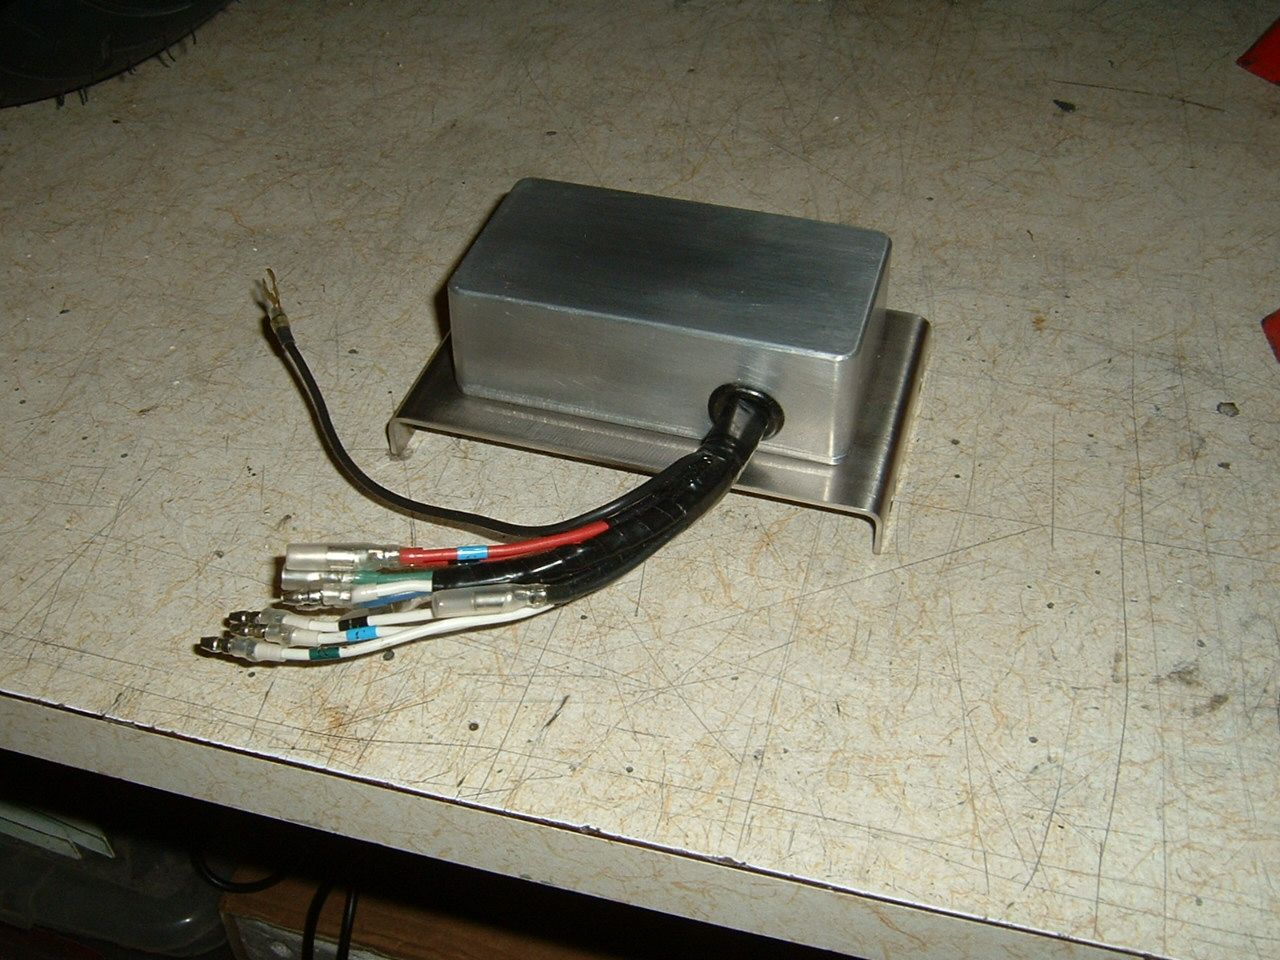 Looking good already, lol just need to get the swing arm in the frame then it easy from there. 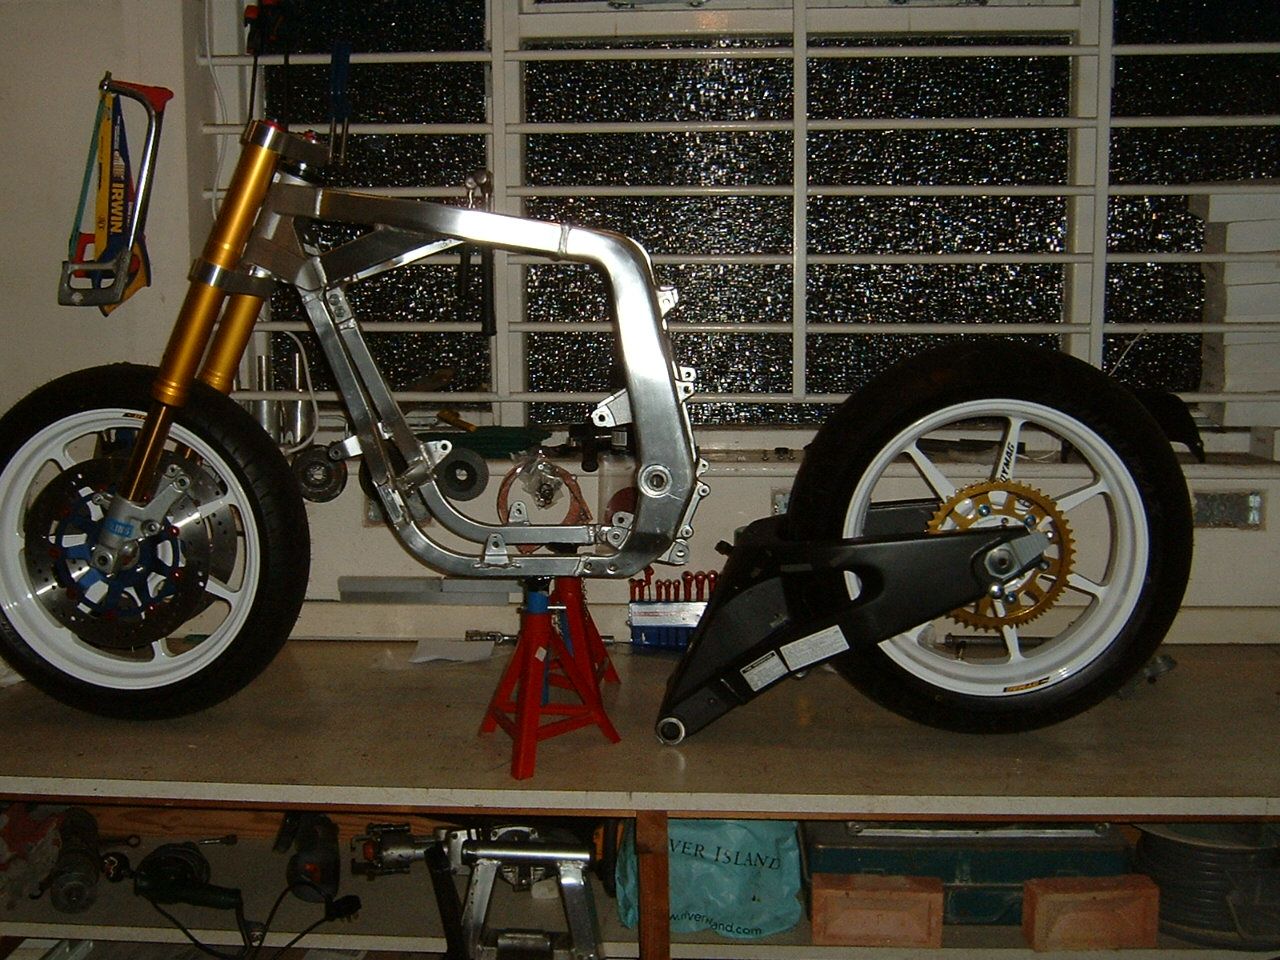 The new carbs arrived today, Mikuni 38mm flat slde's with power jets added, should get about 5 miles per gallon :nuts: 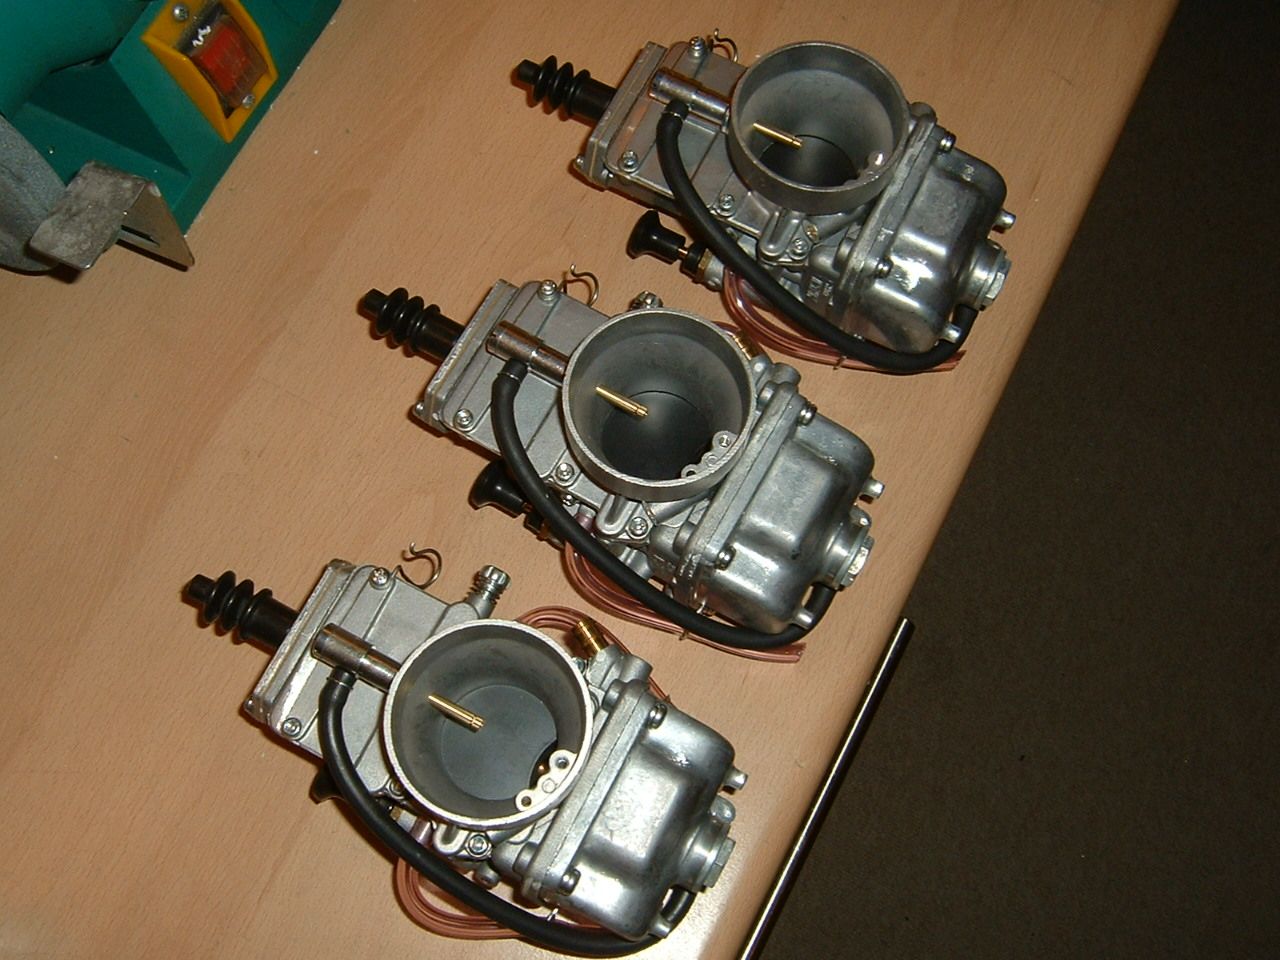 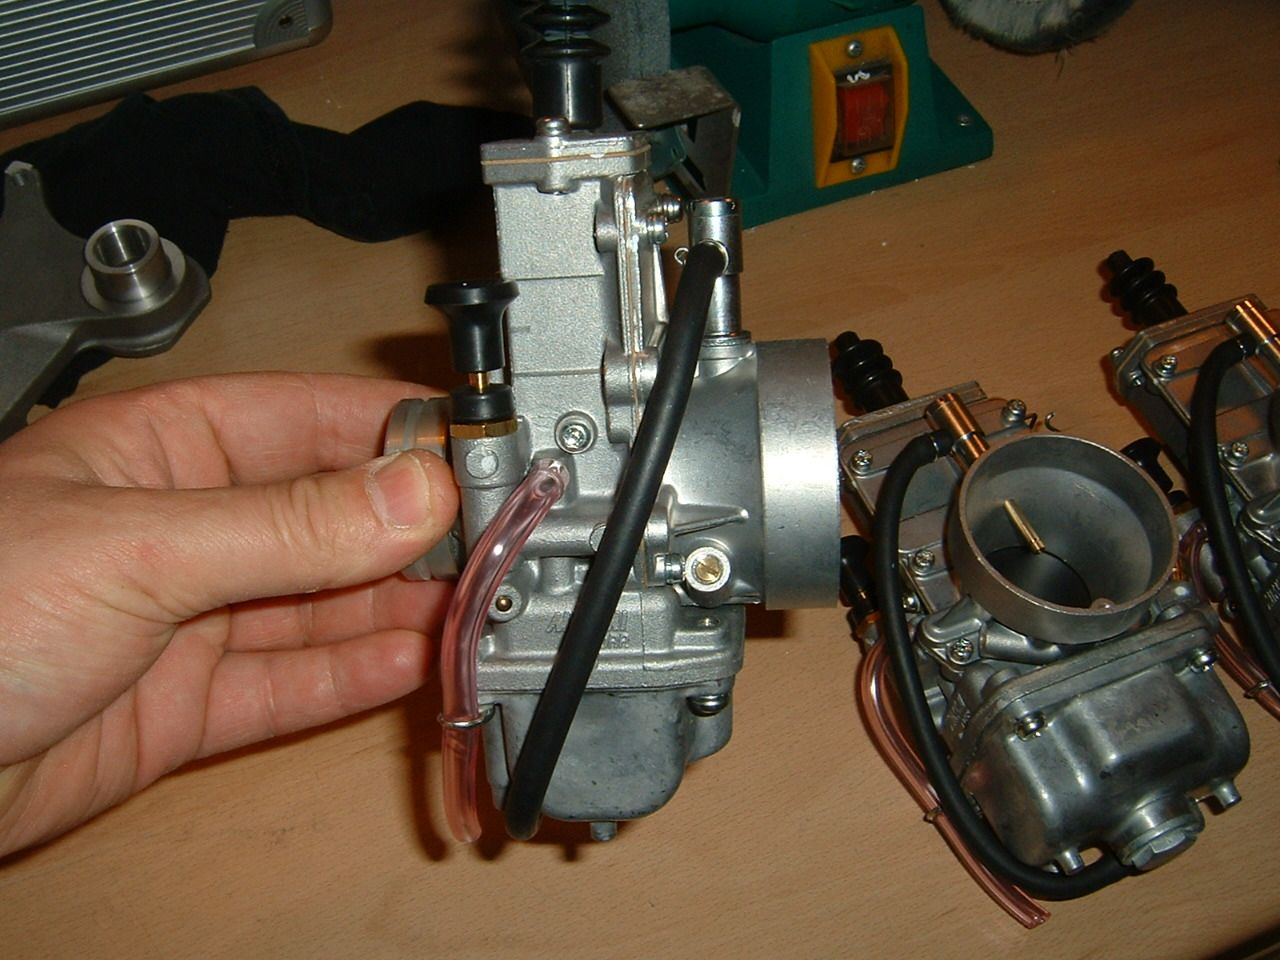
|
|
| Haut |
|
|
|
la fouine
|
Sujet du message: Re: Kwikasfaki Publié: 19 Jan 2012, 22:19 |
|
| Advanced Member |
 |
Inscrit le: 11 Sep 2007, 11:32
Messages: 11699
Localisation: 78/ st germain en laye
|
|
| Haut |
|
|
|
cabbie
|
Sujet du message: Re: Kwikasfaki Publié: 19 Jan 2012, 22:20 |
|
Inscrit le: 19 Jan 2012, 20:34
Messages: 135
|
The front Dymag is made for a gsxr 1100 that uses a 20mm spindle/axle, unfortunately I'm using gsxr 400 forks that use a 17mm spindle/axle, so, here are the front wheel spacers and bearings 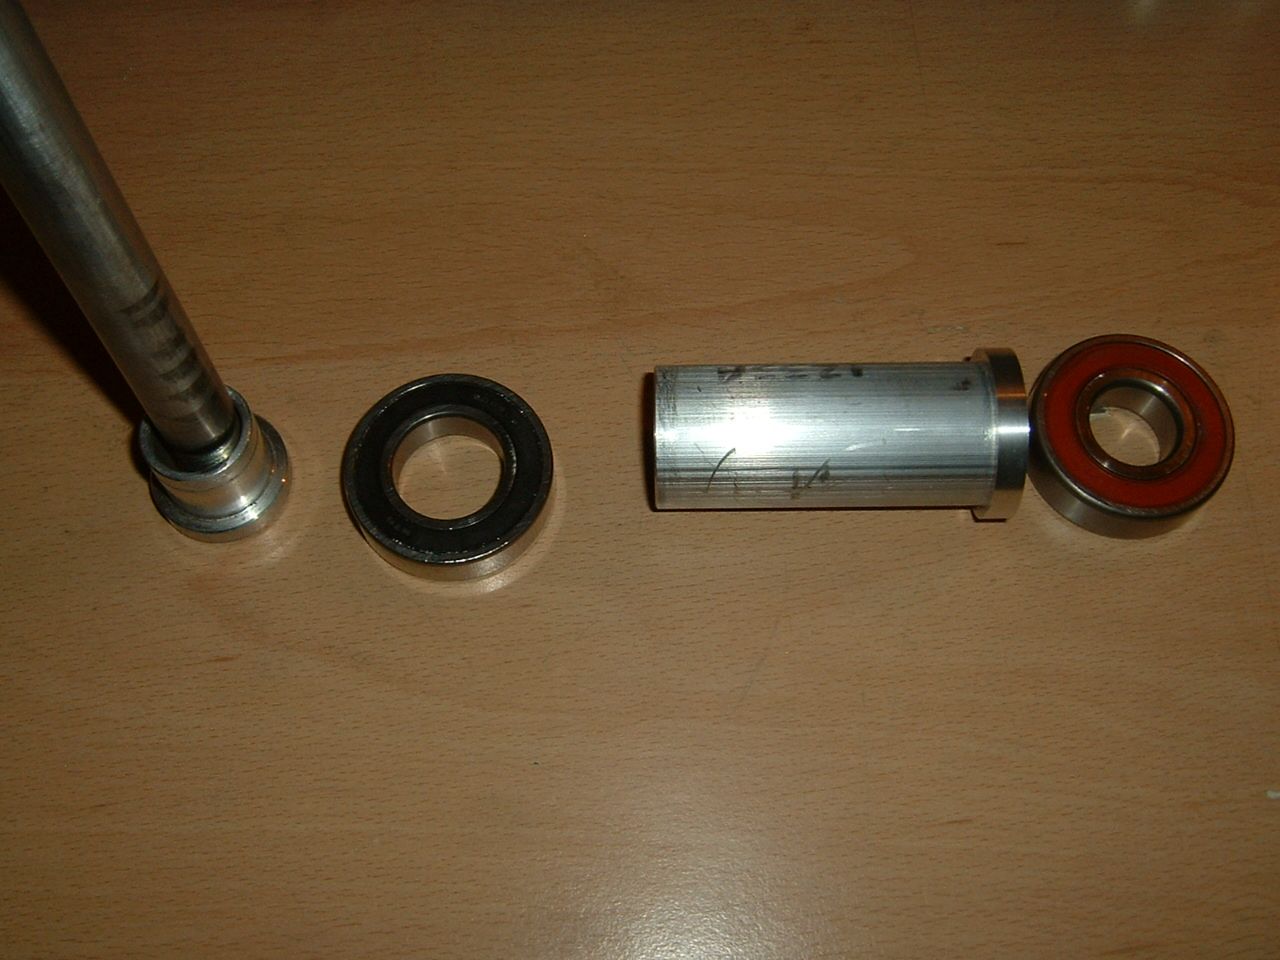 What I've done is made new spacers with a 17mm bores and change the right hand bearing from a 6204 to a 6303 (same size bearing except the ID measurement) 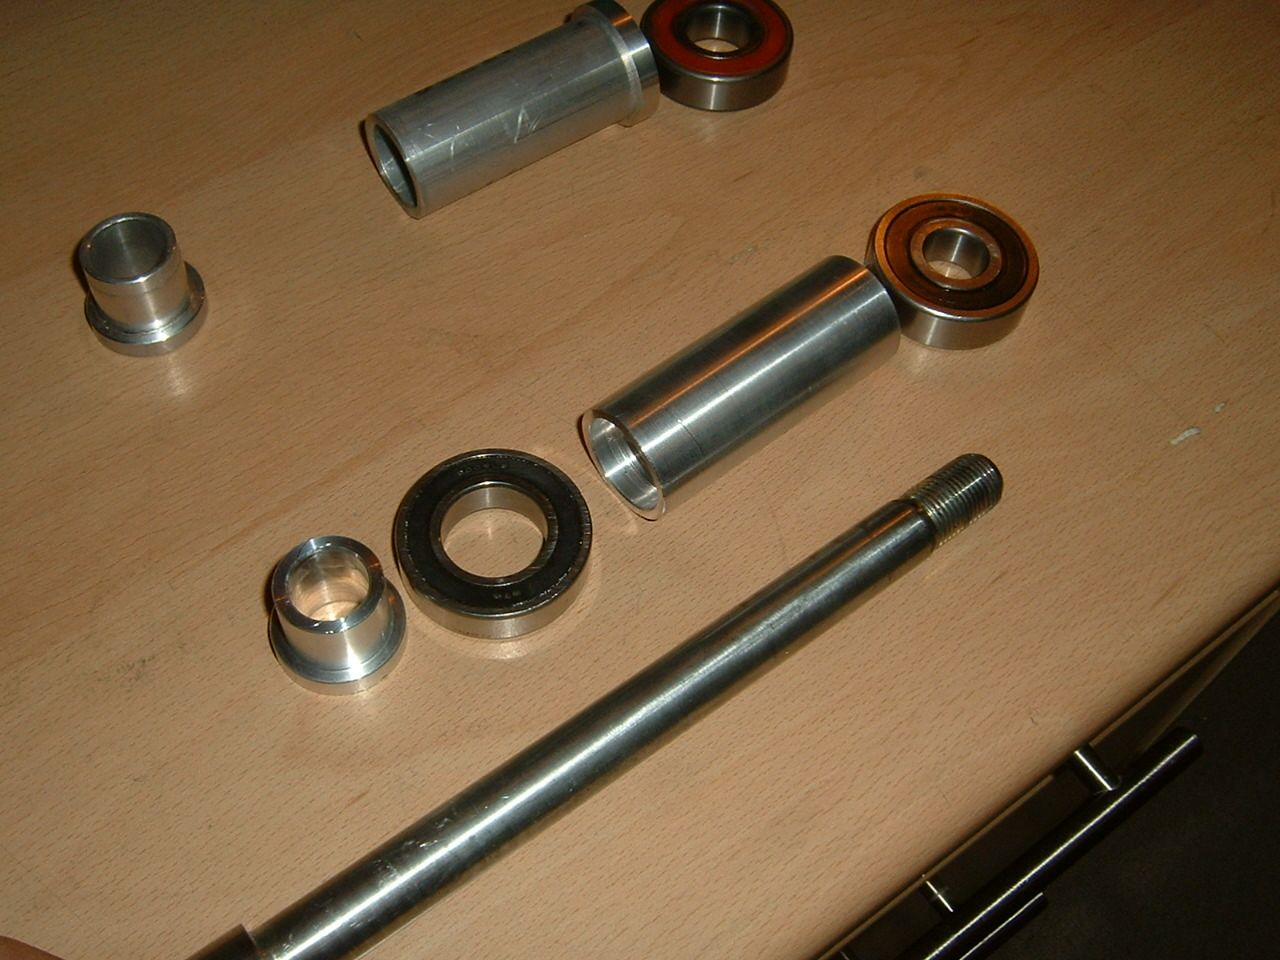 Here's the new parts fitted, I just need two outer spacers now to fit the wheel.  I also made a reducing spacer for the rear caliper holder 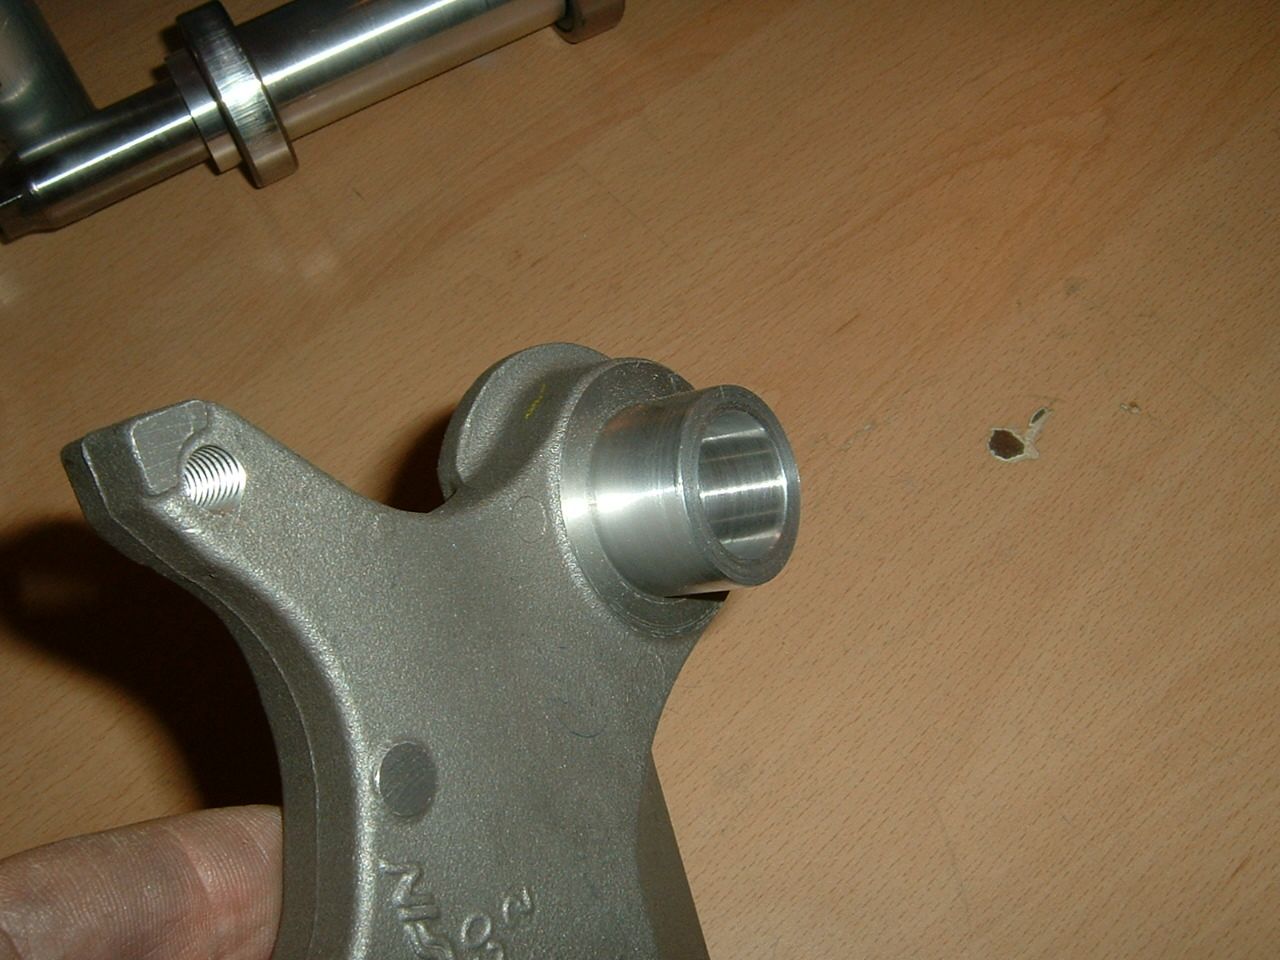 Made an MDF jig and routed out the frame both sides by 10mm 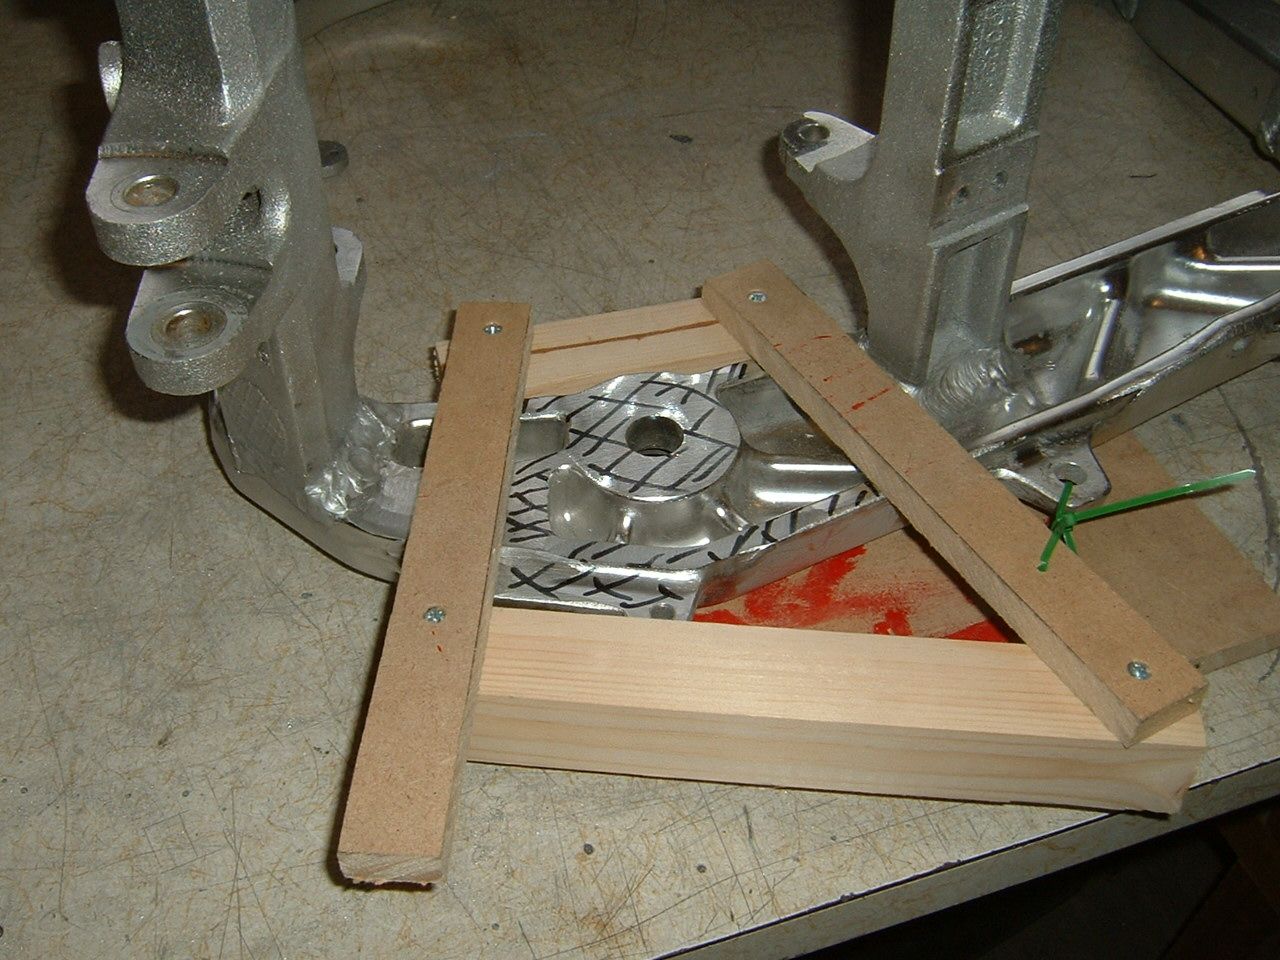 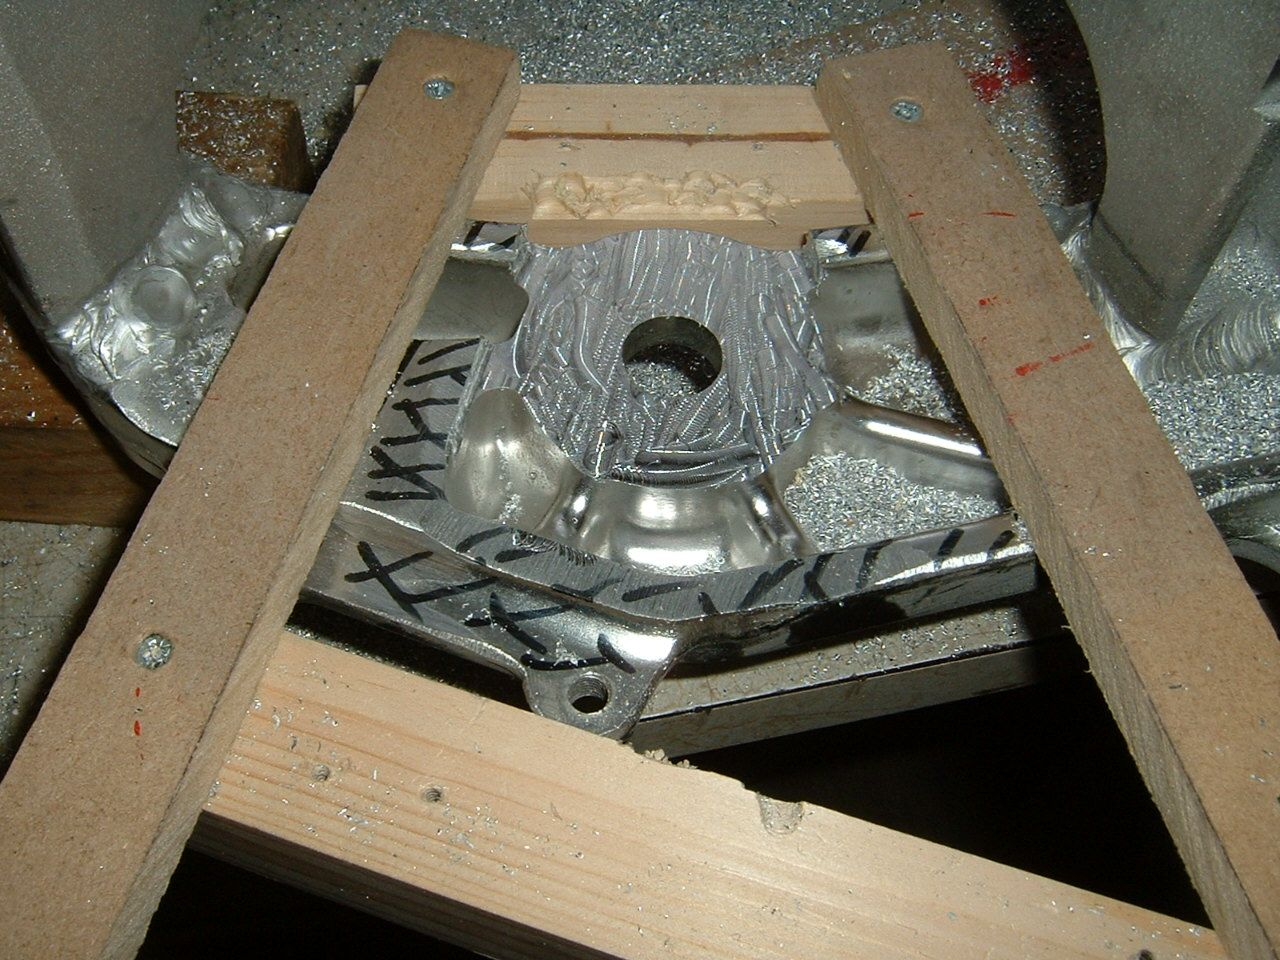 Swing arm fitted, the spindle will need cutting down etc 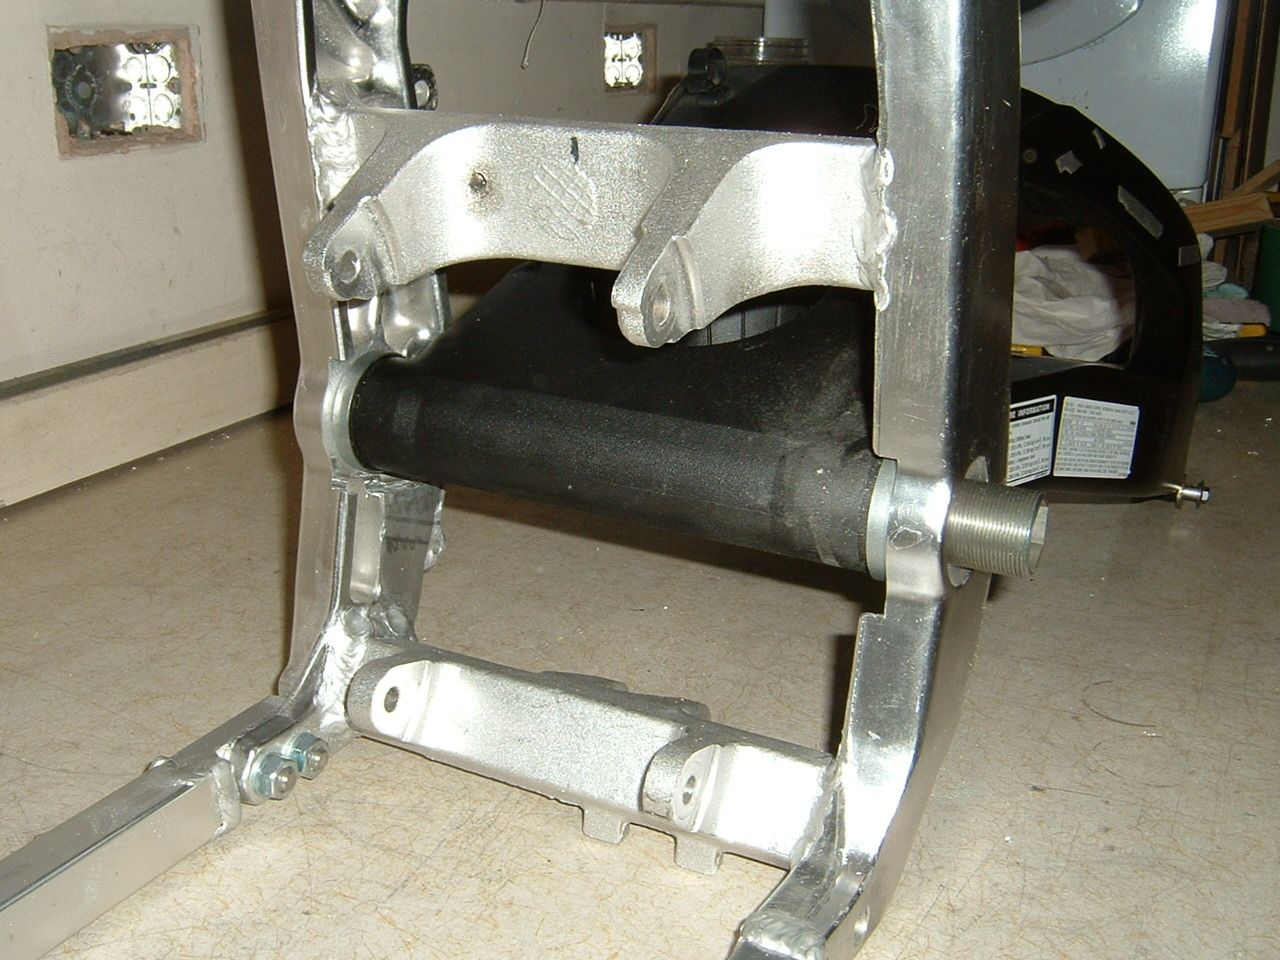 The R6 shock linkage fitted straight to the frame! result there, just need to make two longer track rods 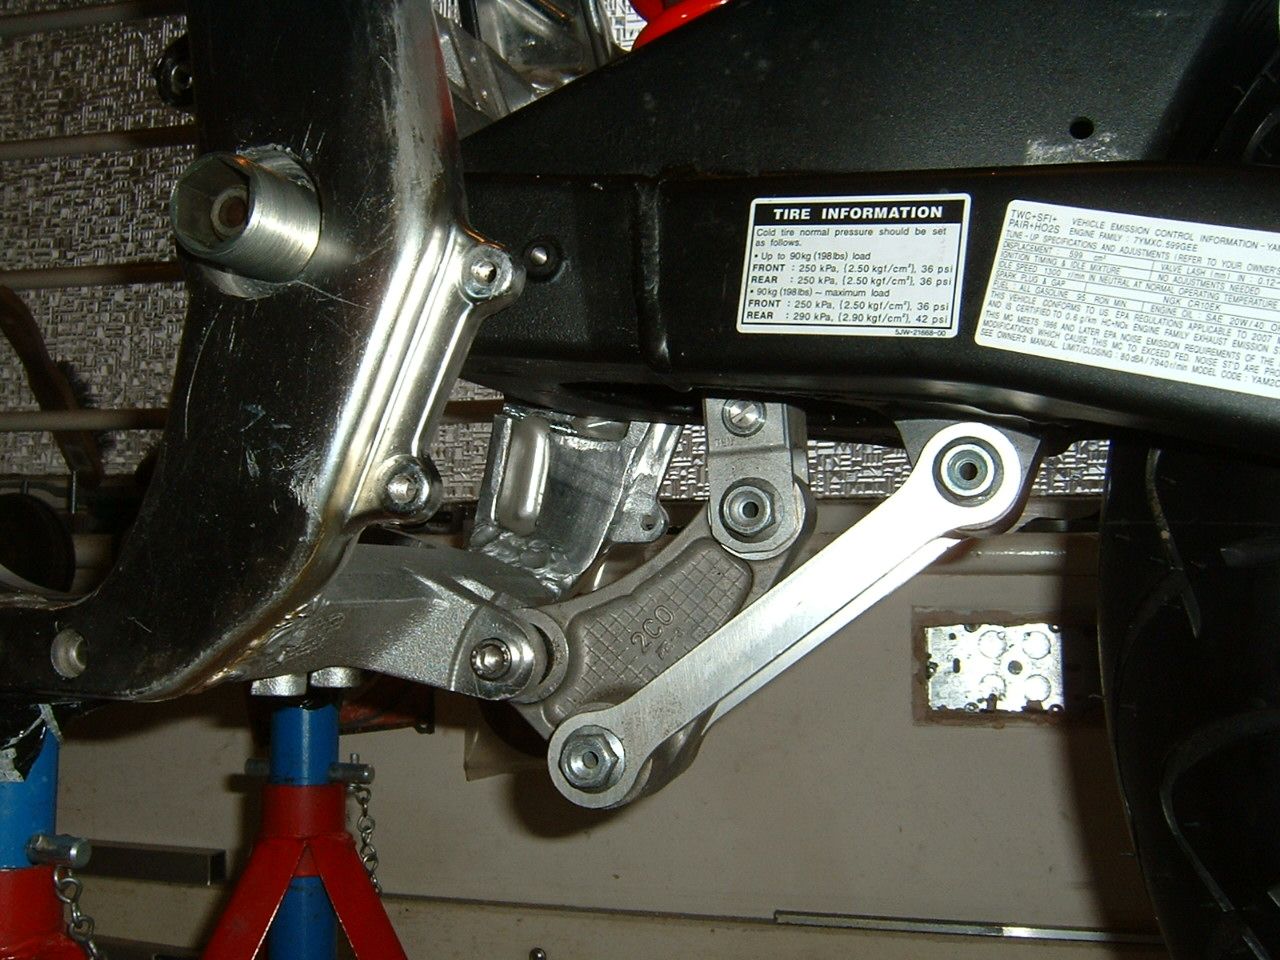 Here's the back end done, all the wheel spacers are made and the caliper holder is in 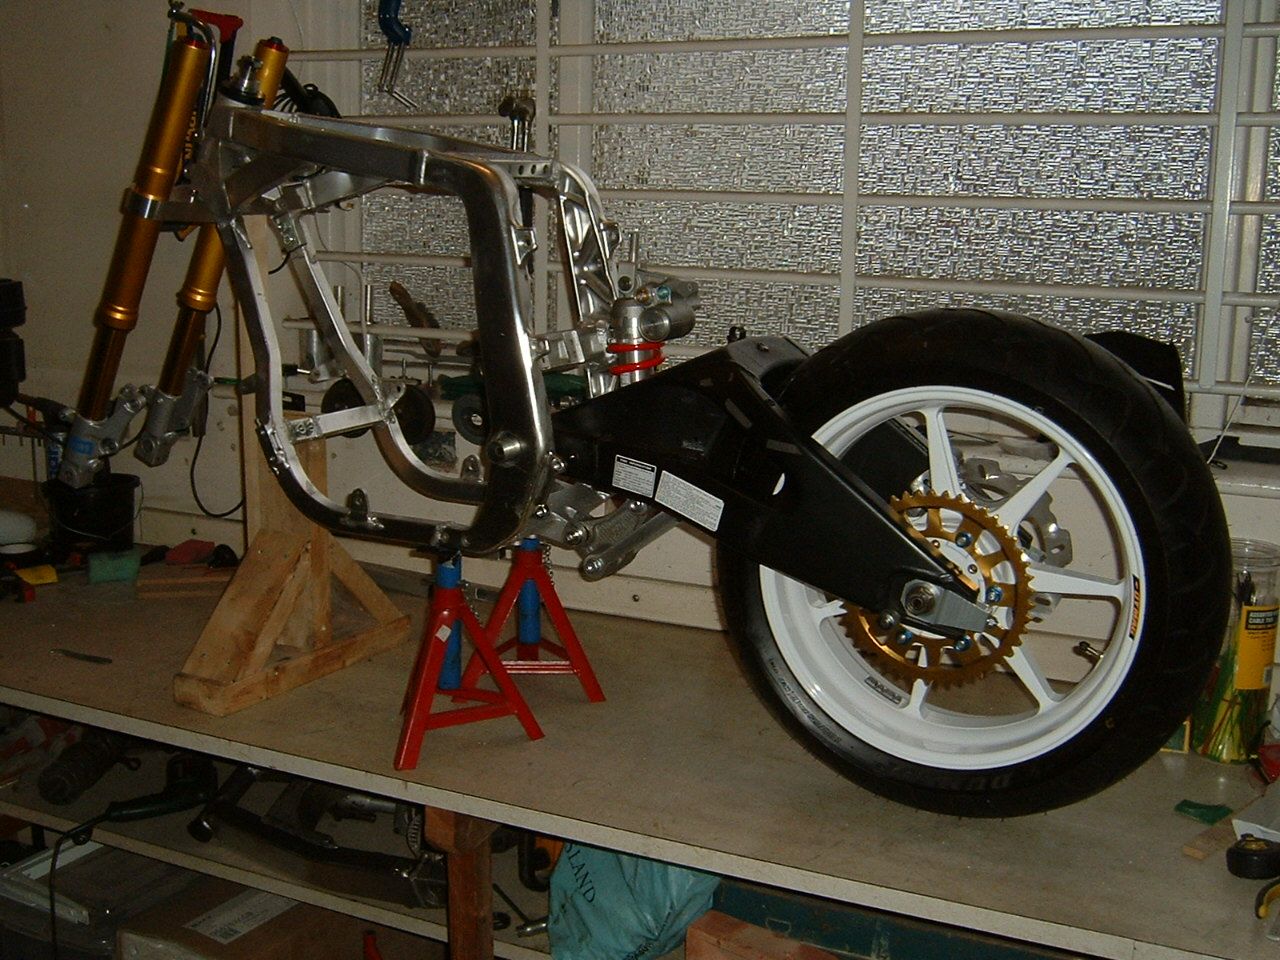 Bought some very nice bar risers too 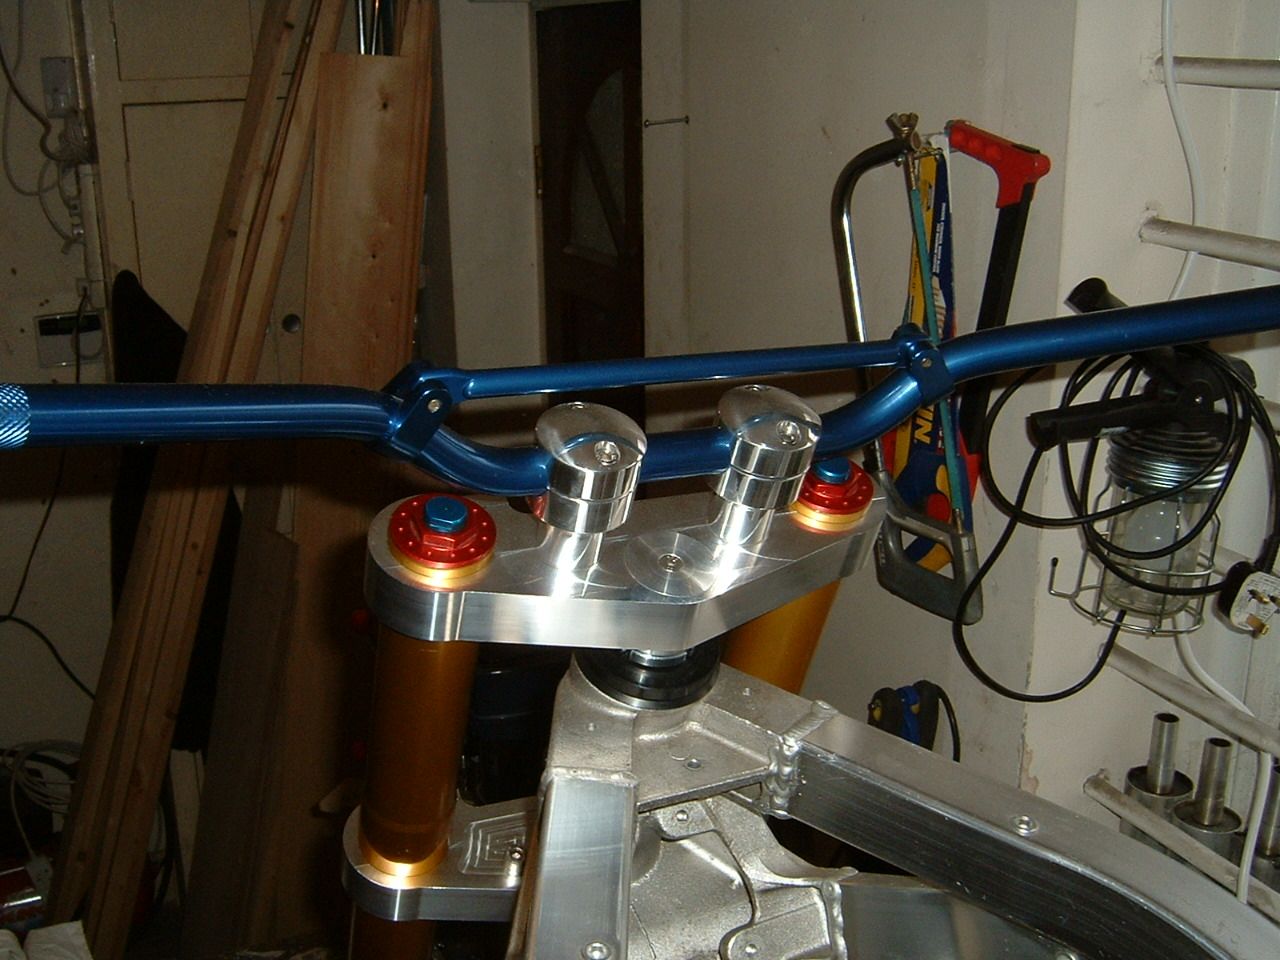
|
|
| Haut |
|
|
|
cabbie
|
Sujet du message: Re: Kwikasfaki Publié: 19 Jan 2012, 22:21 |
|
Inscrit le: 19 Jan 2012, 20:34
Messages: 135
|
Wel the new site owner is having major issues with planning permission to develope the land so he said I could continue using the workshop, nice. On to mounting the Brembos, these have come up just about as awkward as possible for mounting to the forks 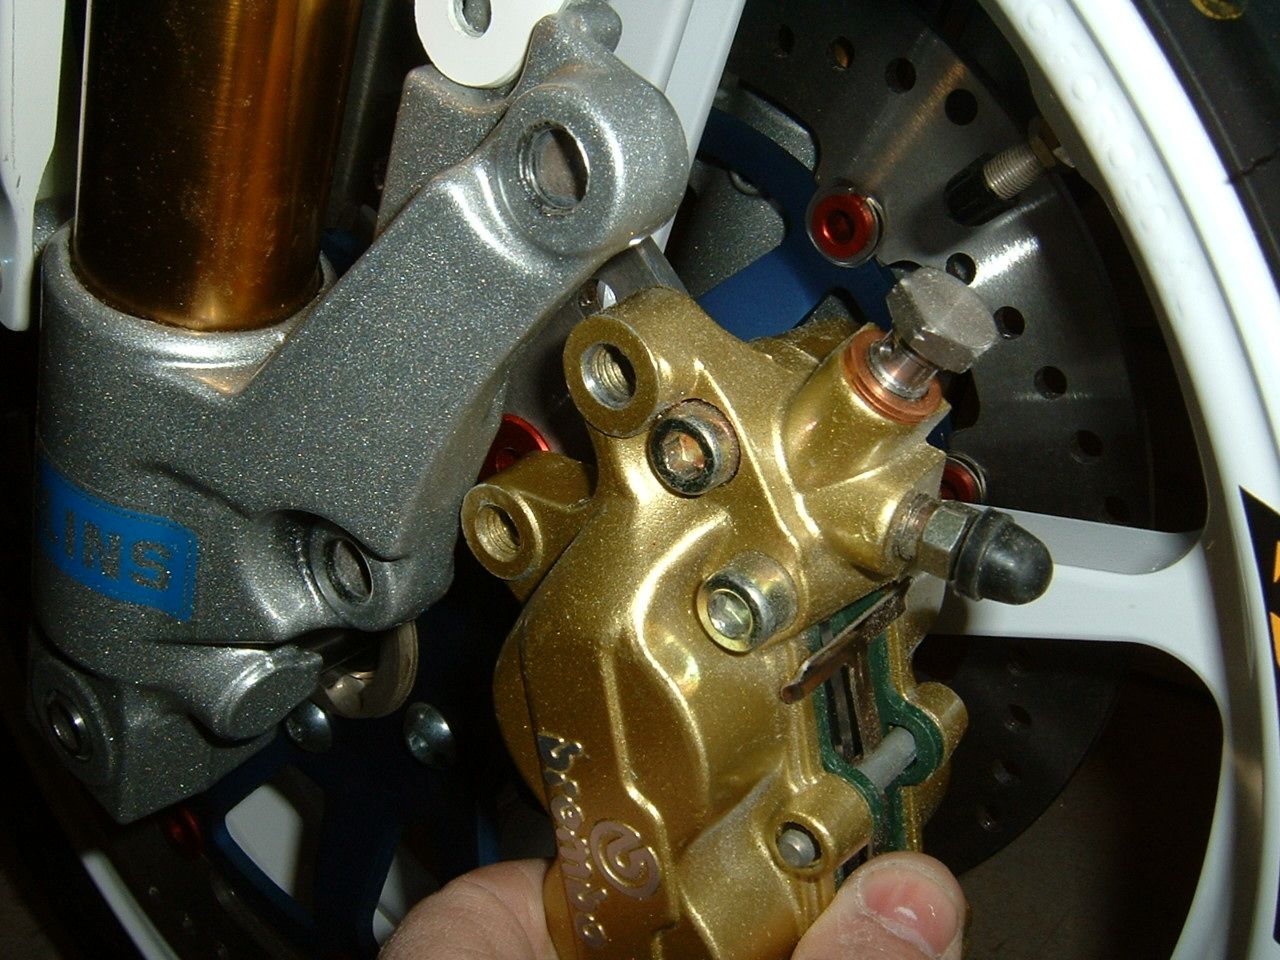 What I always do in cases like this is make a template from MCF because MFD is cheap and easy to cut etc, here's the template 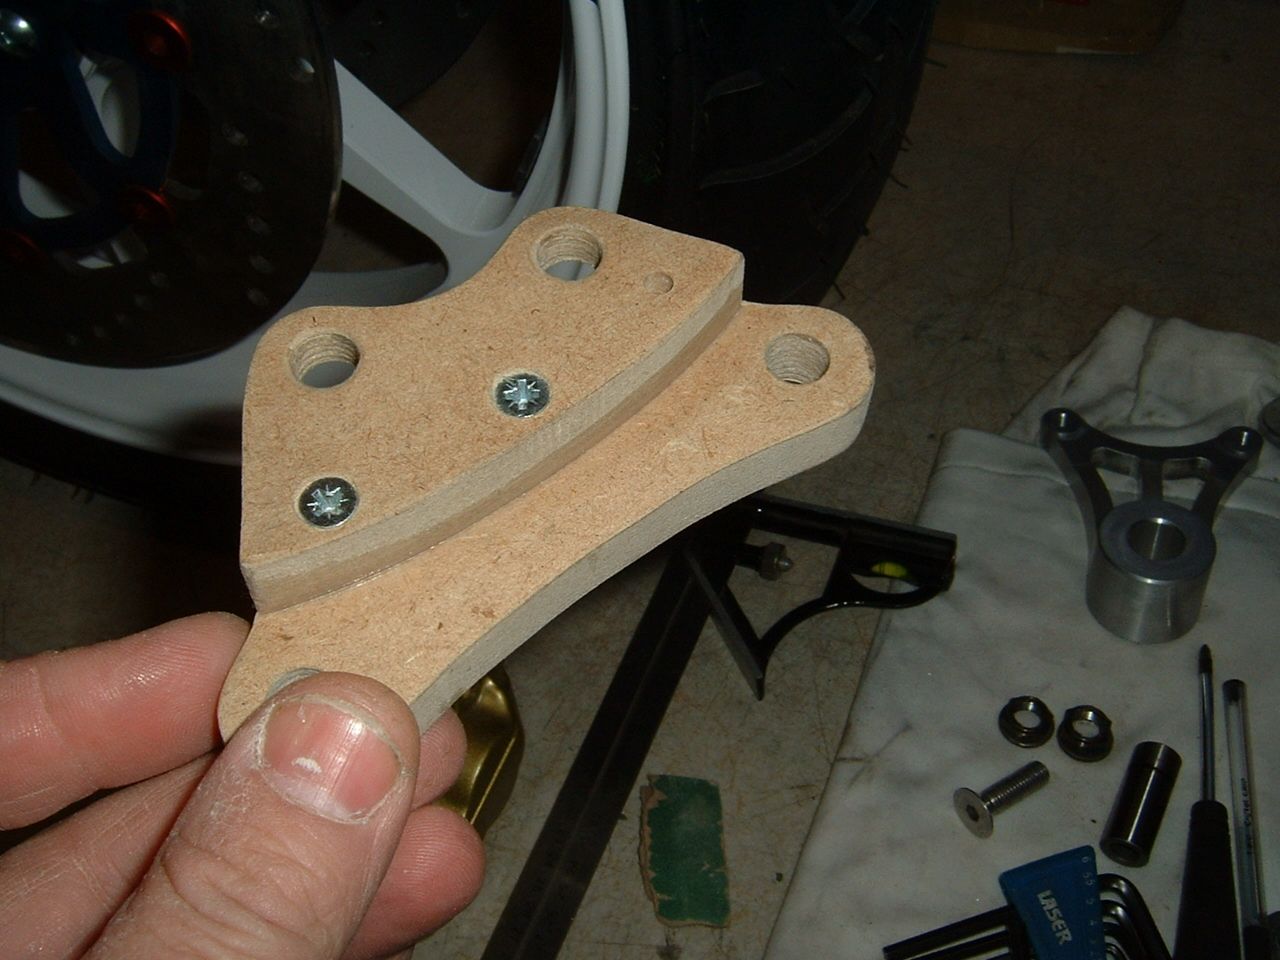 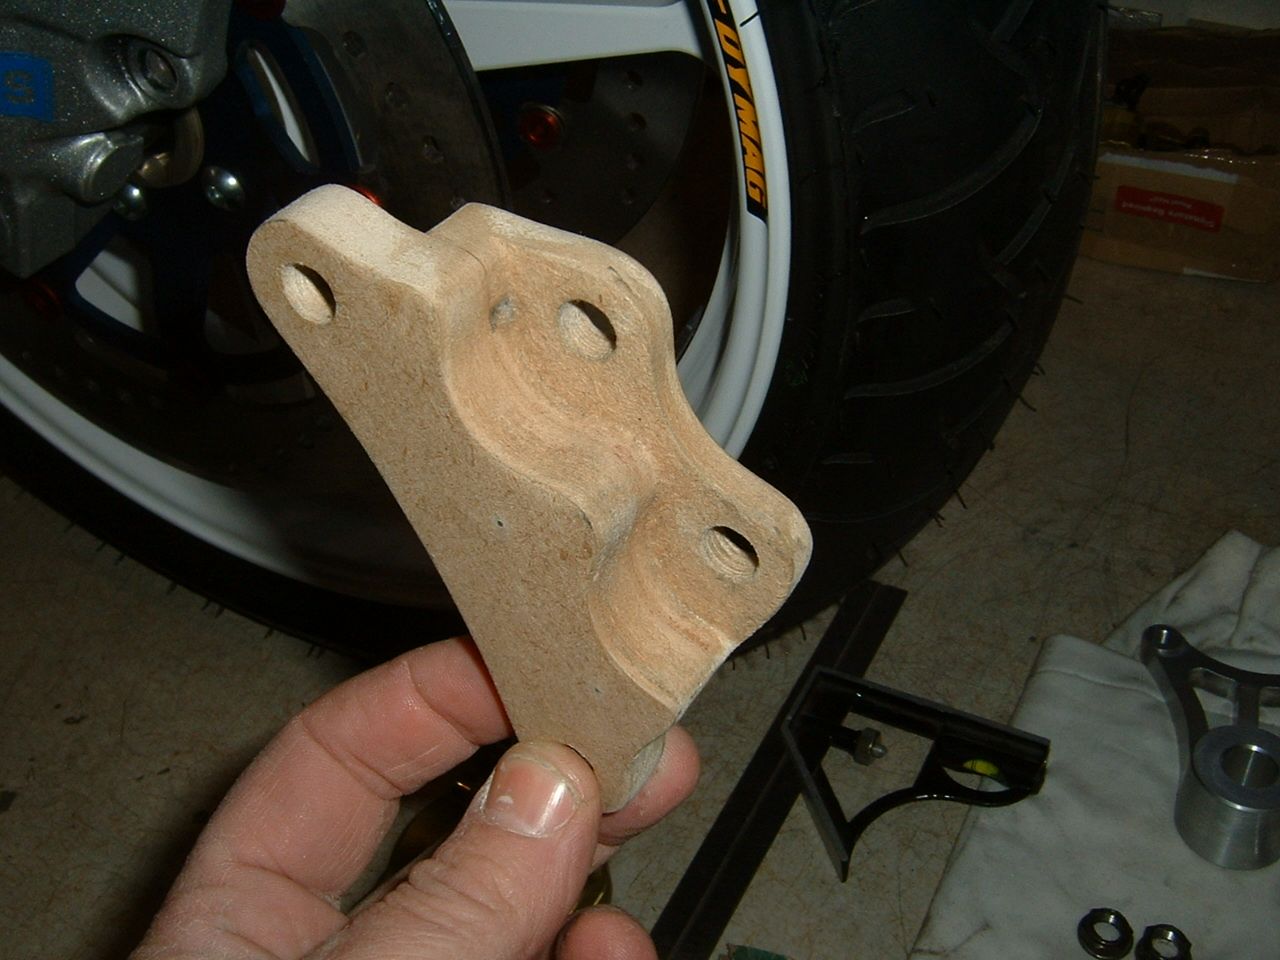 I make sure the piece is perfect in fit and appearance then send it away for CNC'ing out of 7075T6 alloy. 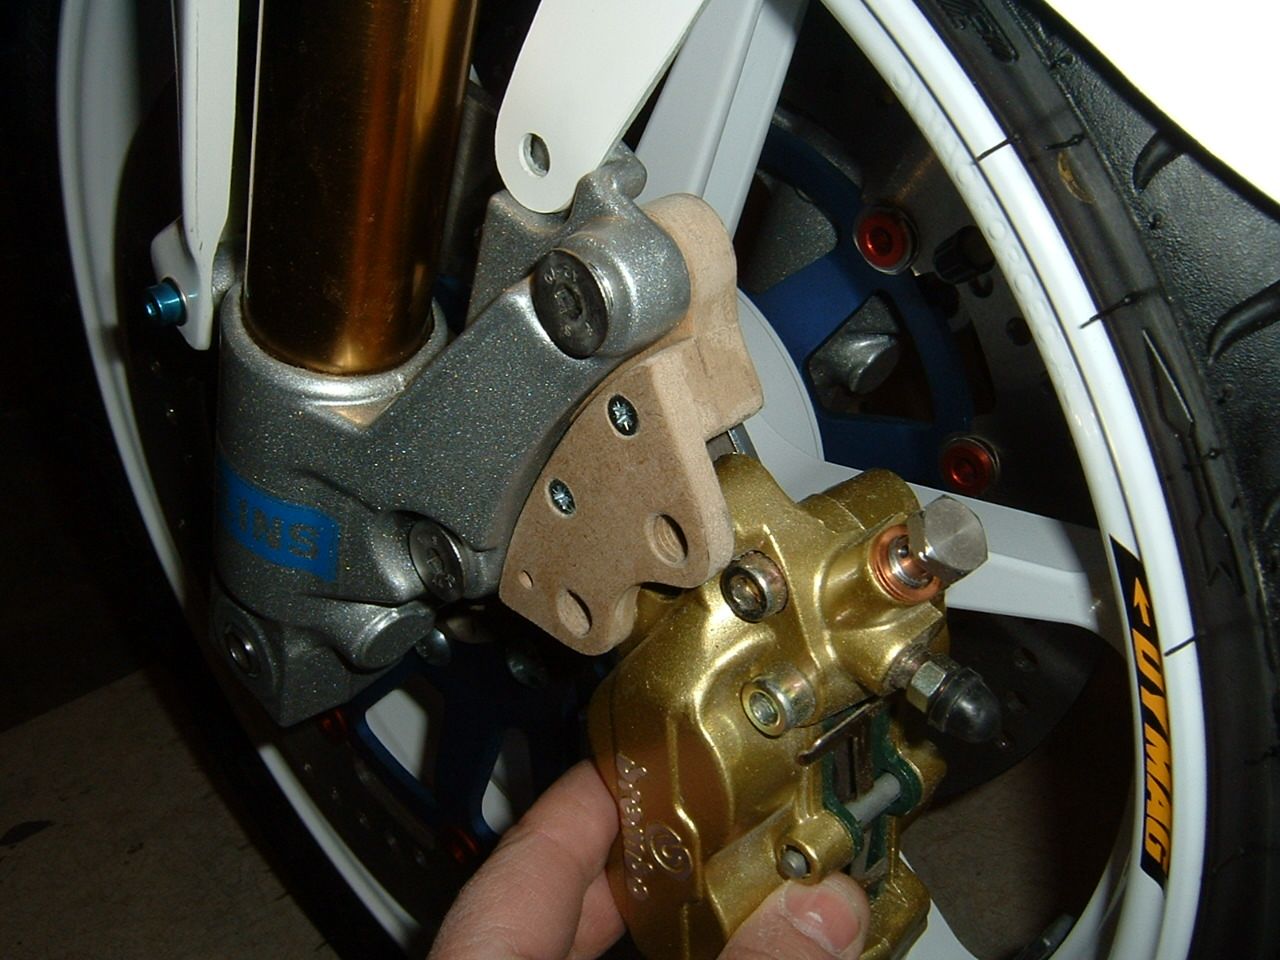 I'm using adjustable turnbuckles from a car steering system so set up the ride height, once the bike is finished and the rear suspension is set up right I'll make new alloy rods to replace the turnbuckles  I need a new top shock mount to hold the R6 shock, I've made a pattern from MDF for the CNC man to copy 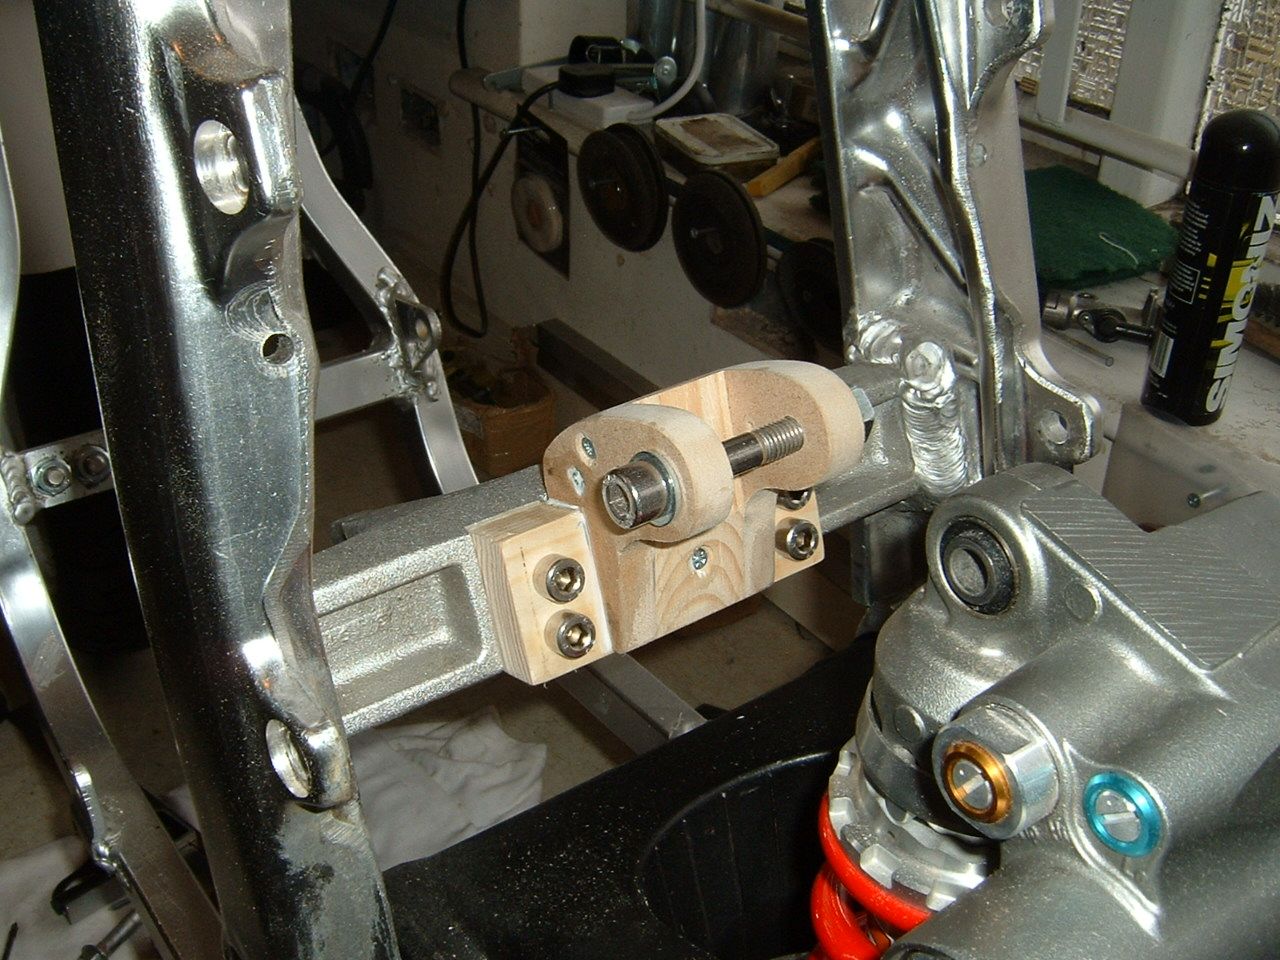 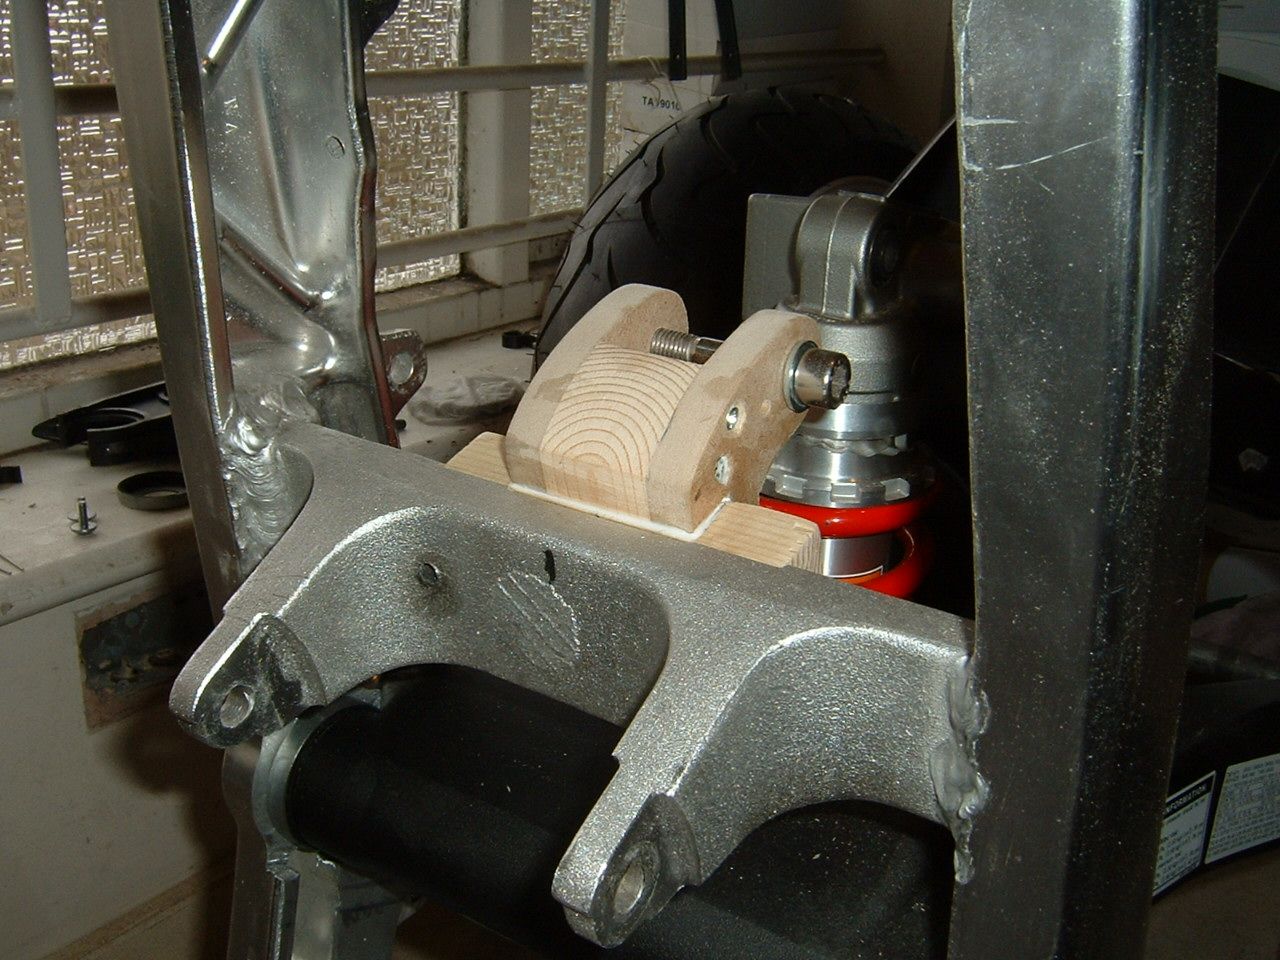 And making sure it all fits before sending away 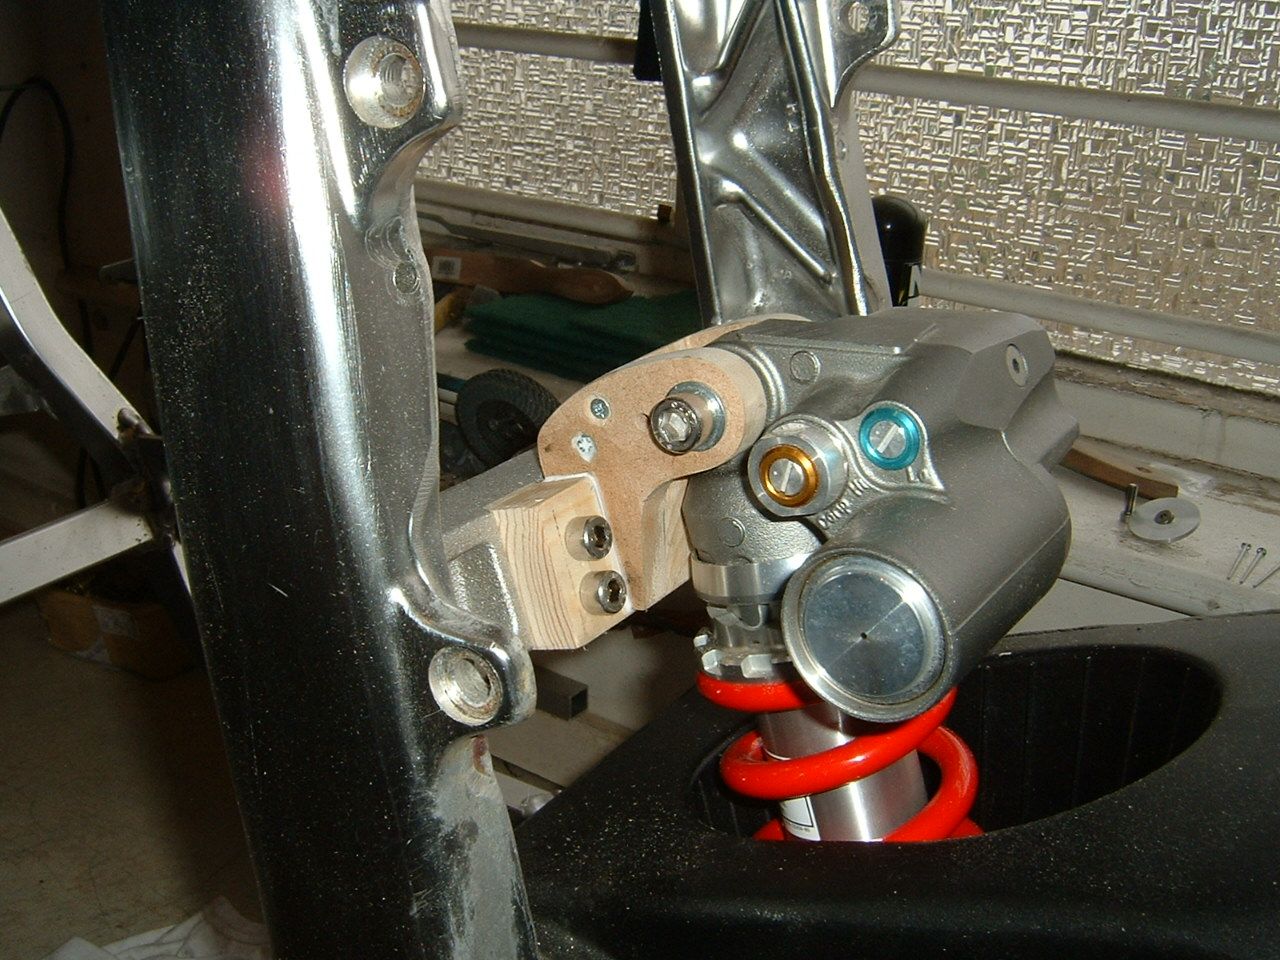 Next problem Opps I mean challenge. I bought a very nice billet gsxr 1100 rear caliper hanger and a used gsxr 1100 caliper but the caliper weighed the same as a semi detached house so it went in the bin. I bought a Brembo caliper to match the fronts, only problem is the Brembo won't fit the hanger 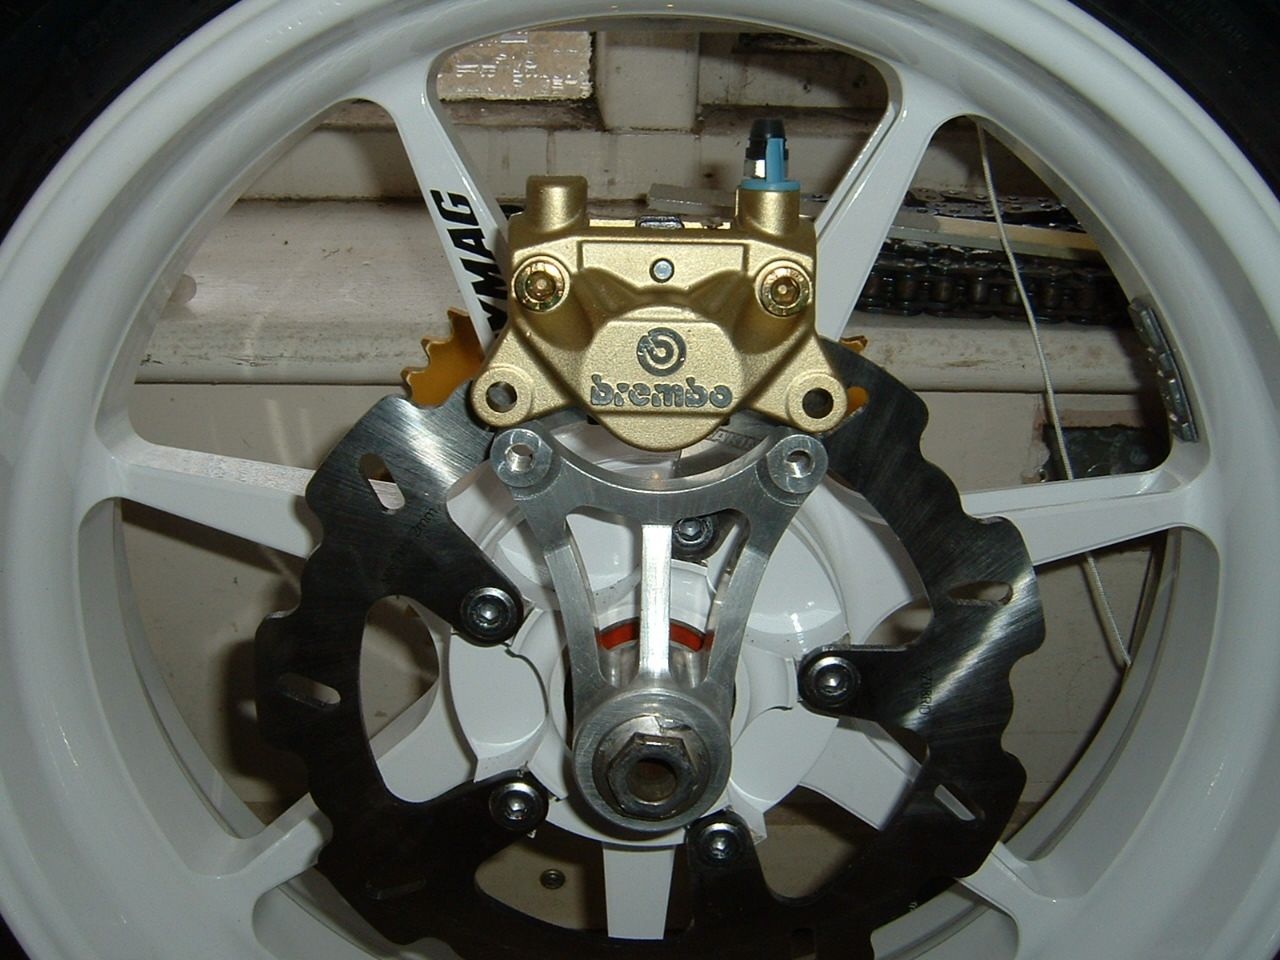 But with the caliper sitting on top of the hanger it's in the correct position for the disc so I'll just need a bridging plate, simples!
|
|
| Haut |
|
|
|
cabbie
|
Sujet du message: Re: Kwikasfaki Publié: 19 Jan 2012, 22:24 |
|
Inscrit le: 19 Jan 2012, 20:34
Messages: 135
|
The Billet parts are going to be a while so thought I'd make a start on the seat unit. After many hours of looking at seat units I've decided on the Honda RS 125 race bike unit 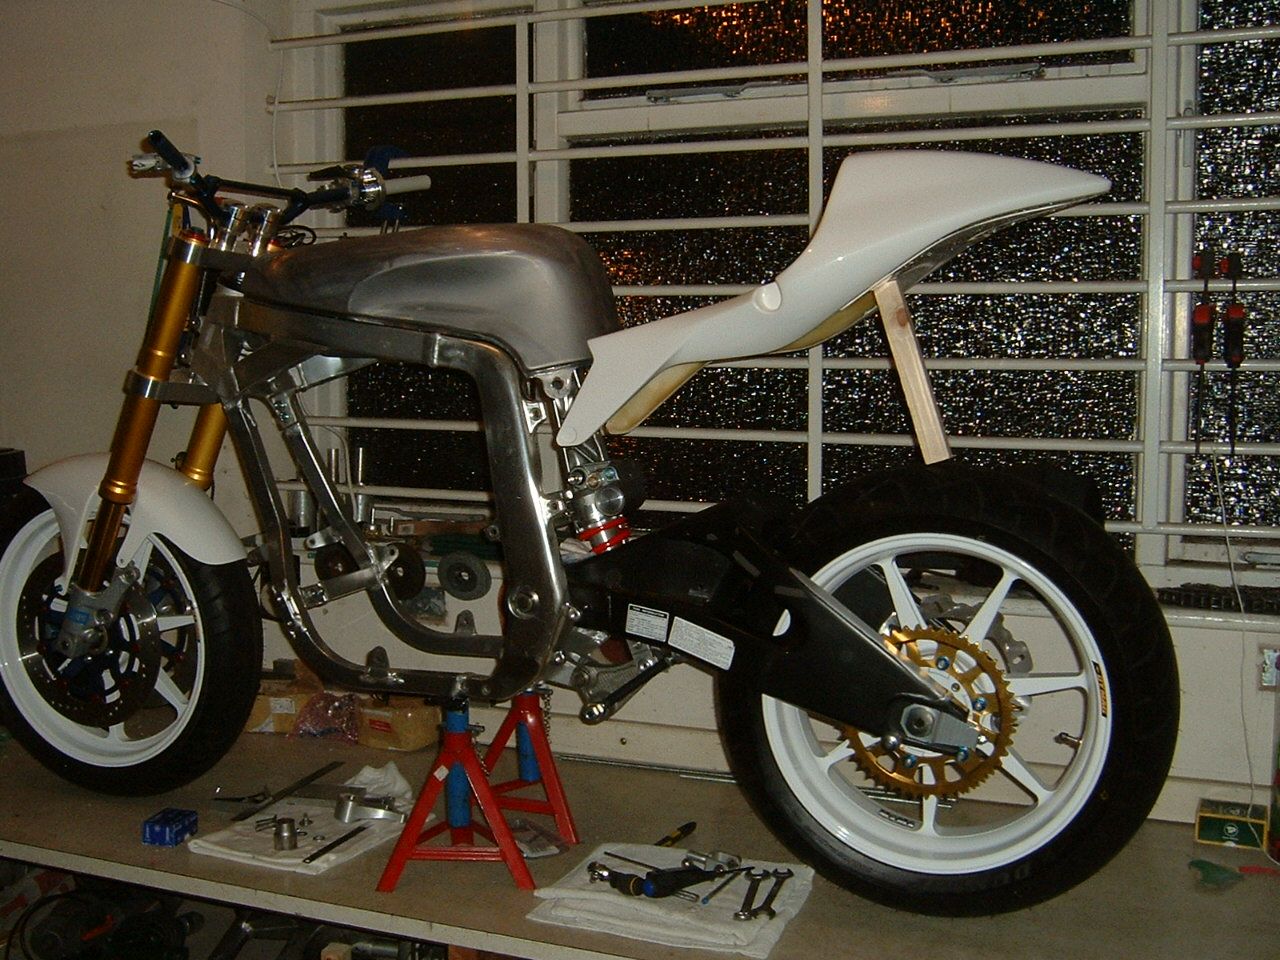 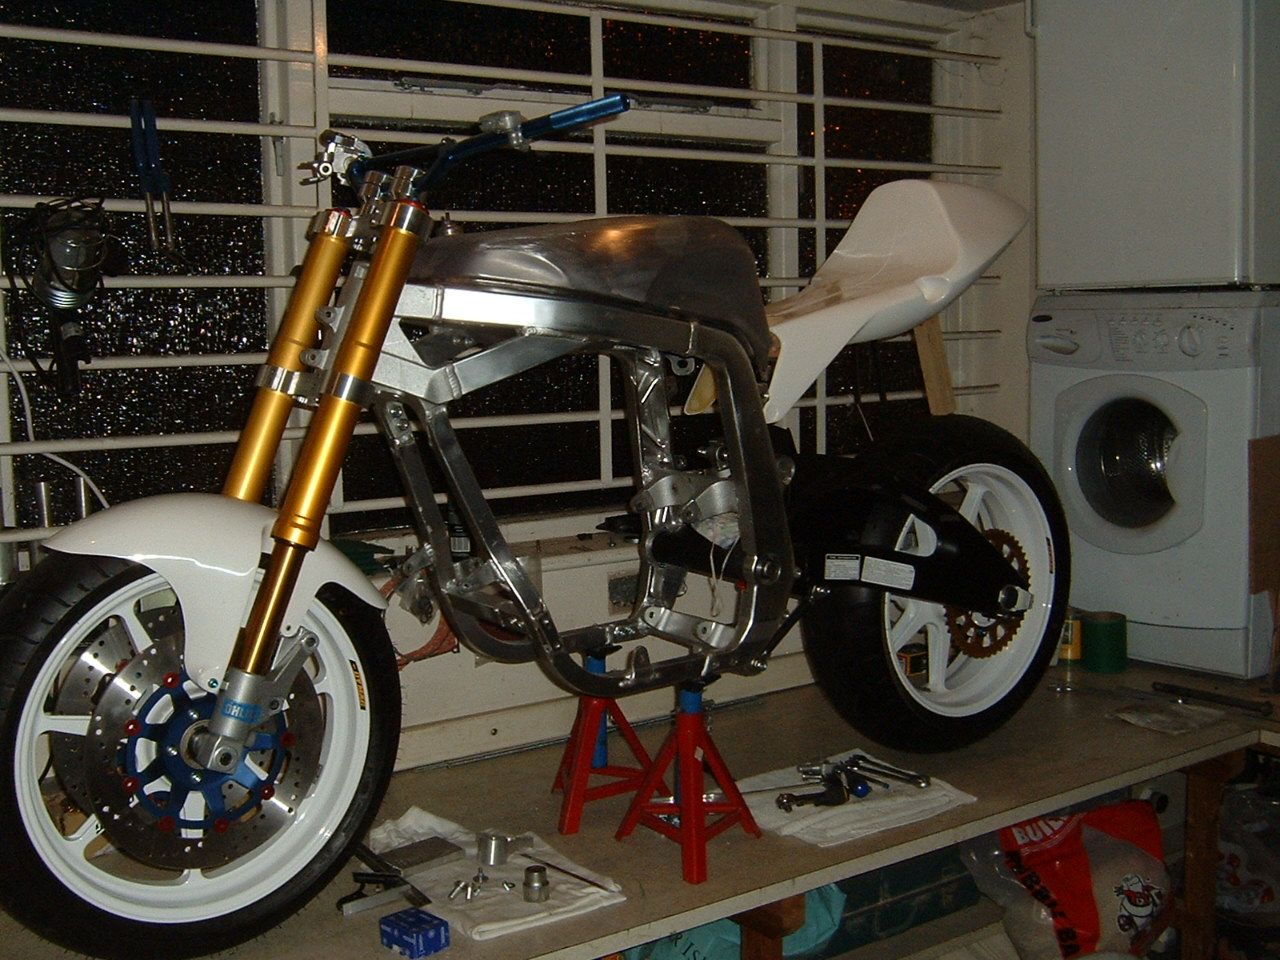 Just need to make this look factory fitted now :LolLolLolLol: 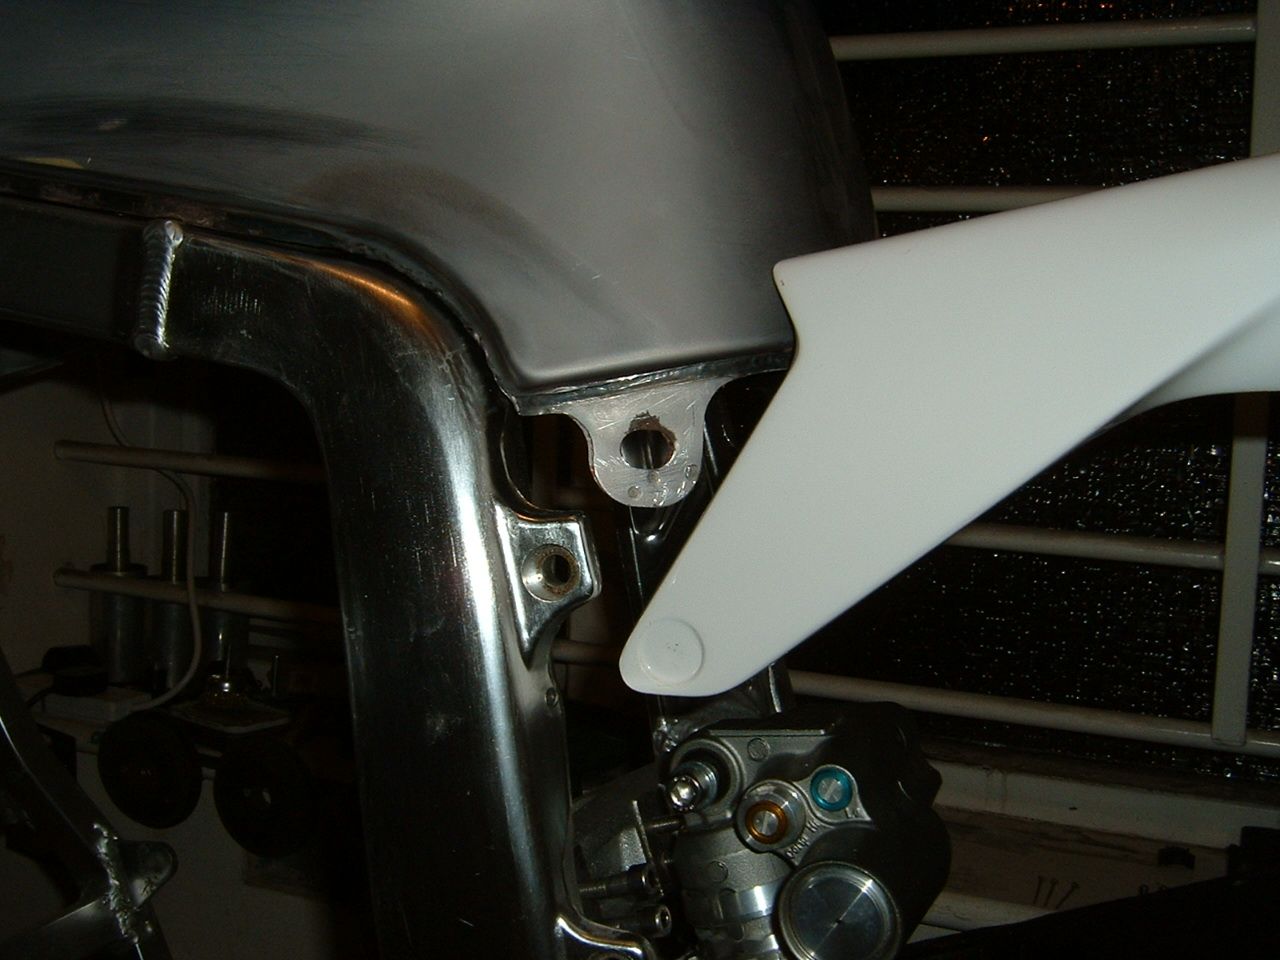 I don't like the flat top tank with the round seat unit so I'm going to sculpt the tank with a round profiled top. Got the billet caliper carriers and shock mount back from the CNC man (£150 for all 3 parts!) 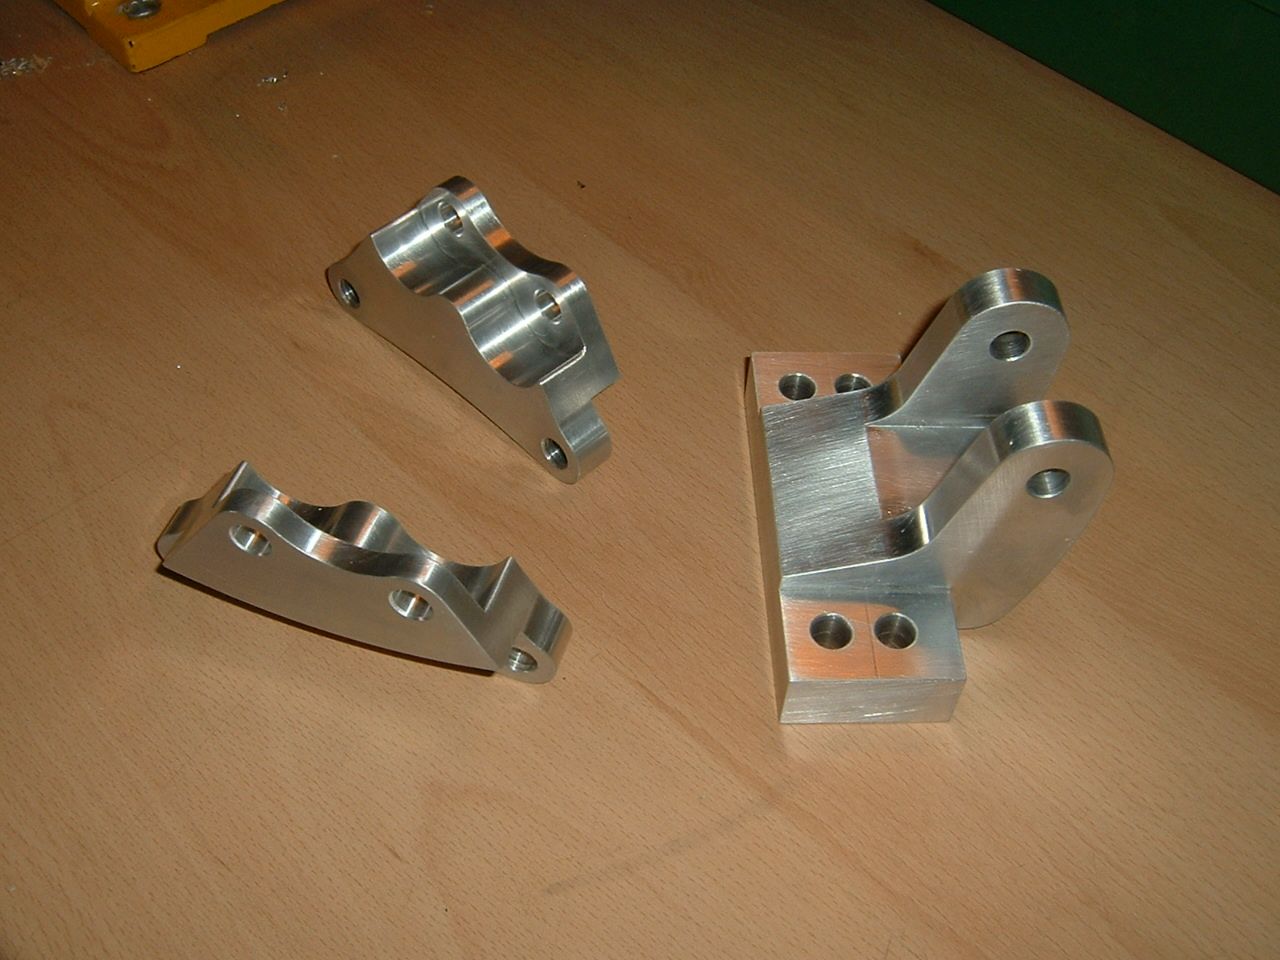 I'll get these fitted tomorrow and then the bike will be a rolling chassis, (an exciting stage of any build) Shock mount fits perfect 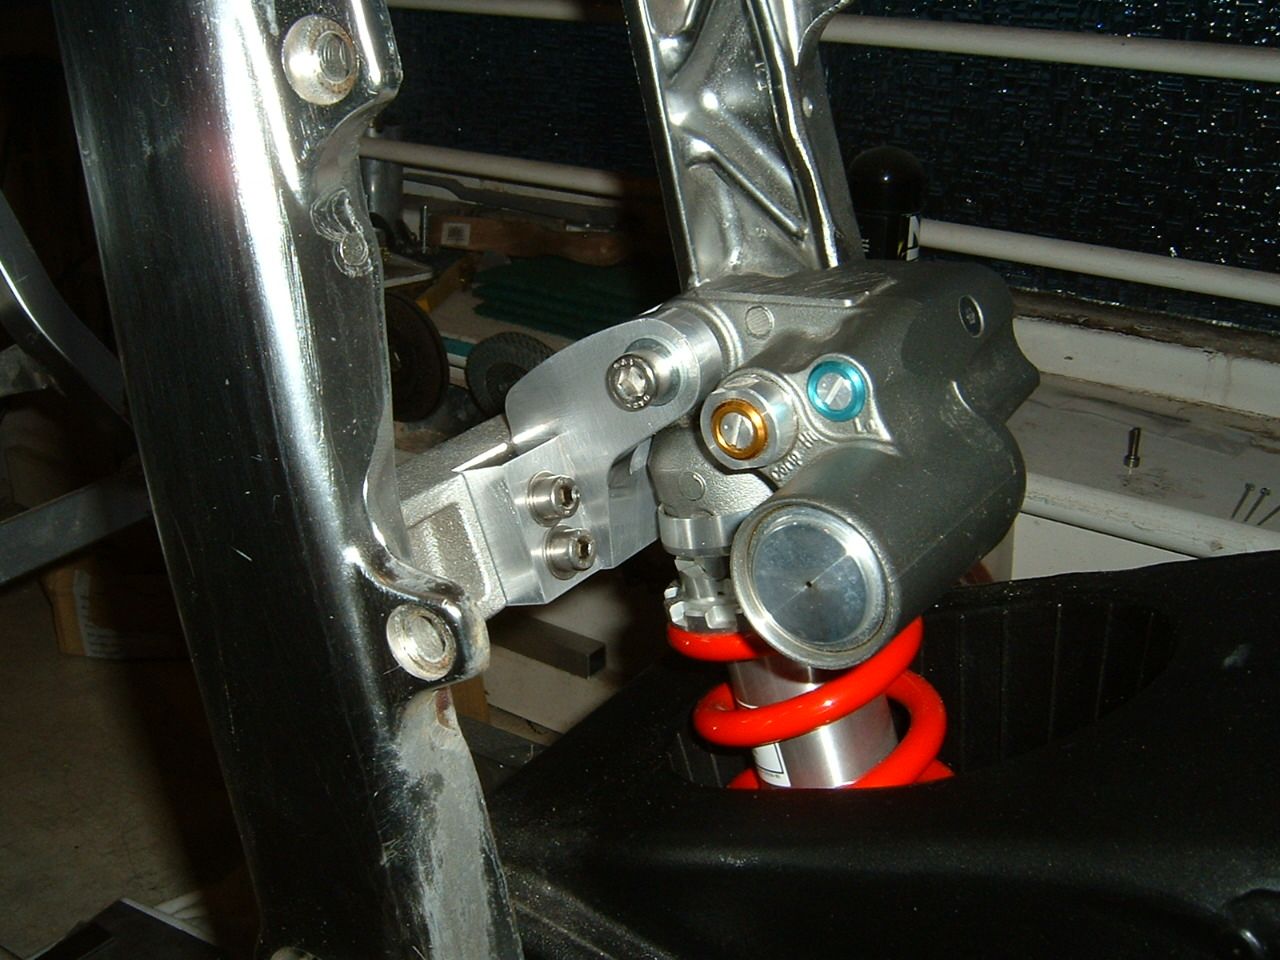 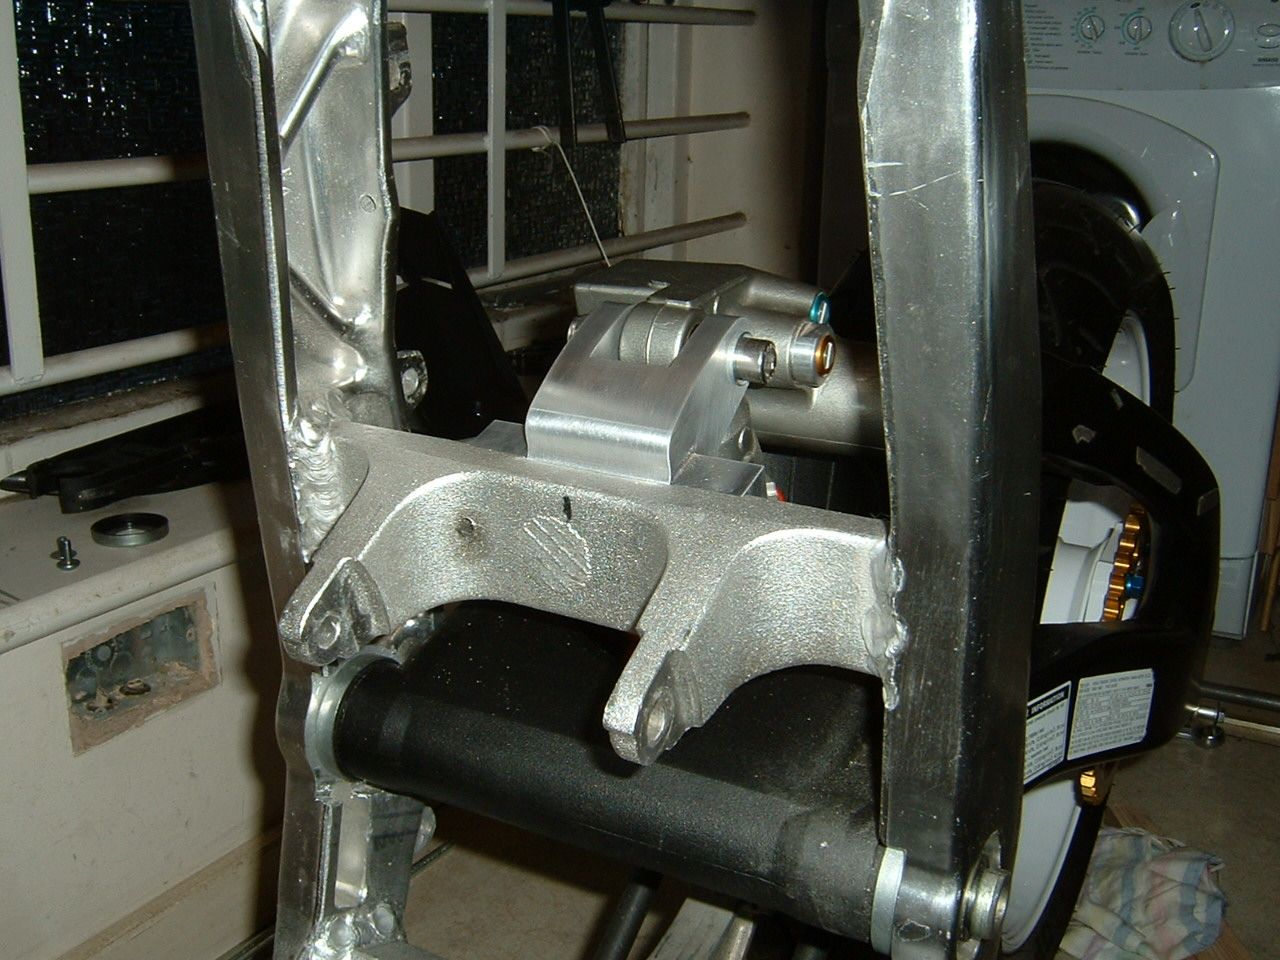 Calipers are a little off centre to the disks but 0.5mm off the inner surface of the carrier will sort that out 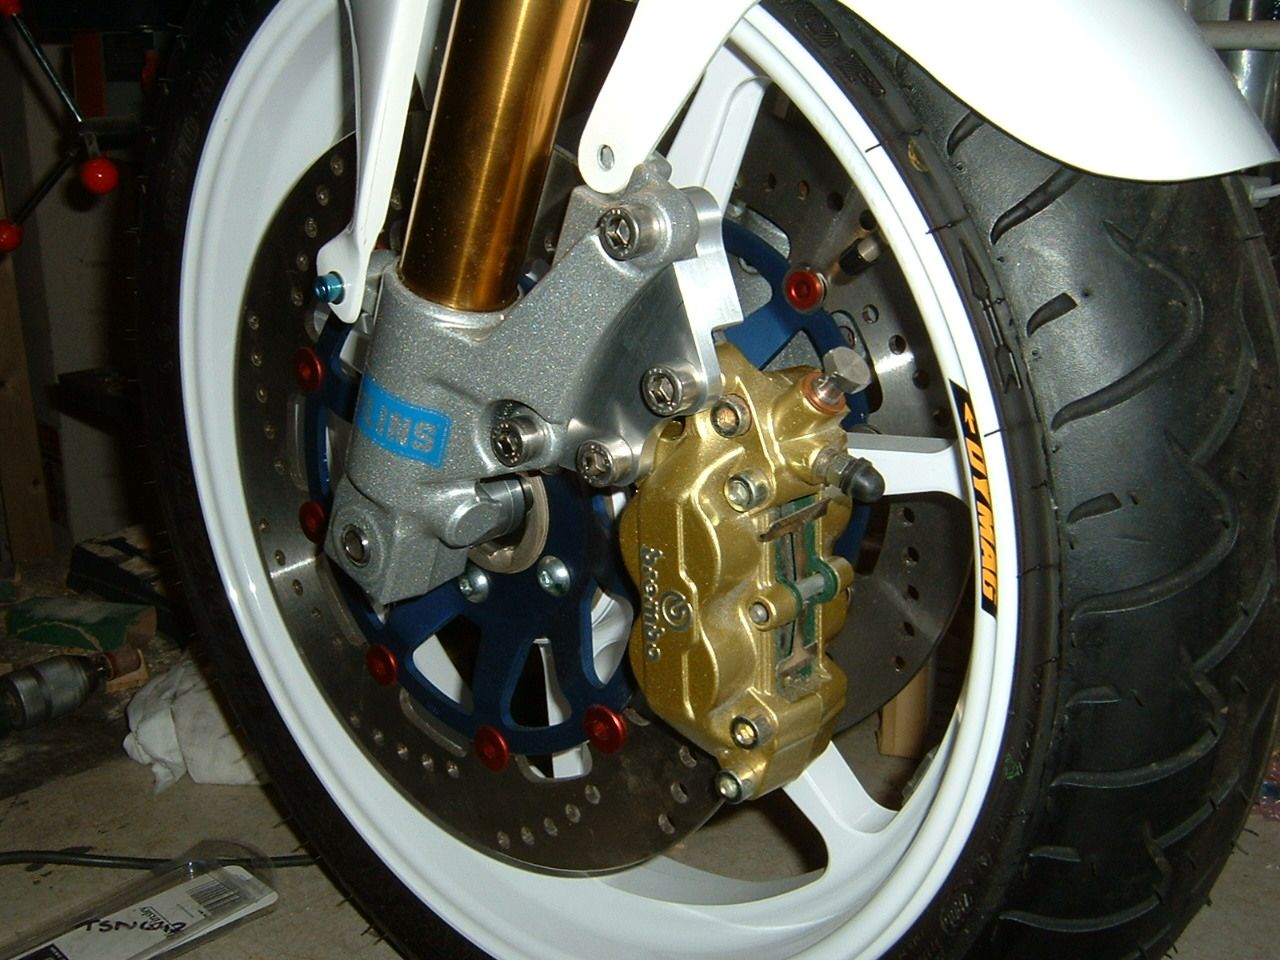 And we have a rolling chassis! (might need a longer side stand, LOL) 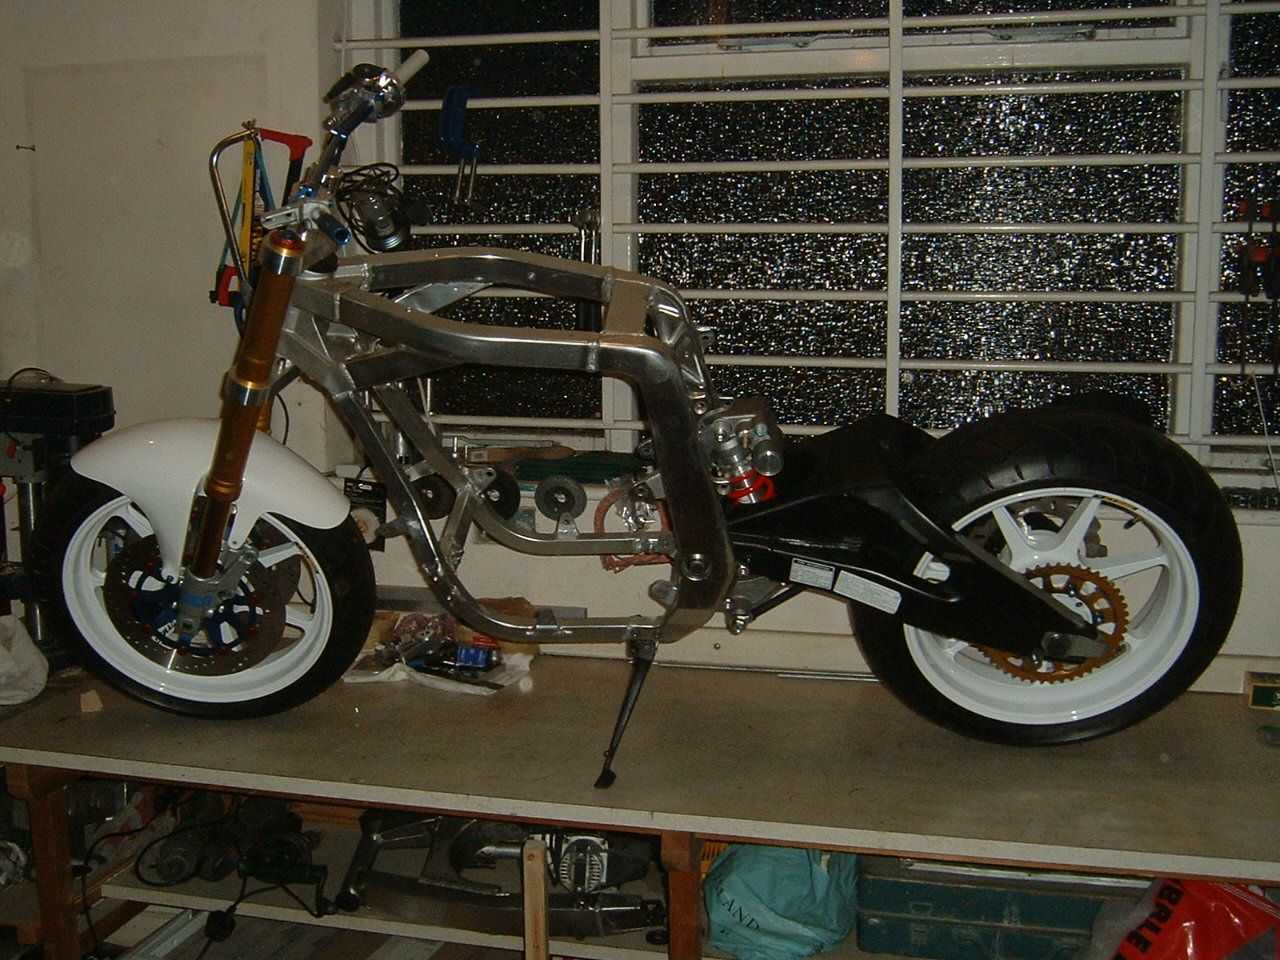 Now for the bad and good news. I have to leave the workshop in two weeks, BUT, I looking at another one tomorrow morning that was advertised, so fingers crossed I'll have a new hobby place. Made a start on the subframe, first cut off the old mounting lugs and flattened the frame rails 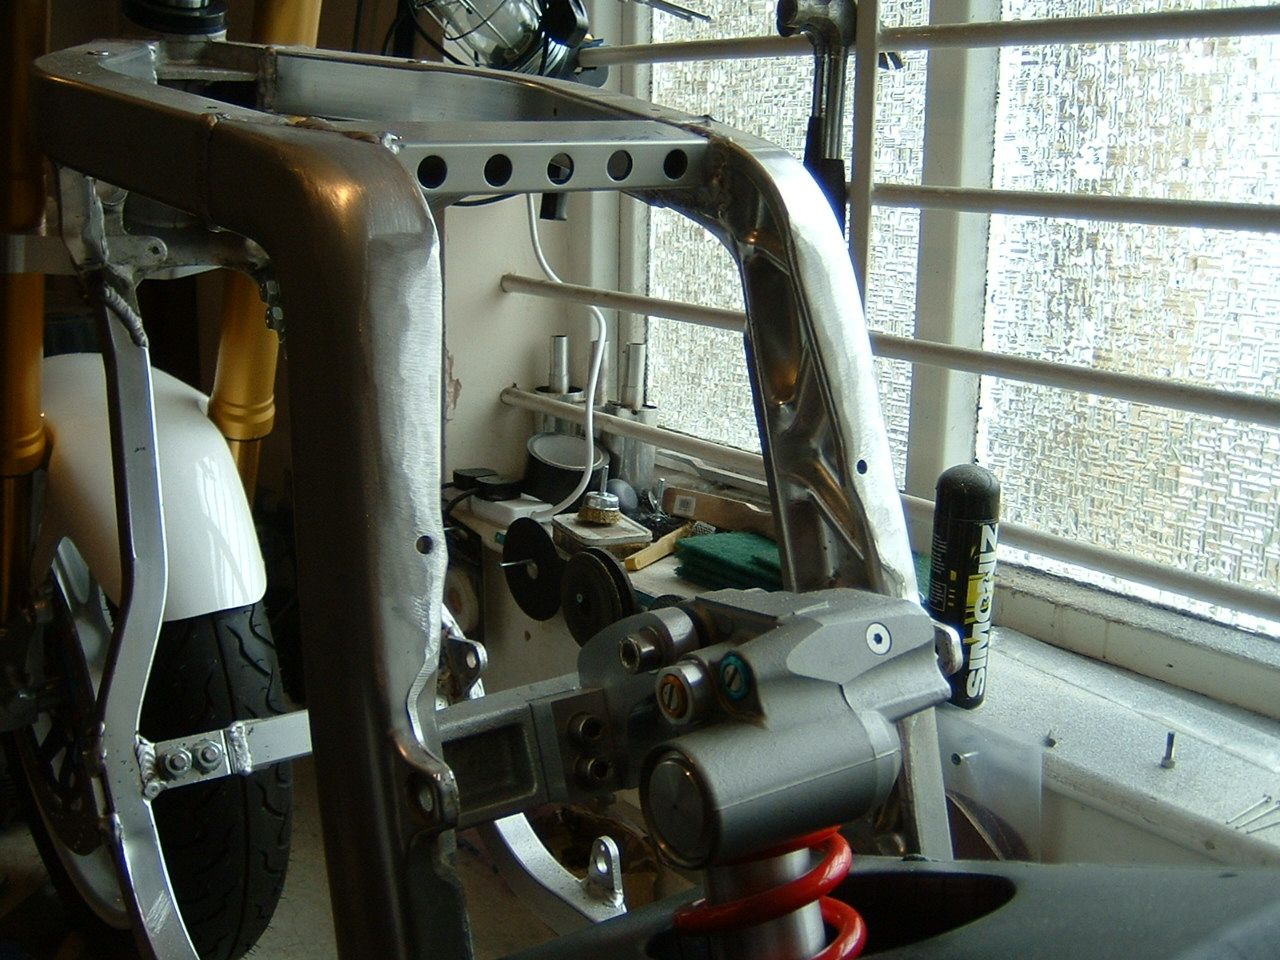 Started making the subframe in MDF, once it looks and fits right I'll have the pieces made from ally and the whole thing will be welded in place 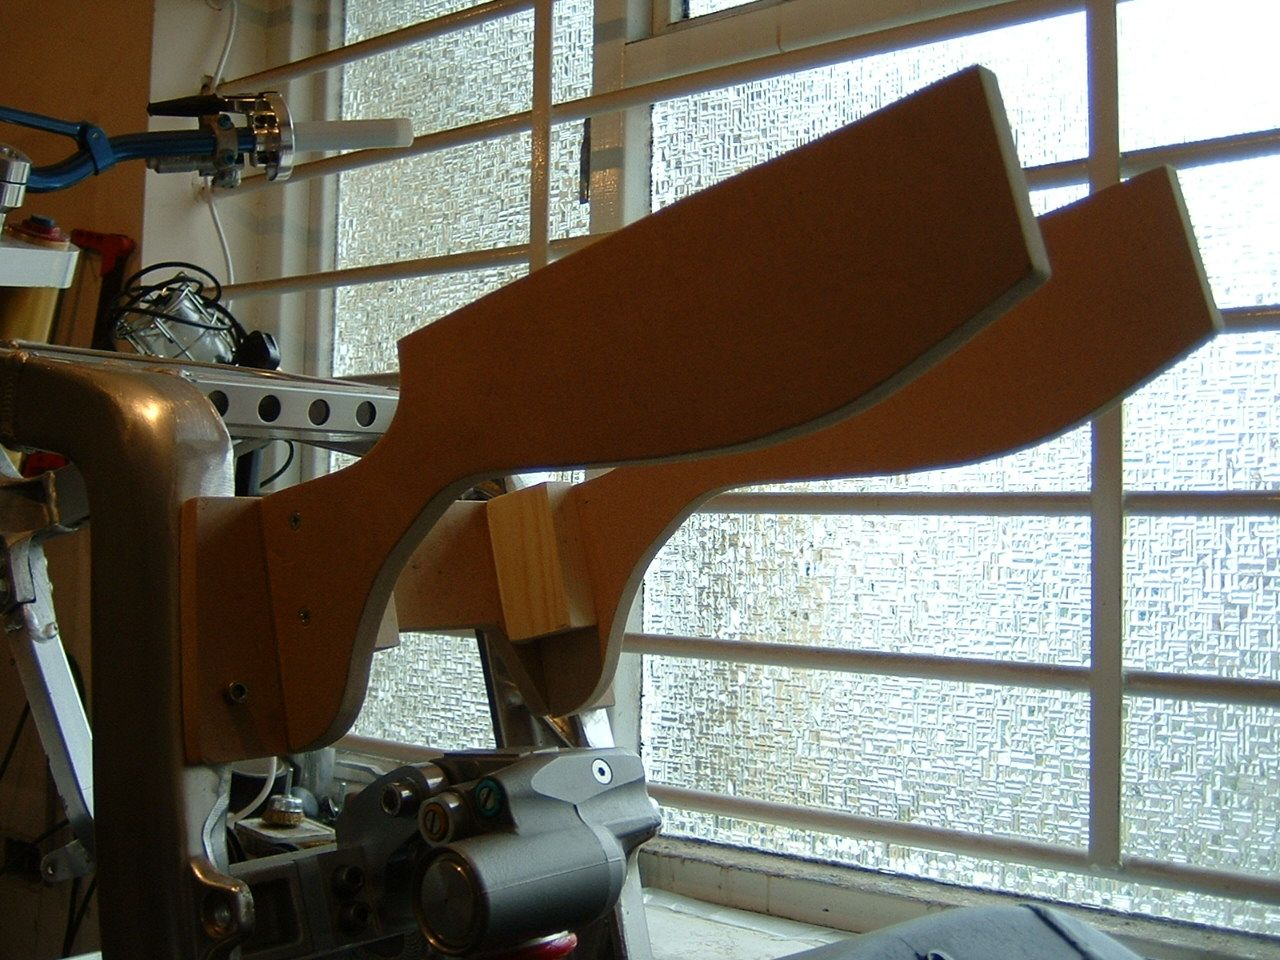 I've made the seat unit 3" shorter and profiled the front to fit round the tank. 
|
|
| Haut |
|
|
|
cabbie
|
Sujet du message: Re: Kwikasfaki Publié: 19 Jan 2012, 22:25 |
|
Inscrit le: 19 Jan 2012, 20:34
Messages: 135
|
Hi kids, I'm back :rock: I remade the subframe as the seat was a little to high, I'll get these parts sent off for CNC'ing next week, the subframe will be welded to the main frame, once the seat is bolted in place I'll add sections of ally to blend it in like it was factory fitted. 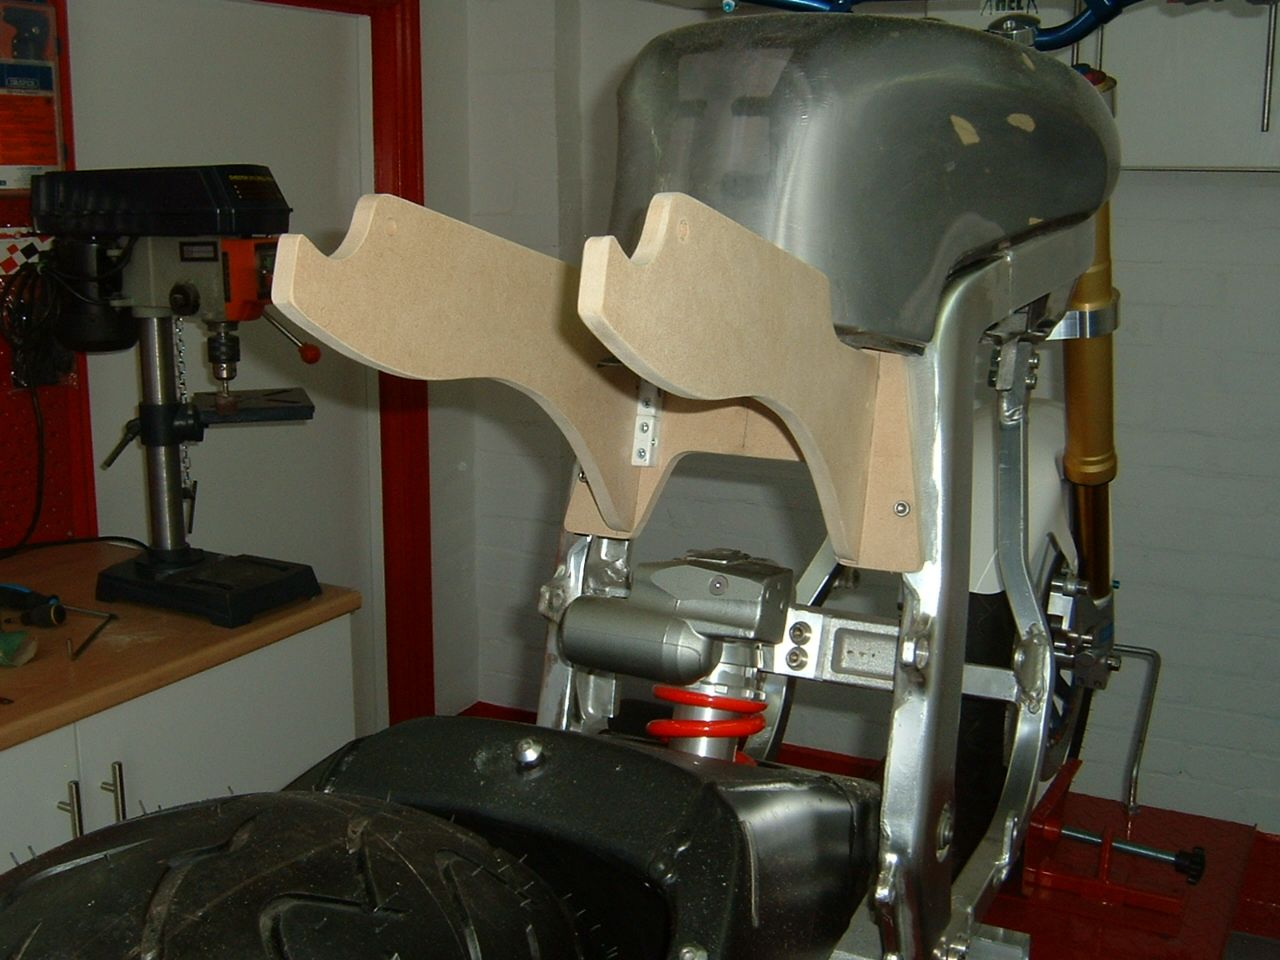 I started making out the mounting holes for the seat 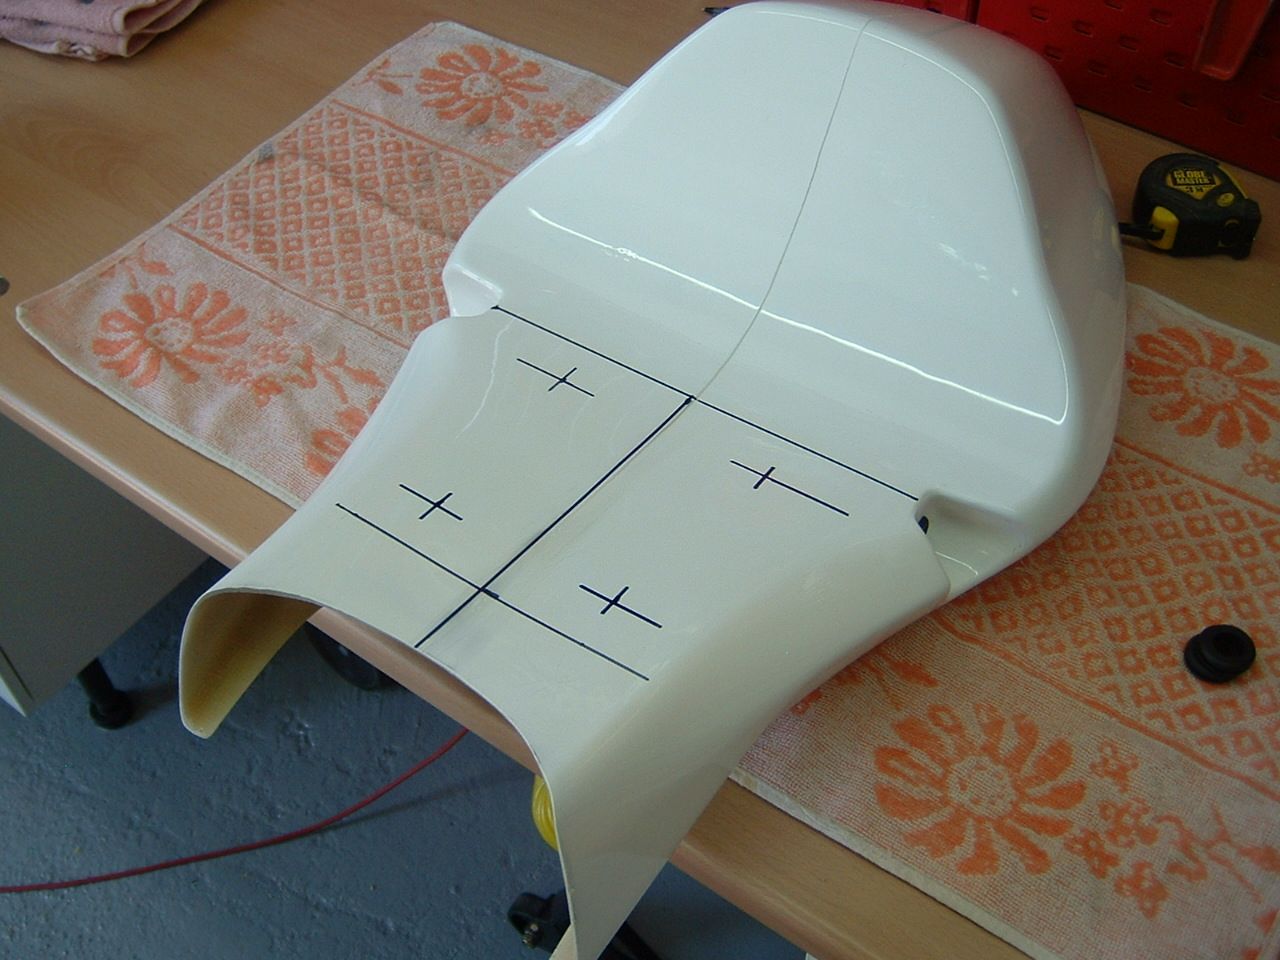 And here's the mounting holes fitted with grommets 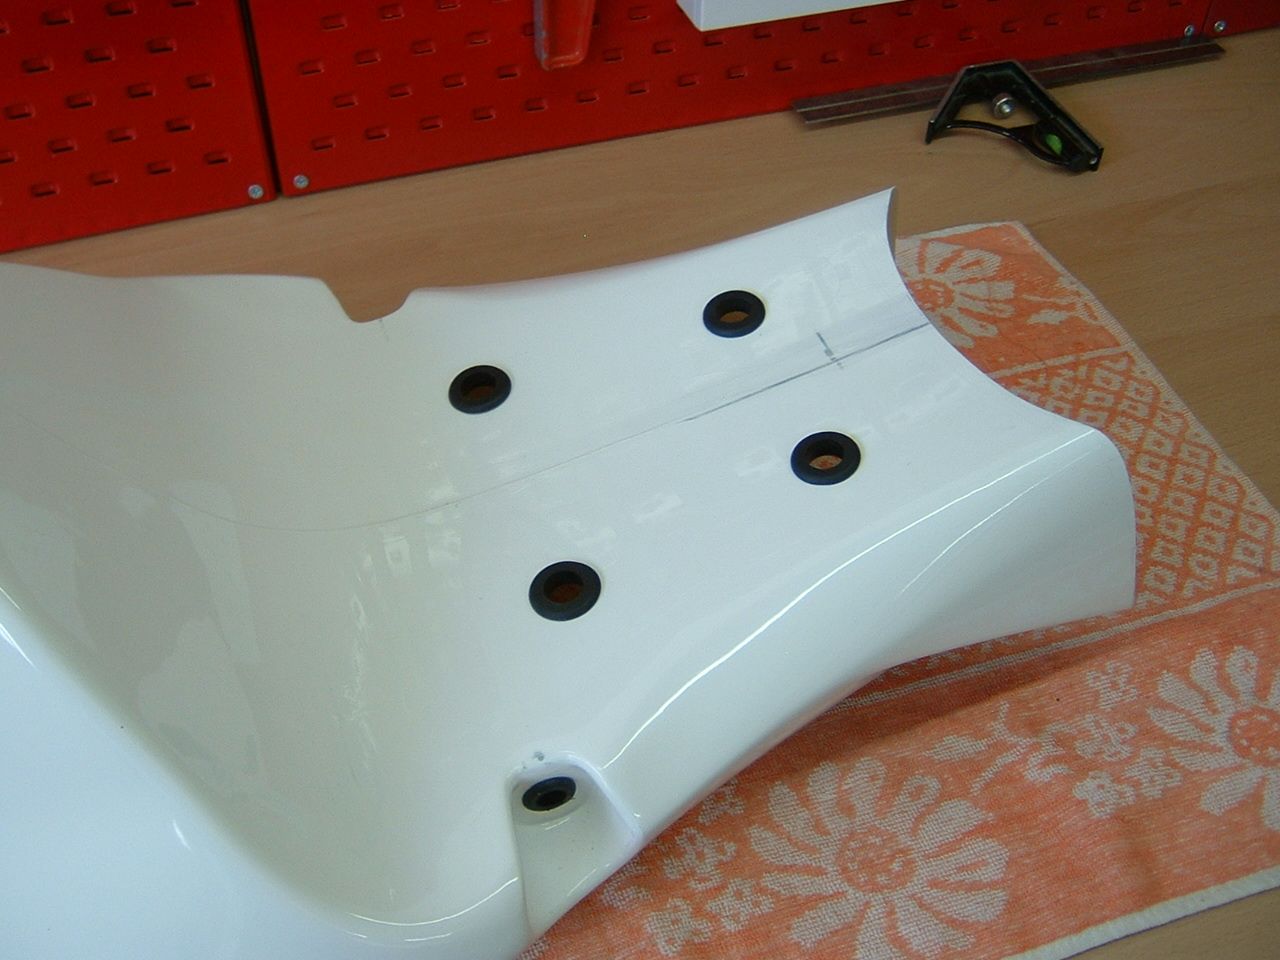 I'm taking a few weeks off work to get the seat and engine mounting work done so watch this space. Some good news and some bad news. Good news is the motor fell in the frame like it was supposed to be there, this motor runs 9.3 quarters in a drag bike steel frame, now fooking mental will it be in this little bike! damn I can't wait for the first ride :nuts: 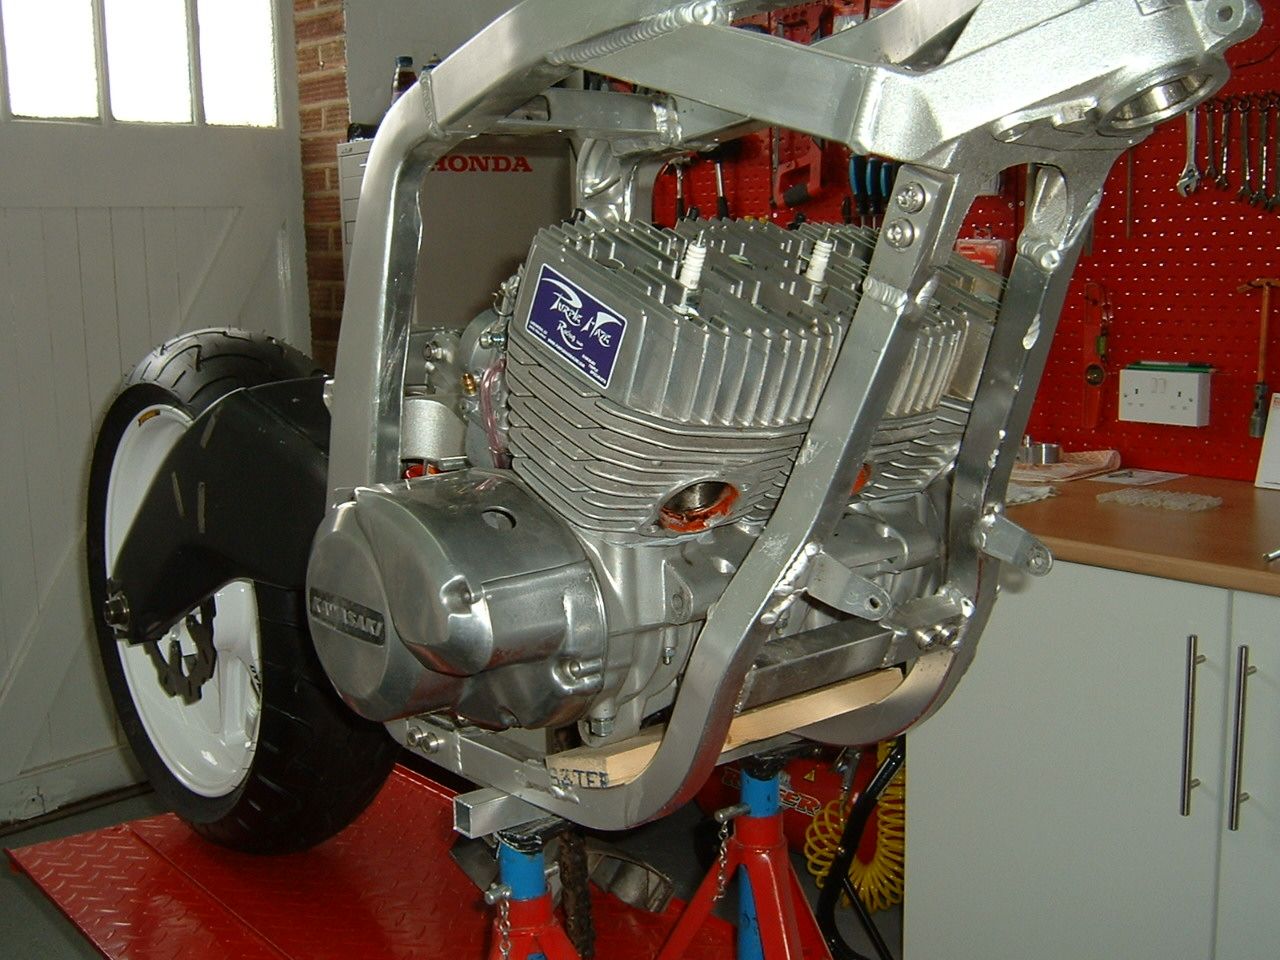 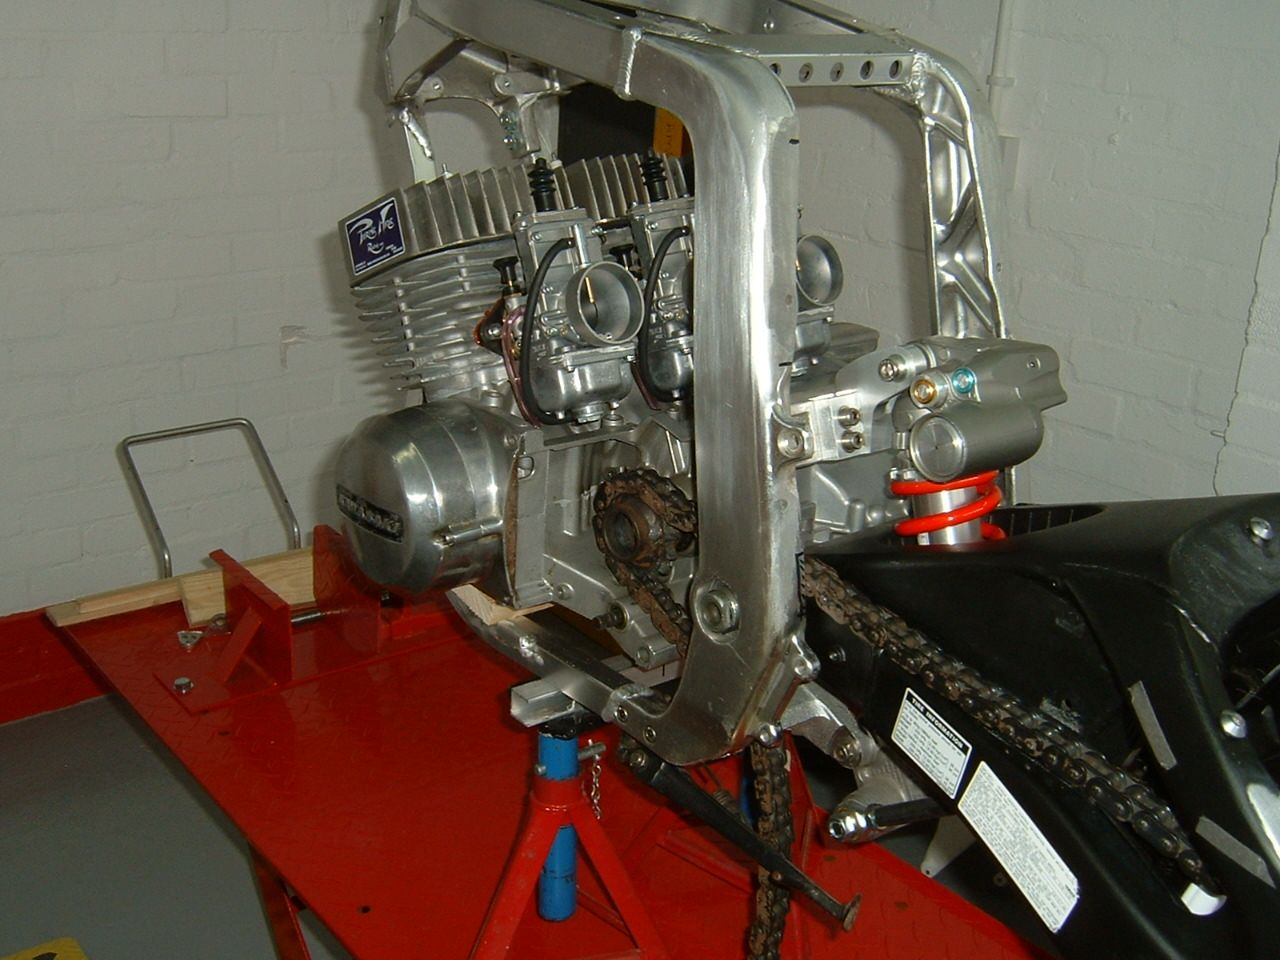 The back mount just needs a spacer and the other mounts just need new brackets welded on, simples! 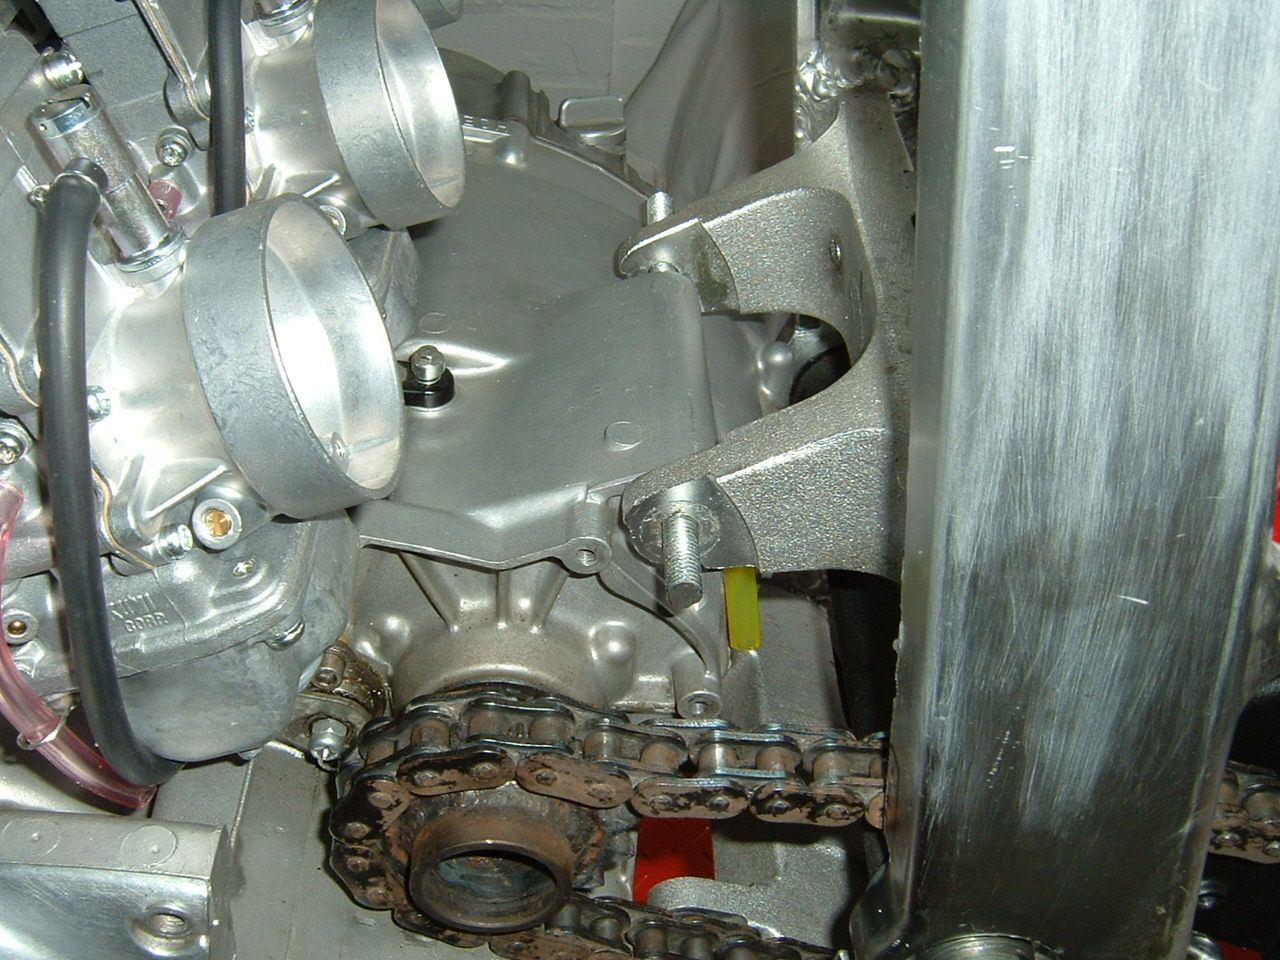 The chain alignment is virtually spot on too, nice. The bad news. The bike was sitting next to a window at the old workshop and the sun has bleached one fork leg! I'll have to send the forks back to Firefox for re-anodising 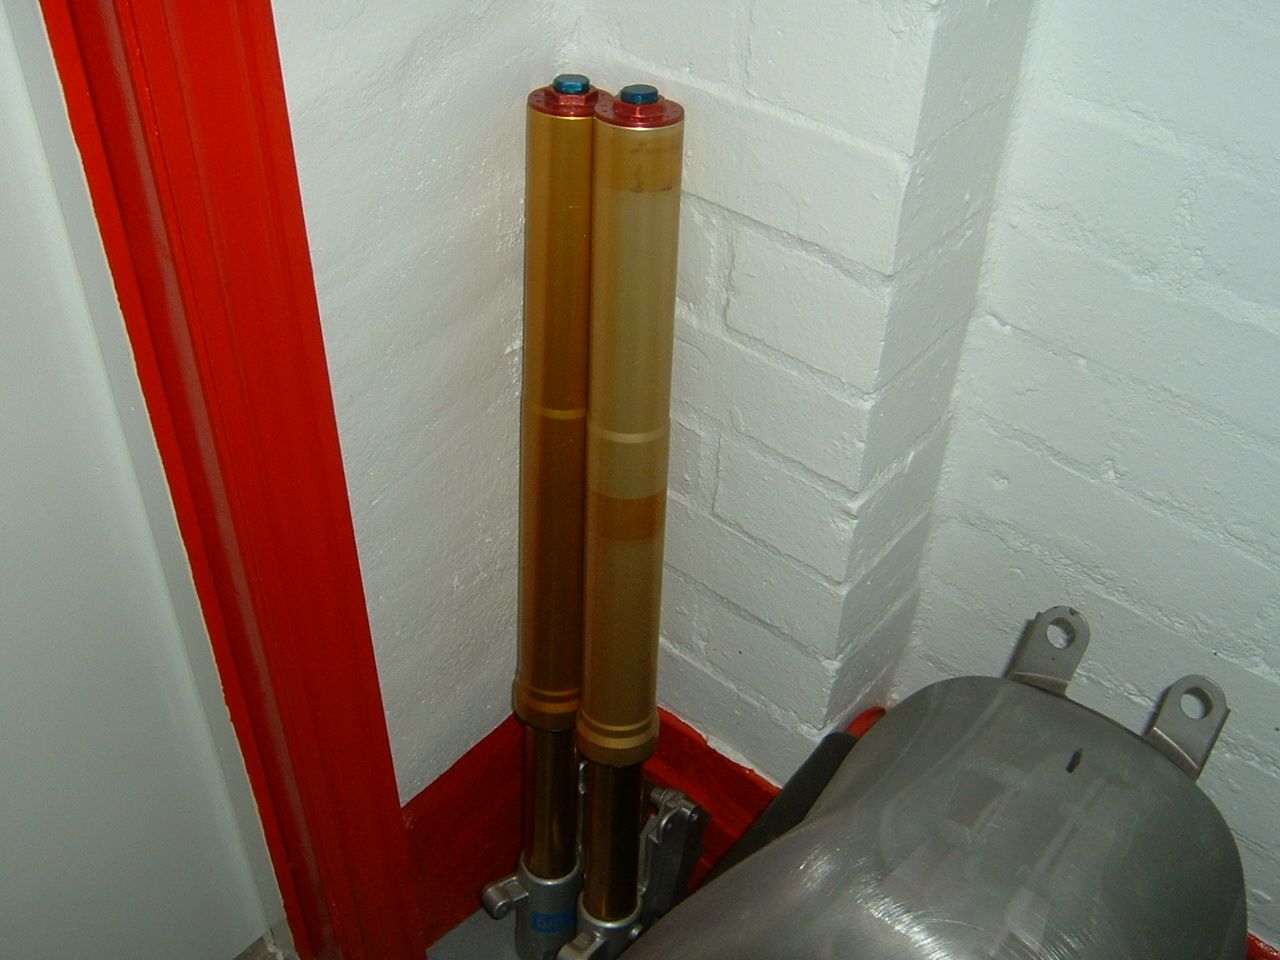 More bad news is Talon quoted 4/6 weeks for a new off-set front sprocket, this means there will be some waiting in the build time, oh well. The cylinders and heads have been Vapour blasted plus new studs etc 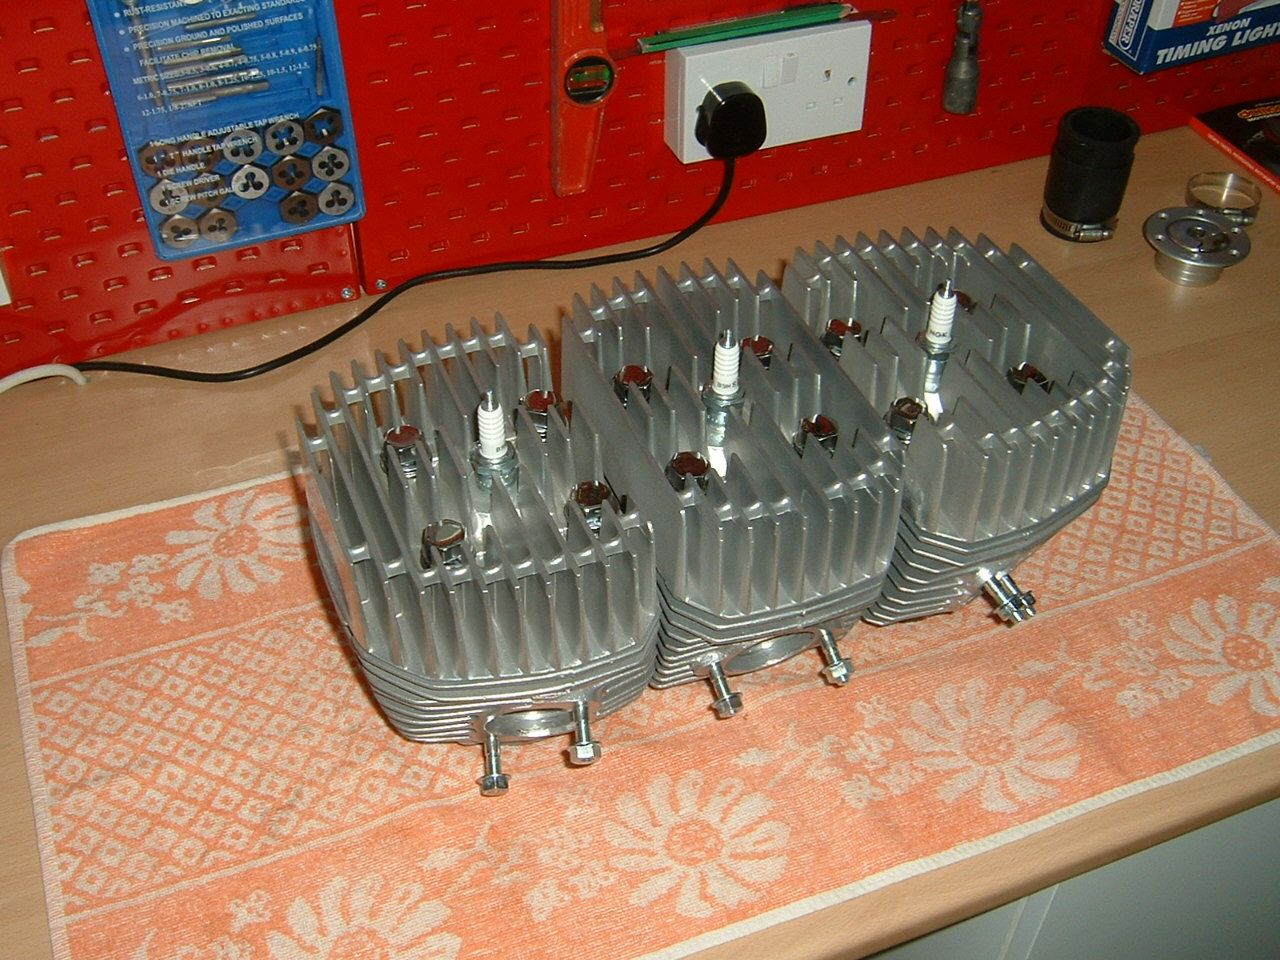 The rear sets arrived 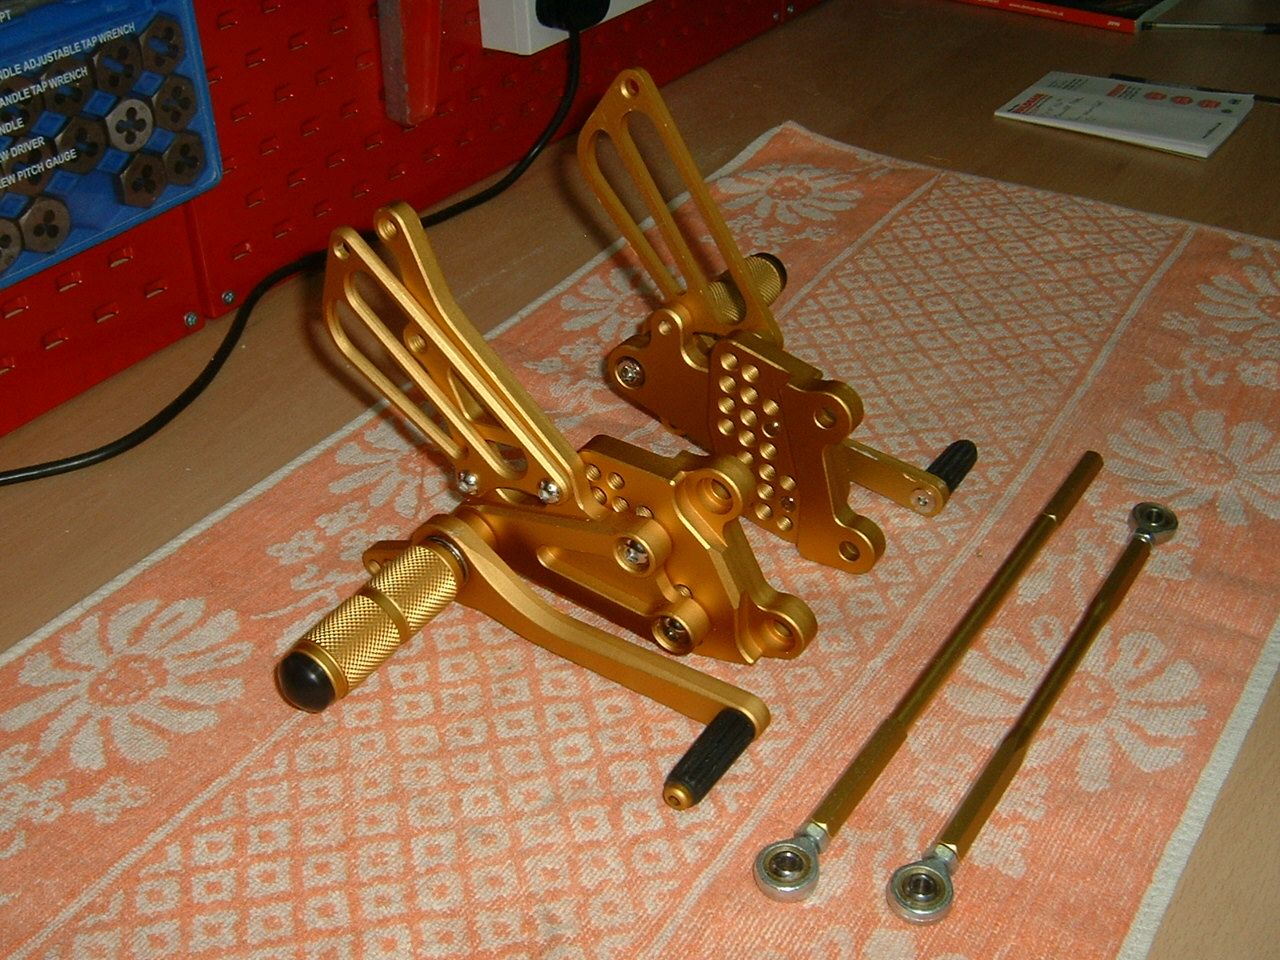 I'm fitting a 2 stroke tank in the seat so it's out of sight, I bought one of these little slimline fuel tank caps 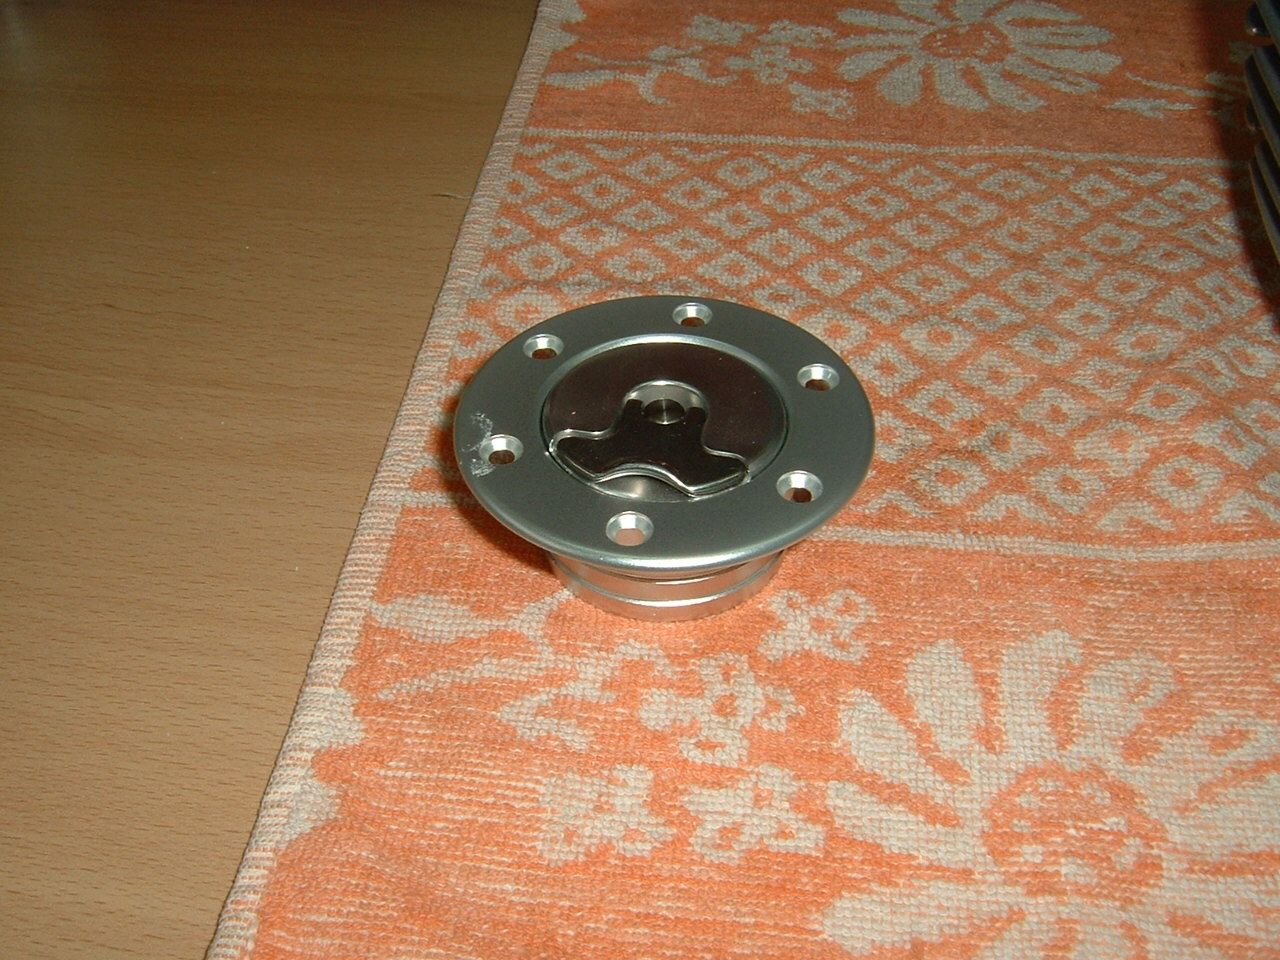 The tail drilled 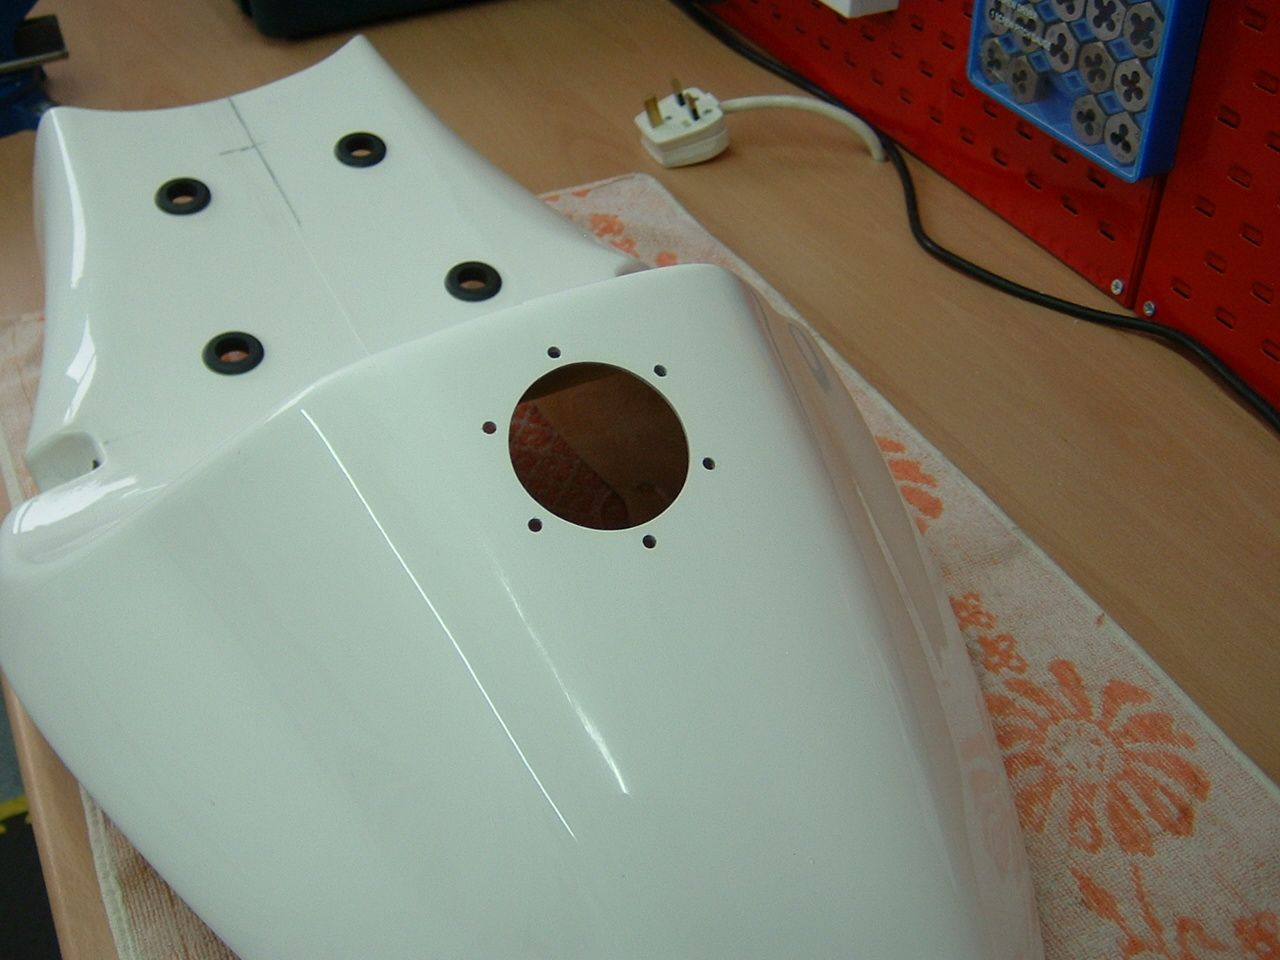 And cap fitted (yes I know the cap is 1 hole out) 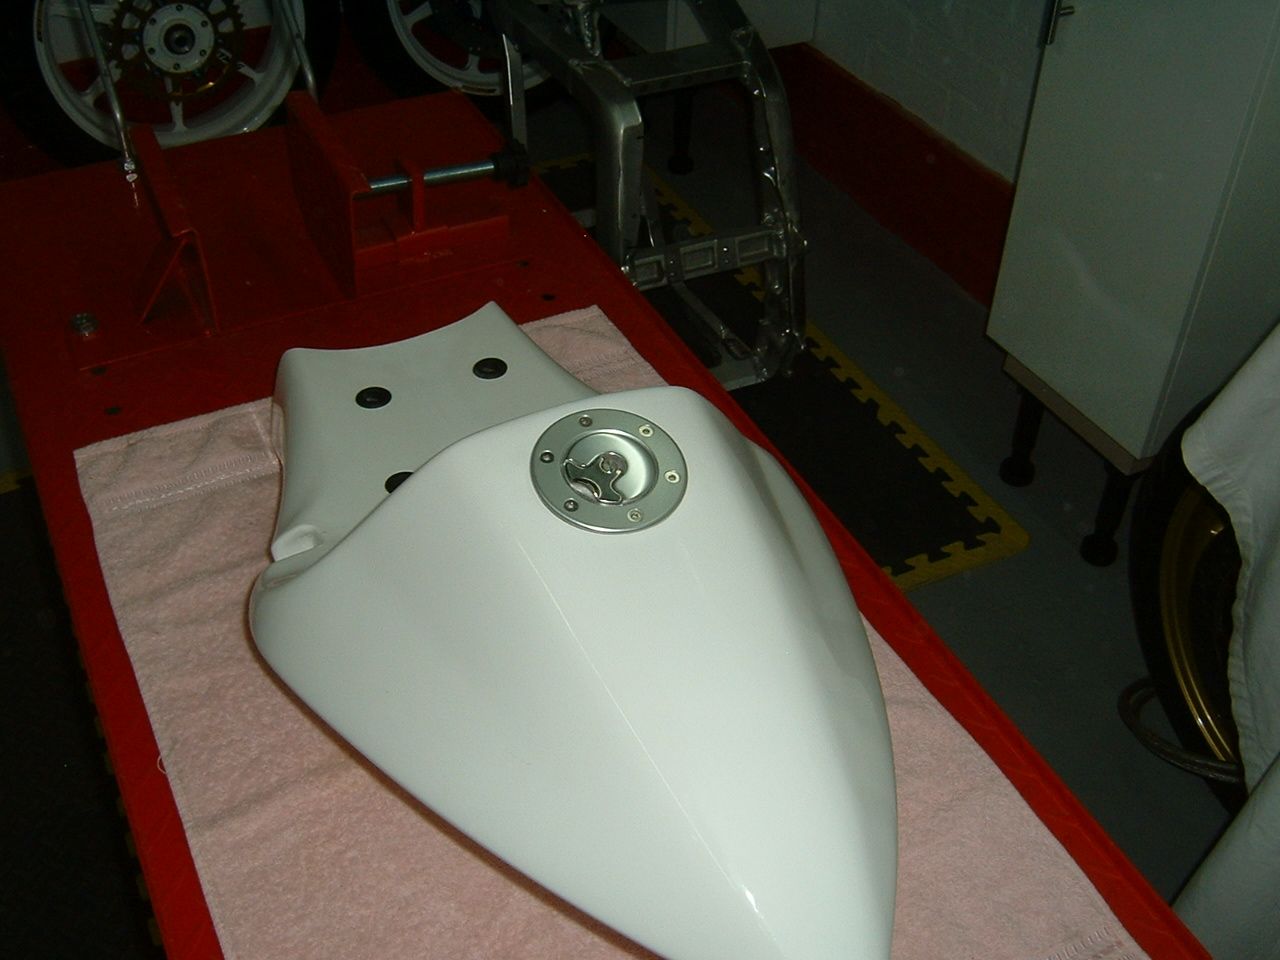
|
|
| Haut |
|
|
|
cabbie
|
Sujet du message: Re: Kwikasfaki Publié: 19 Jan 2012, 22:28 |
|
Inscrit le: 19 Jan 2012, 20:34
Messages: 135
|
I'm making an oil tank to fit in the seat and the engine has a pump running off the crank. I made up all the oil tank inlets & outlets 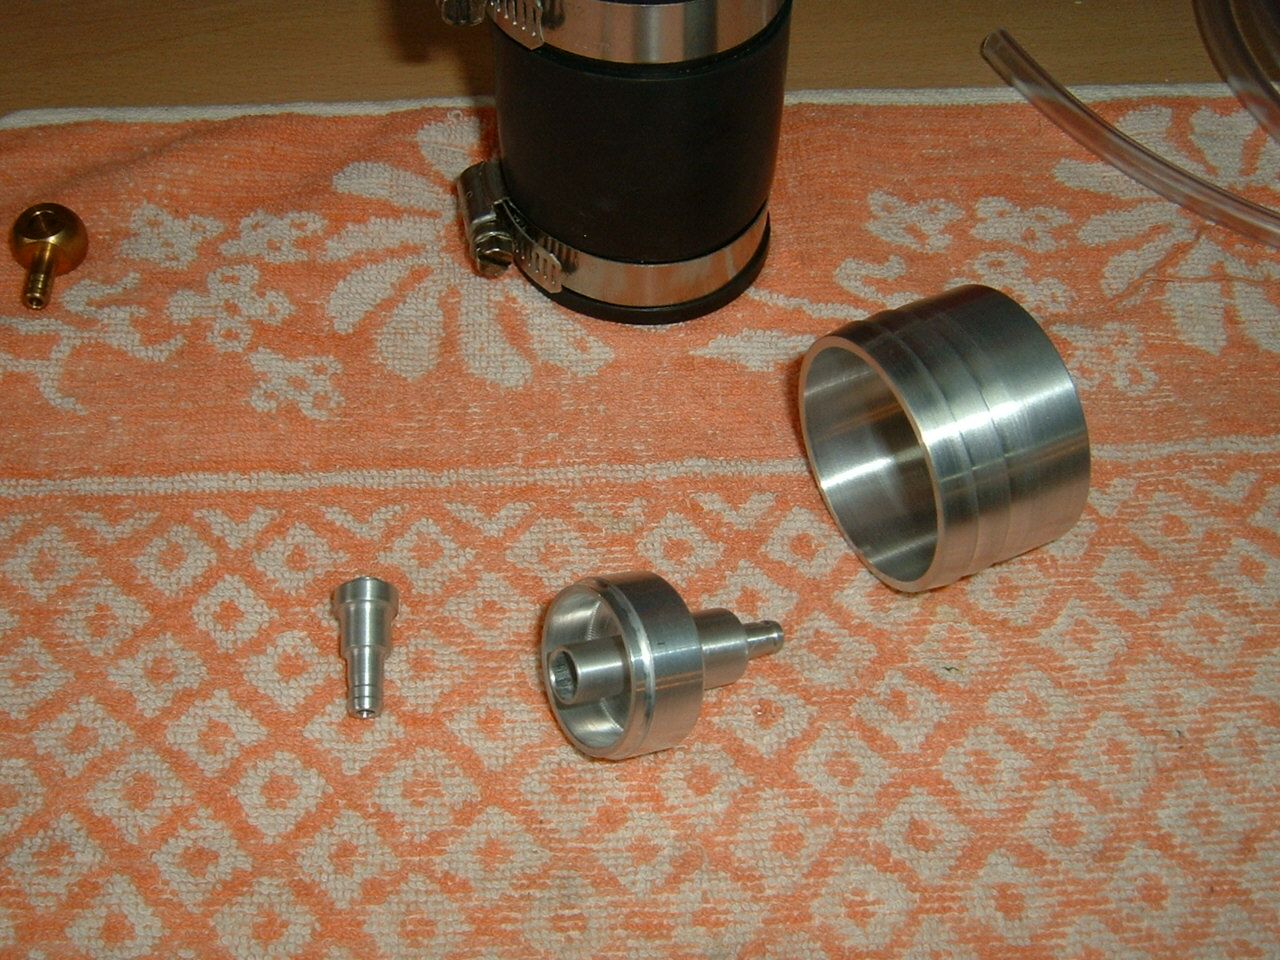 The subframe sections arrived, still lots of work to do here. 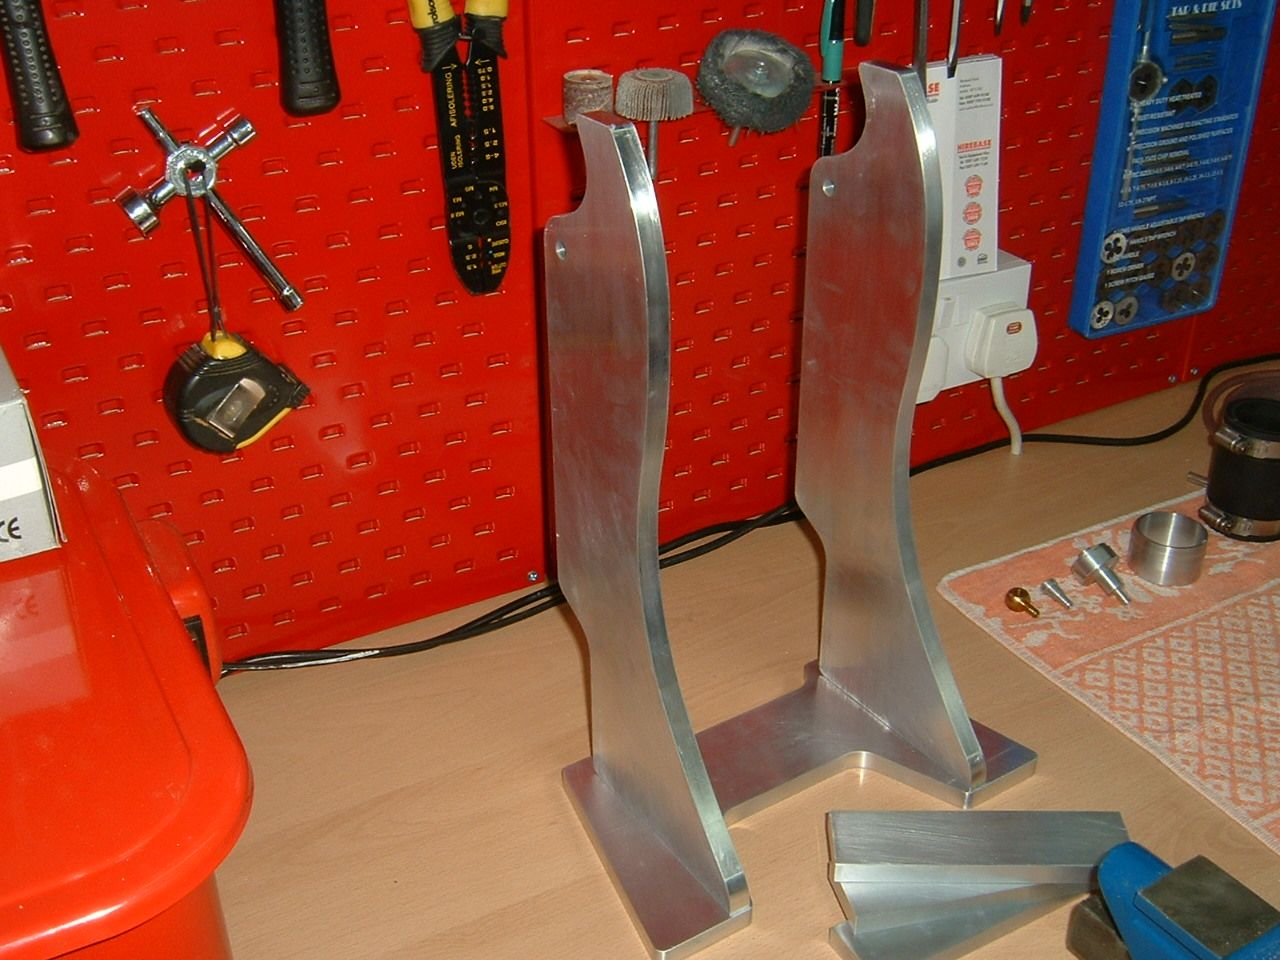 Finished off the oil tank  And fitted in the seat hump, I'll have to wait till the seat is painted before final fitting but I'll fill the seat unit with expanding foam to hold the tank in place 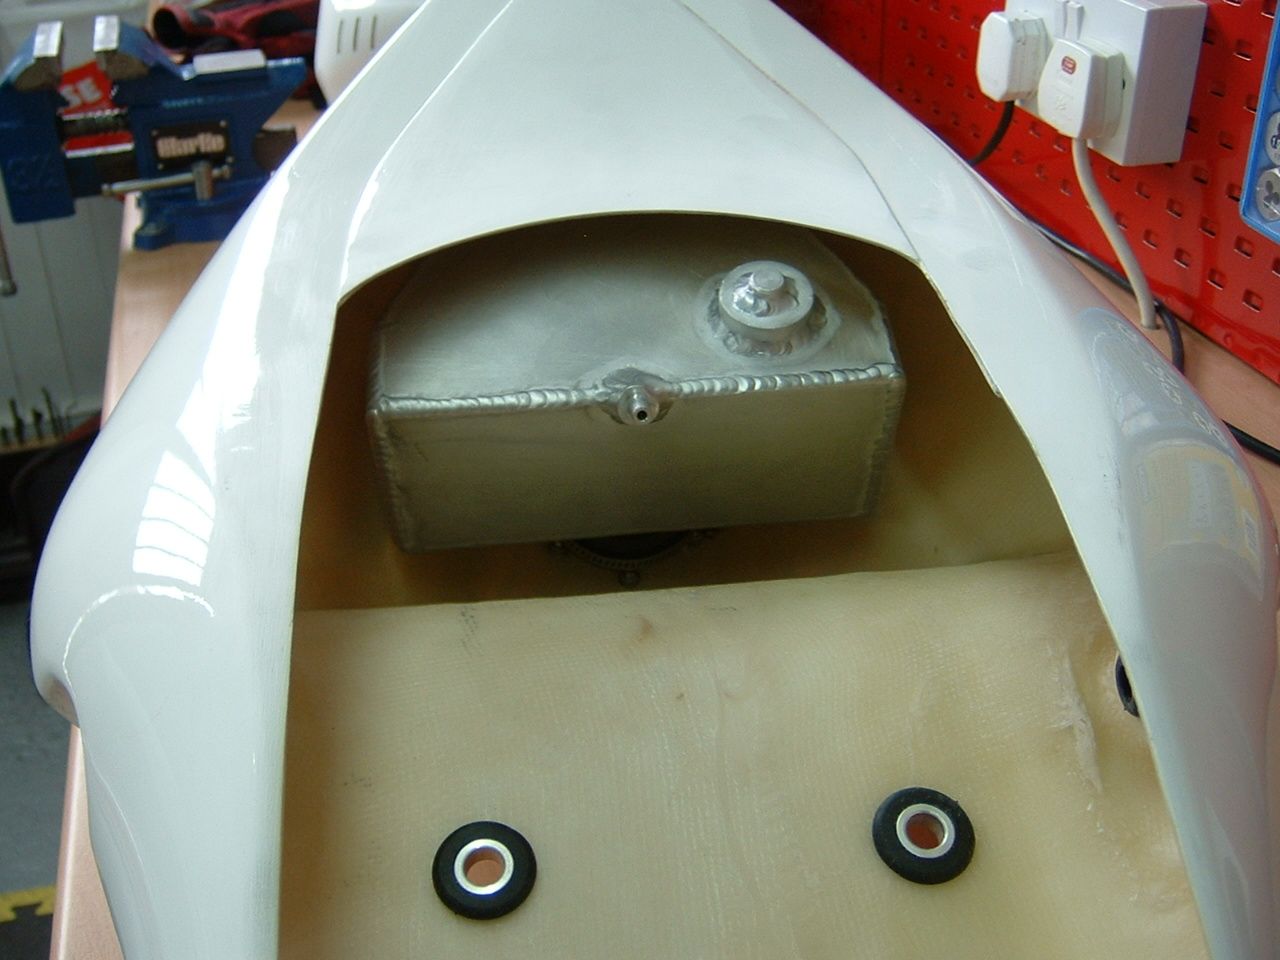 Here's the subframe lightened and welded 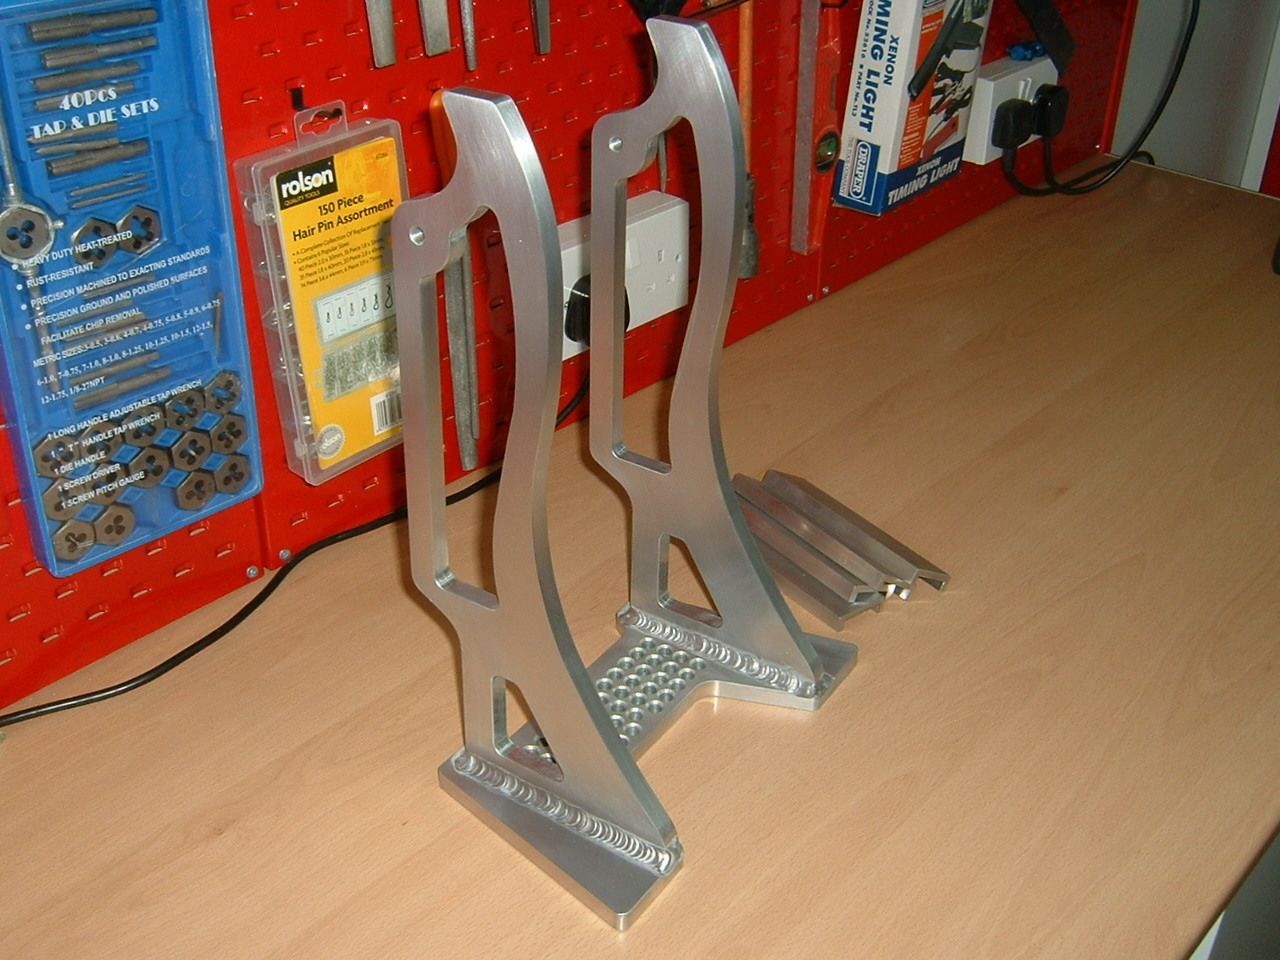 This is the tank mounting bar to be welded in place (If the rubbers turn up I'll fit it!) 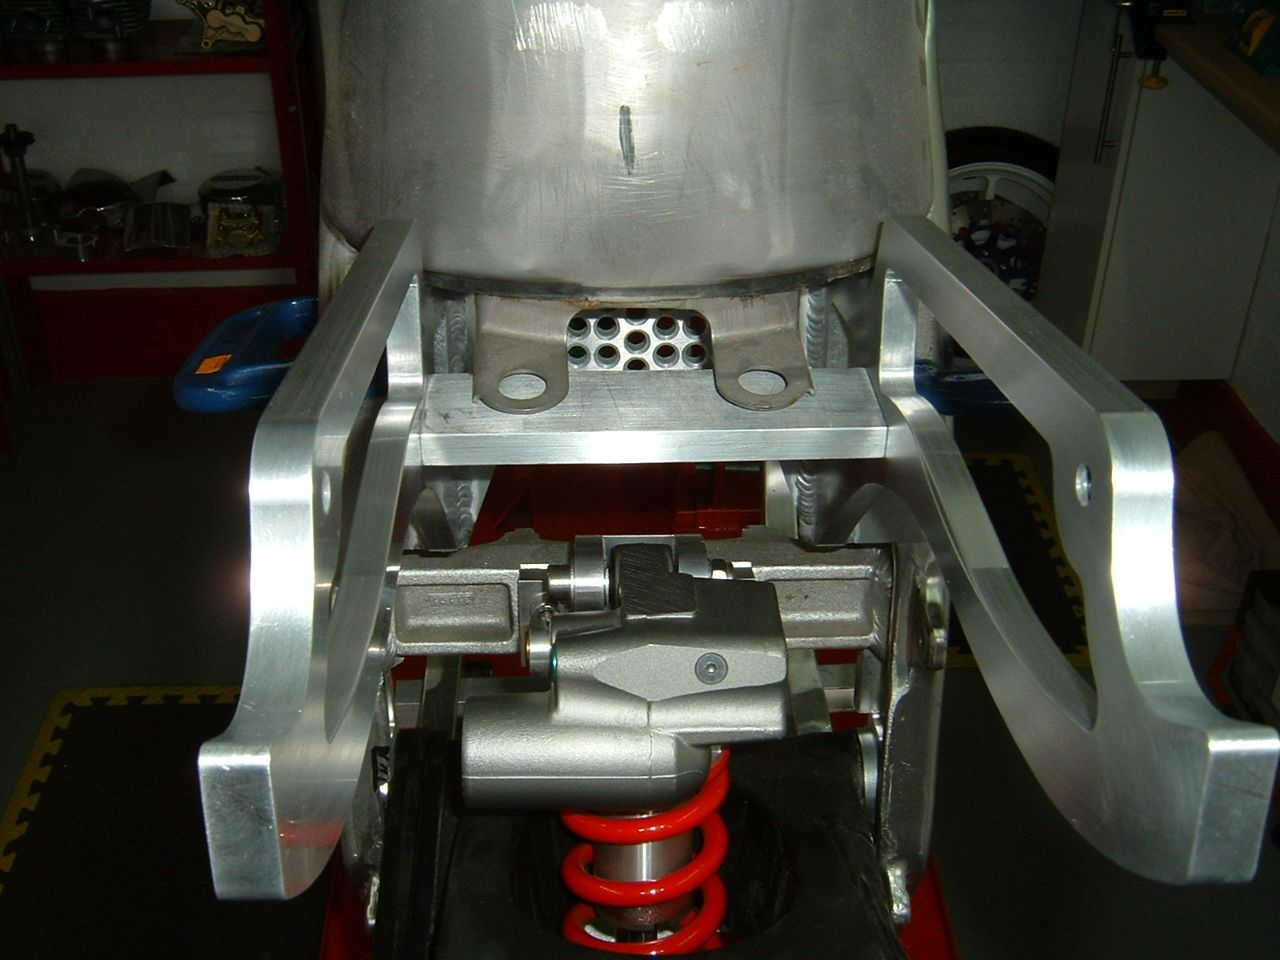 This is the seat fitted to the frame, still some small section of alloy to add so it look factory fitted 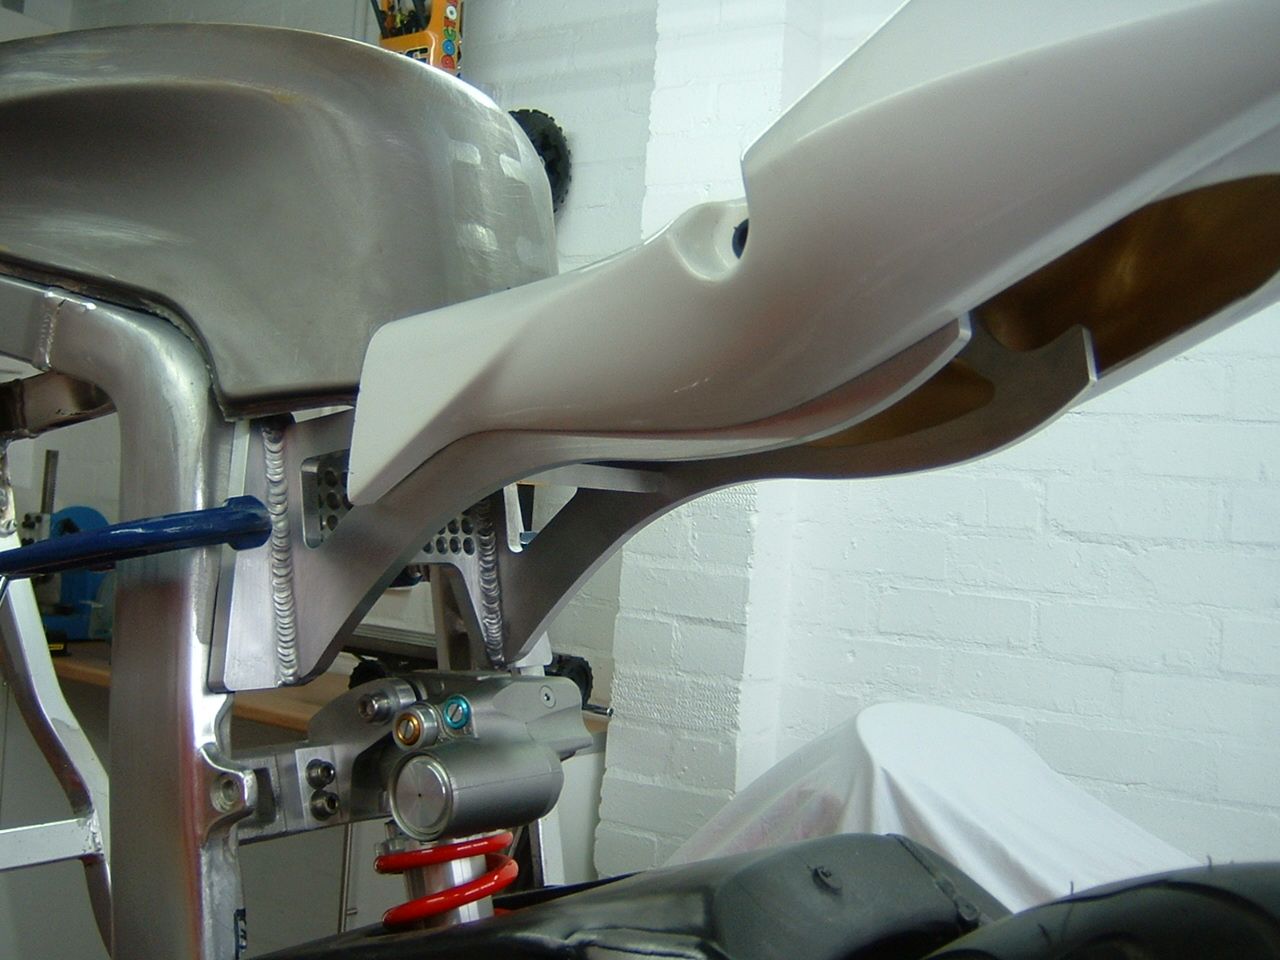
|
|
| Haut |
|
|
|
cabbie
|
Sujet du message: Re: Kwikasfaki Publié: 19 Jan 2012, 22:30 |
|
Inscrit le: 19 Jan 2012, 20:34
Messages: 135
|
Some progress! the tank mounting rubbers arrived so I can finish the subframe Got the seat unit and tank supports fitted 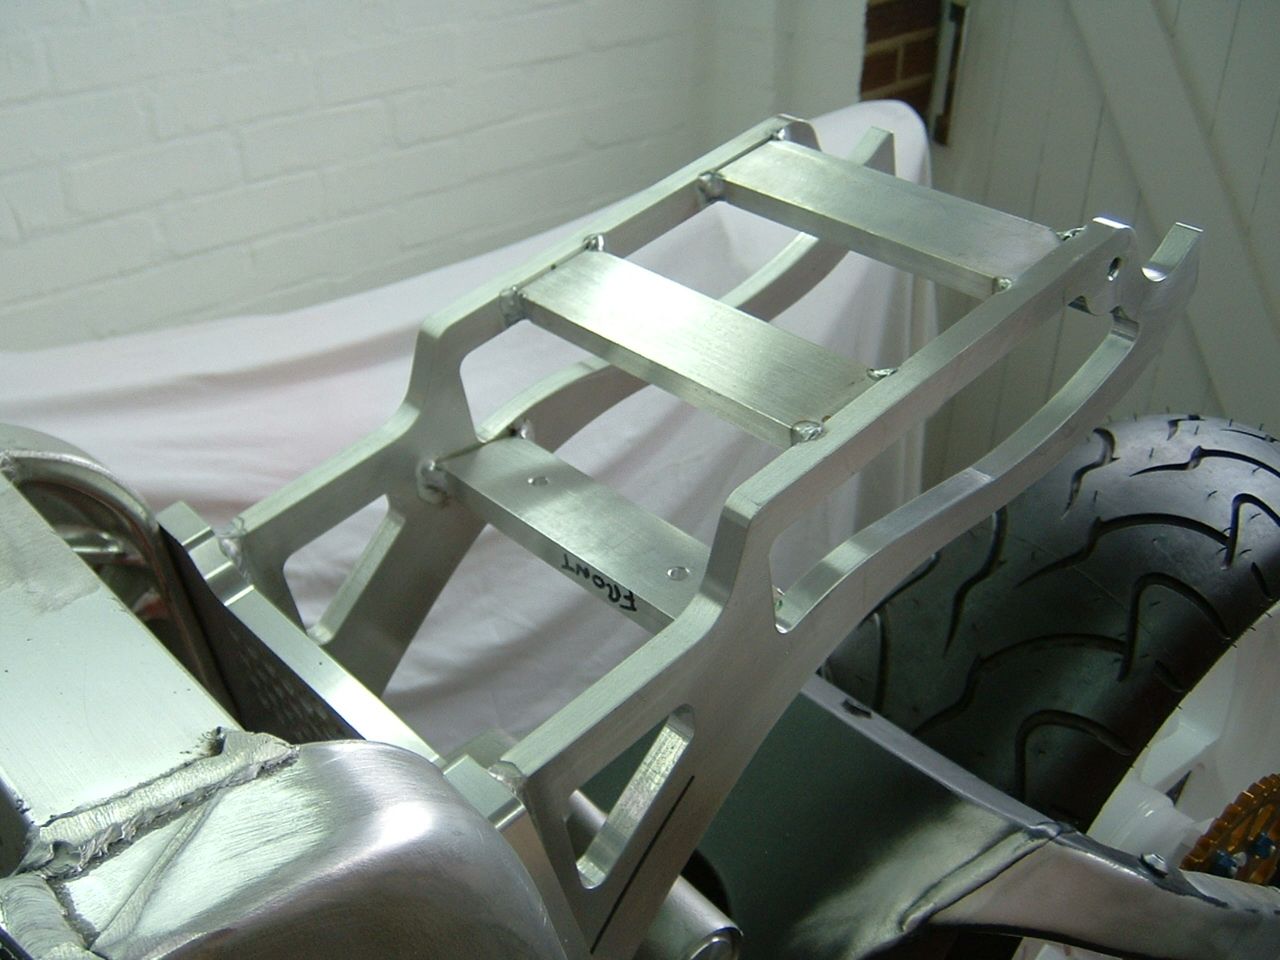 Tank mounted 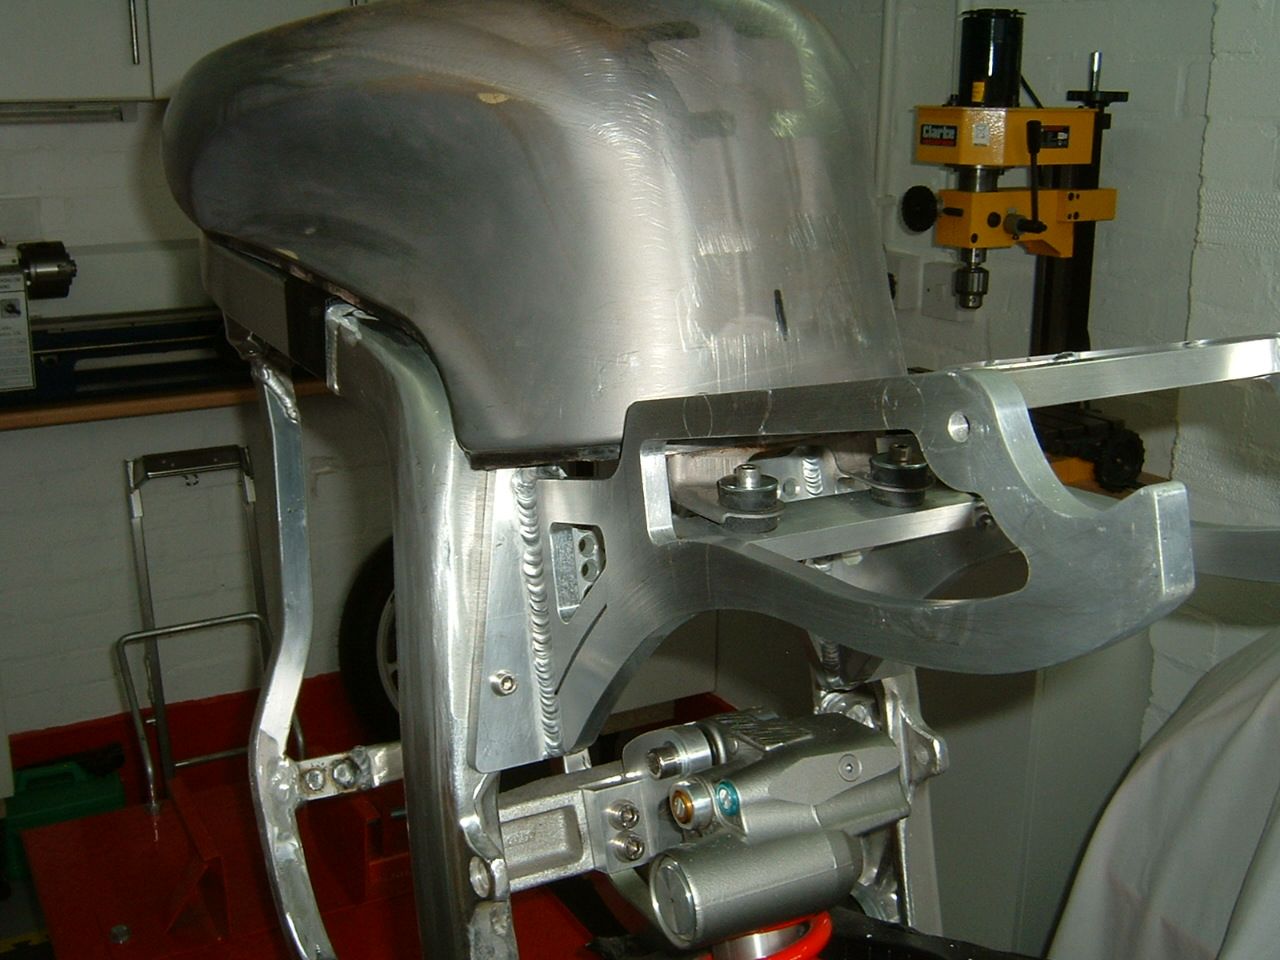 Made the seat unit spacers and studs 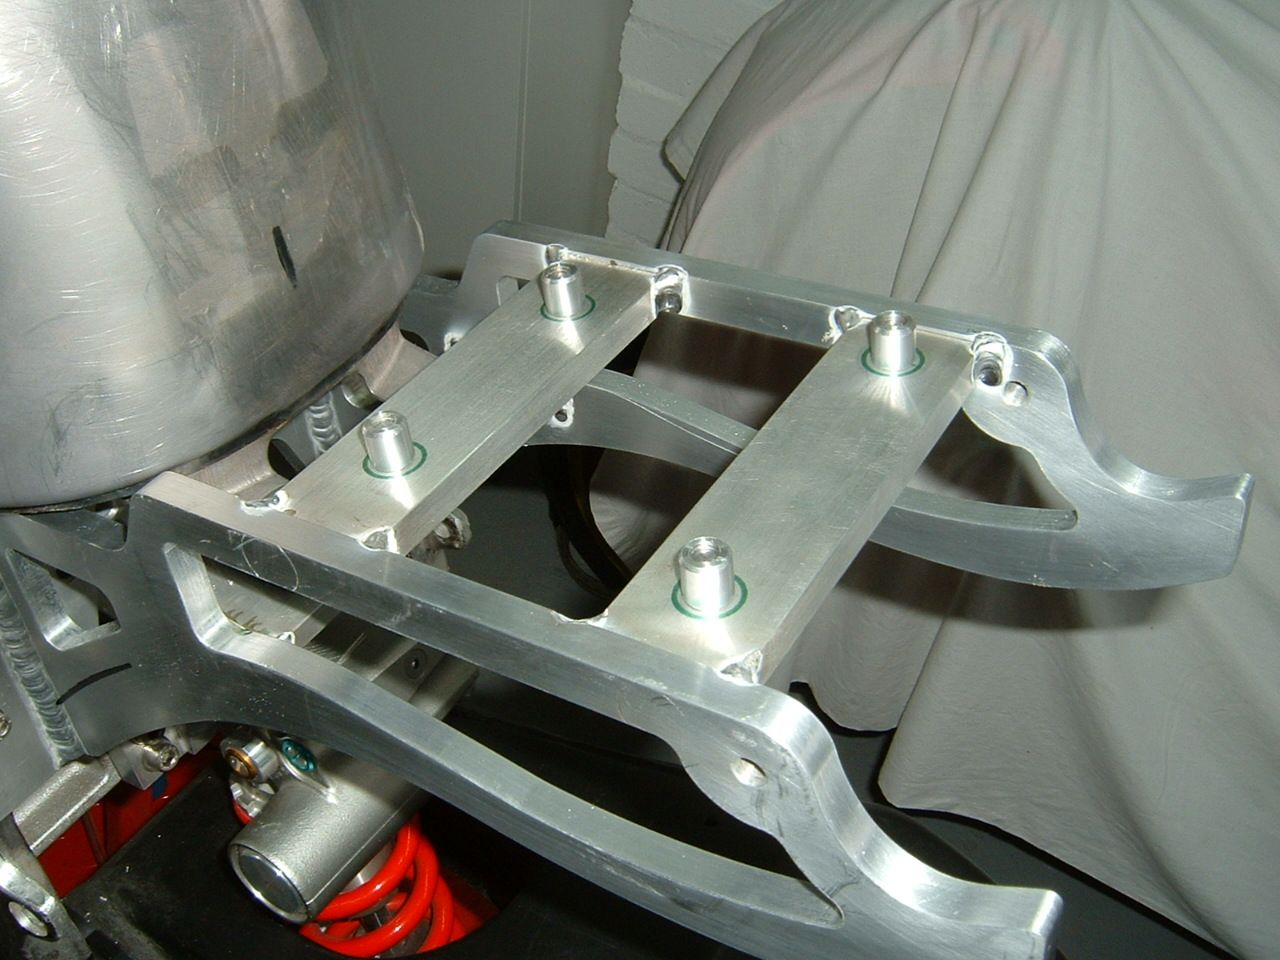 This is the seat fitted with the spacers, there will be a 5mm think alloy seat plate welded to the spacers so when the nuts are tightened the seat plate will hold everything in place plus the rides weight will be on the subframe and not the fiberglass unit. 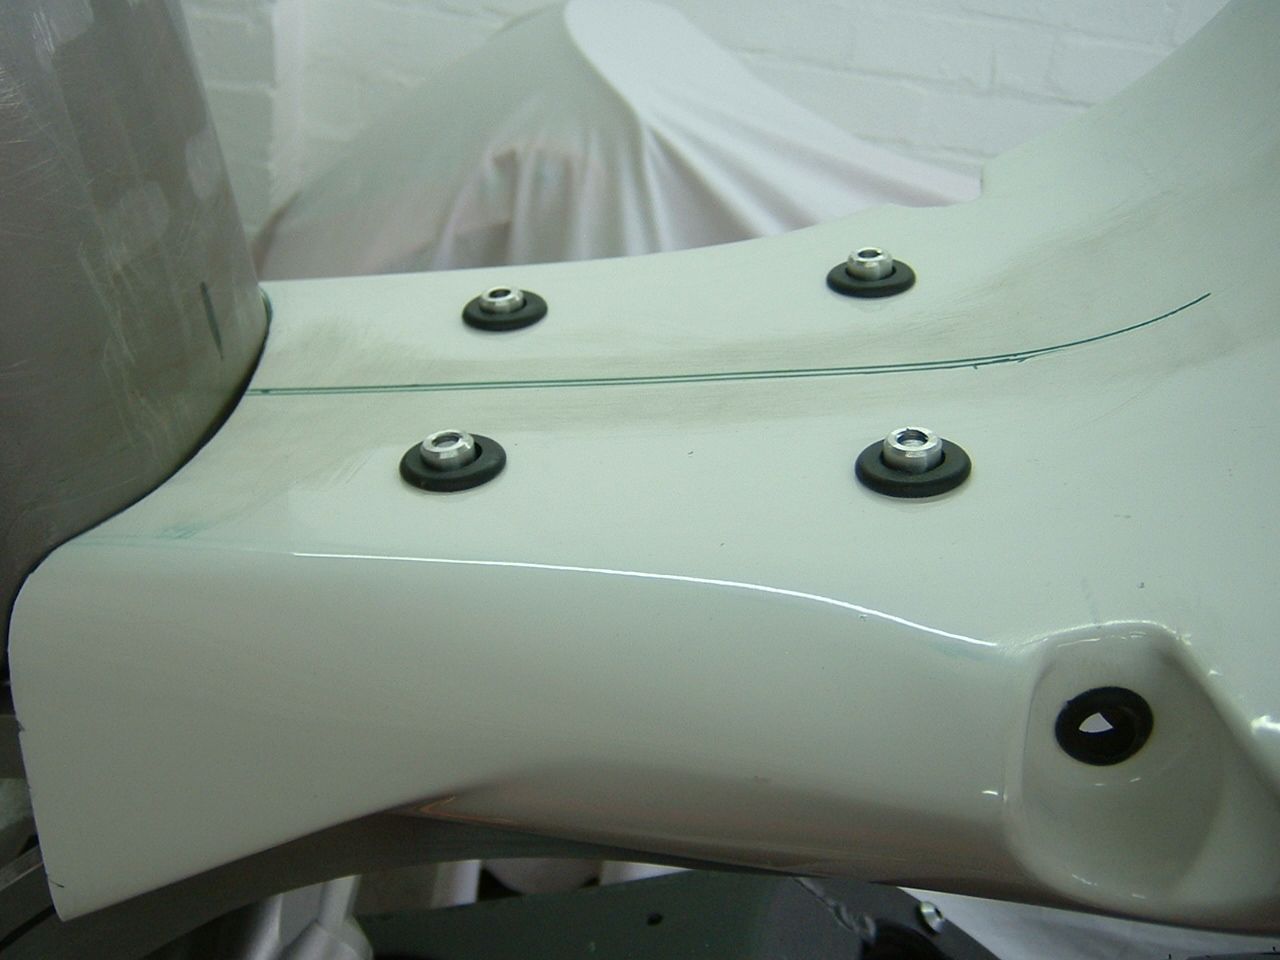 This is the template for the alloy seat plate, the plate will be fitted with 15mm hard foam and covered with vinyl. 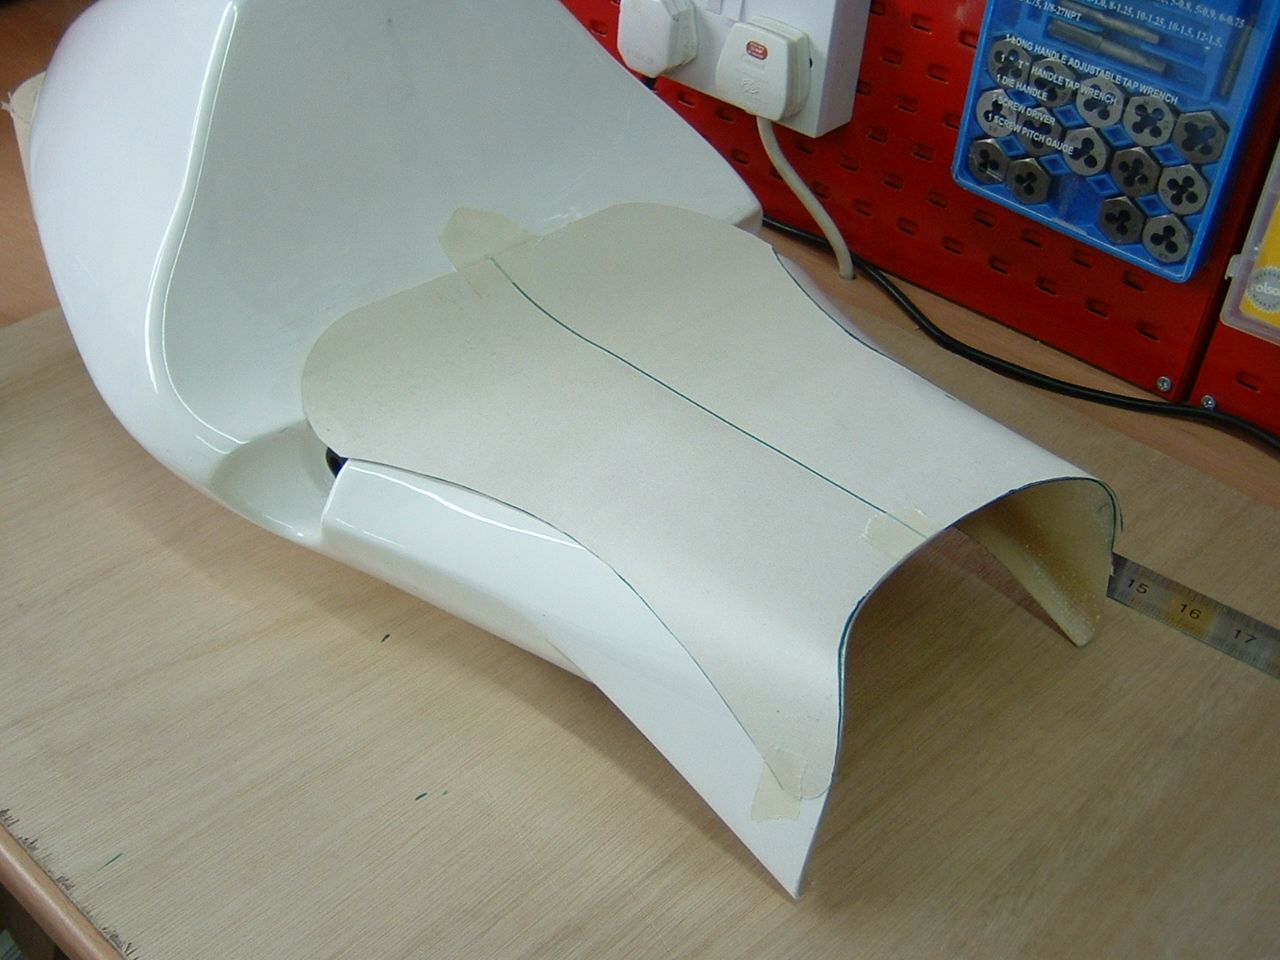 This is the tricky bit, making the seat, tank and frame look factory designed! this section will be welded in place and sanded down so it flows with the frame, tank and seat. 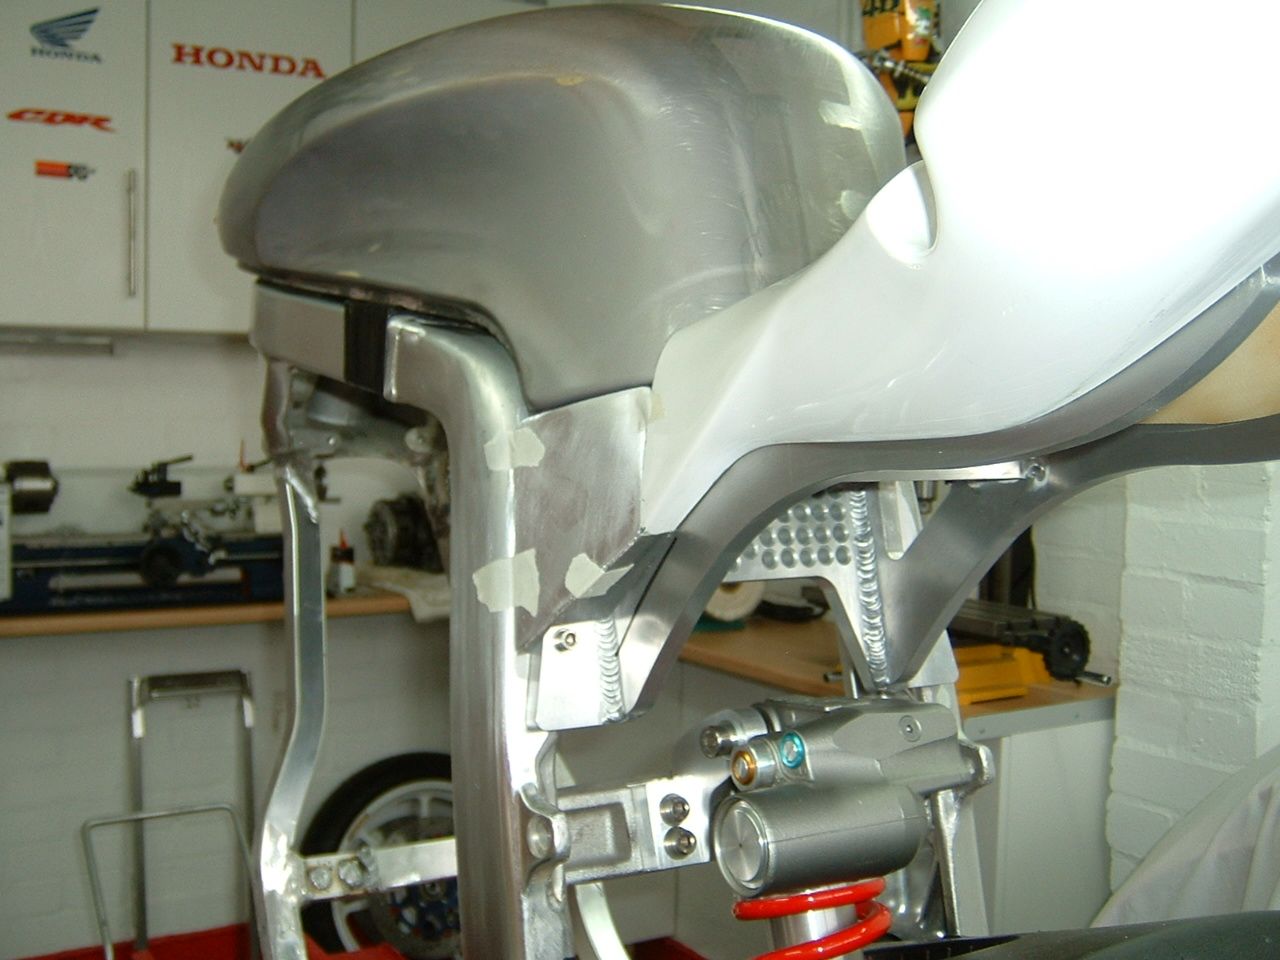 Made the side infill sections and had the welded on, I know this looks like a lot of messing about and time consuming work but I need a quality looking bike. 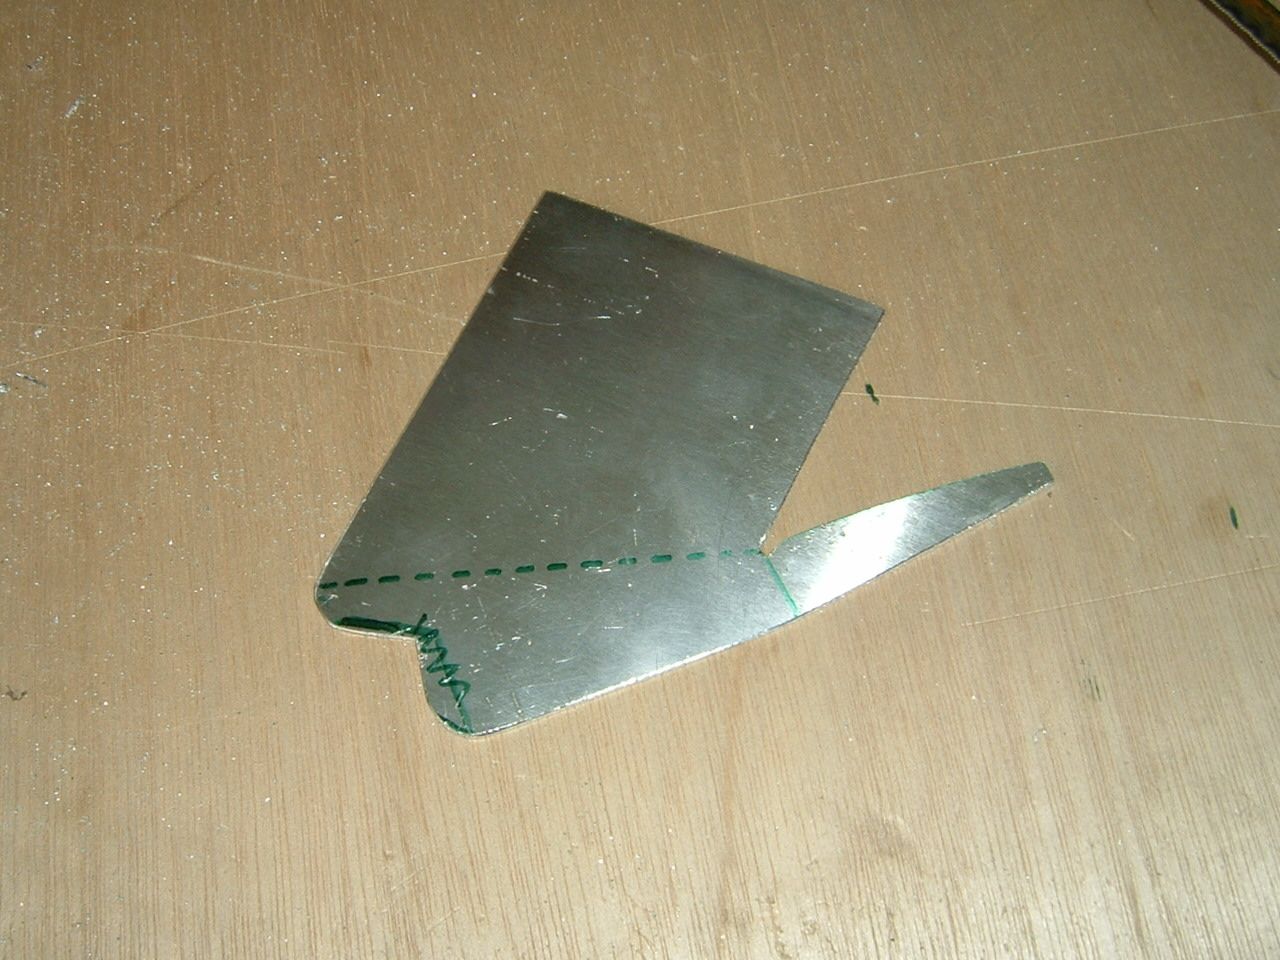 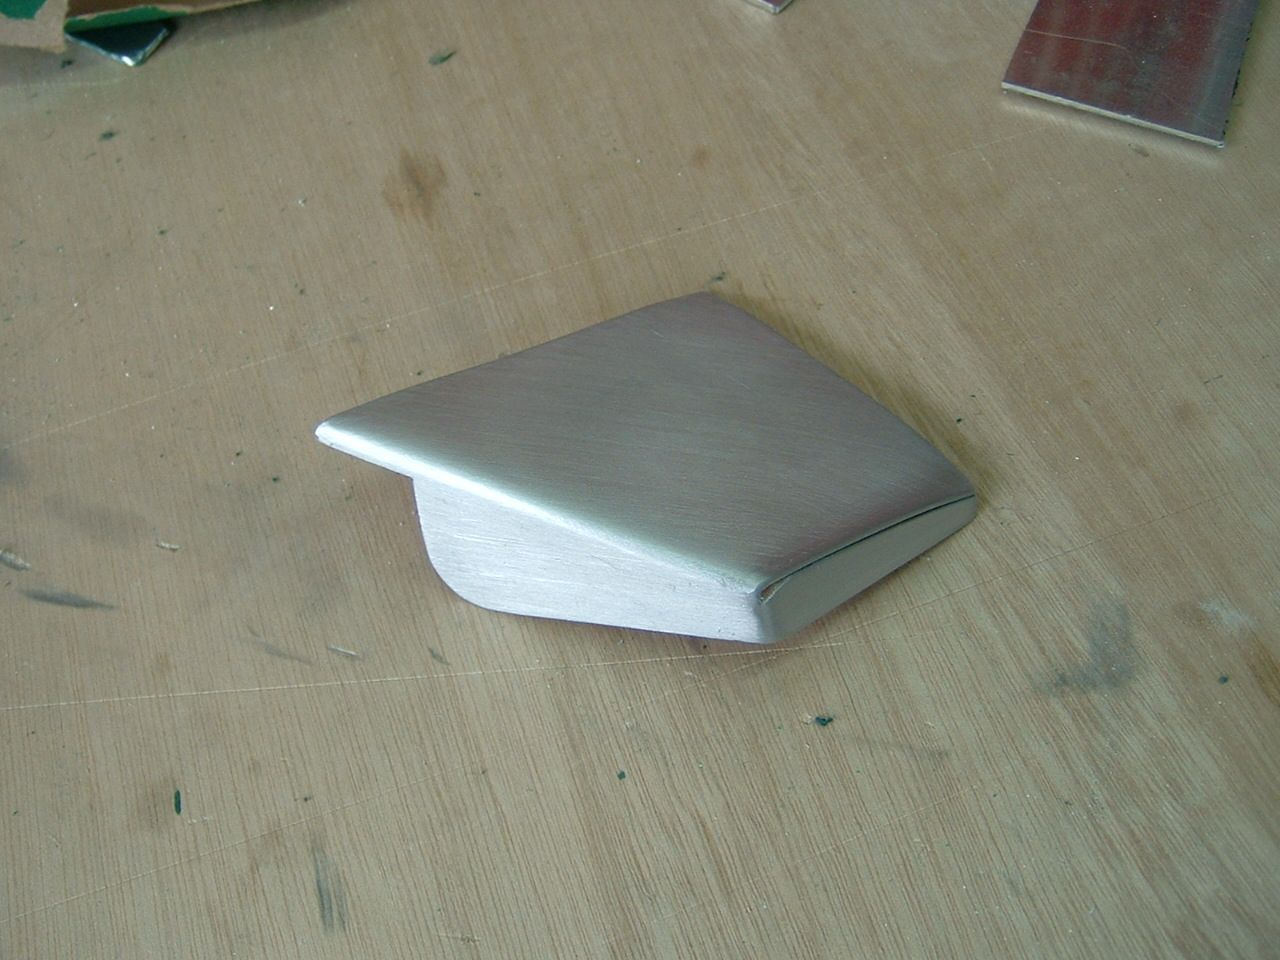 Just need to finish the lower sections and weld them in place 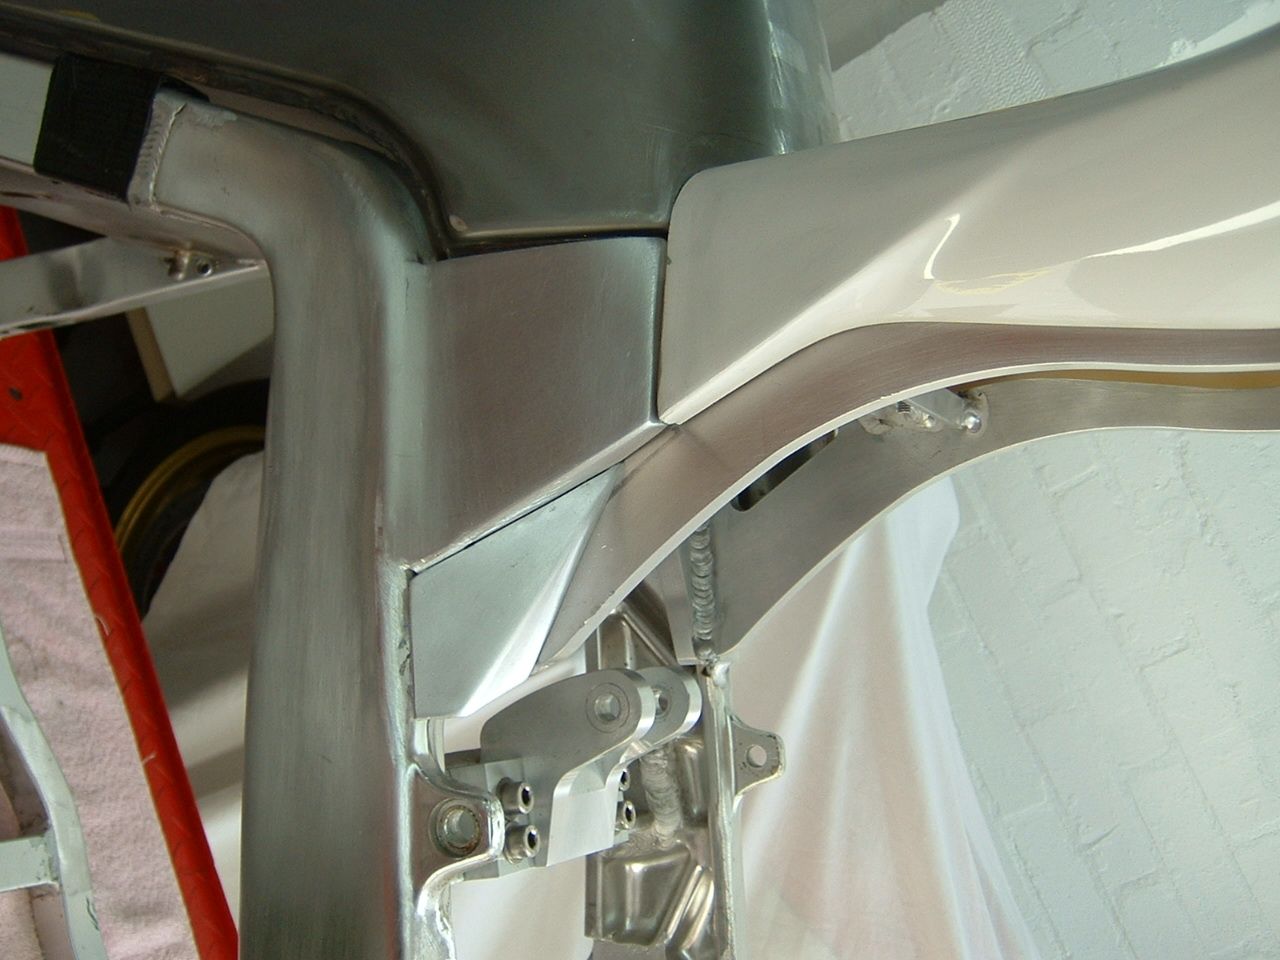 Good news is the off-set sprocket will be here in two days, this means the engine can be fitted.
|
|
| Haut |
|
|
|
cabbie
|
Sujet du message: Re: Kwikasfaki Publié: 19 Jan 2012, 22:32 |
|
Inscrit le: 19 Jan 2012, 20:34
Messages: 135
|
Here's the lower sections welded on 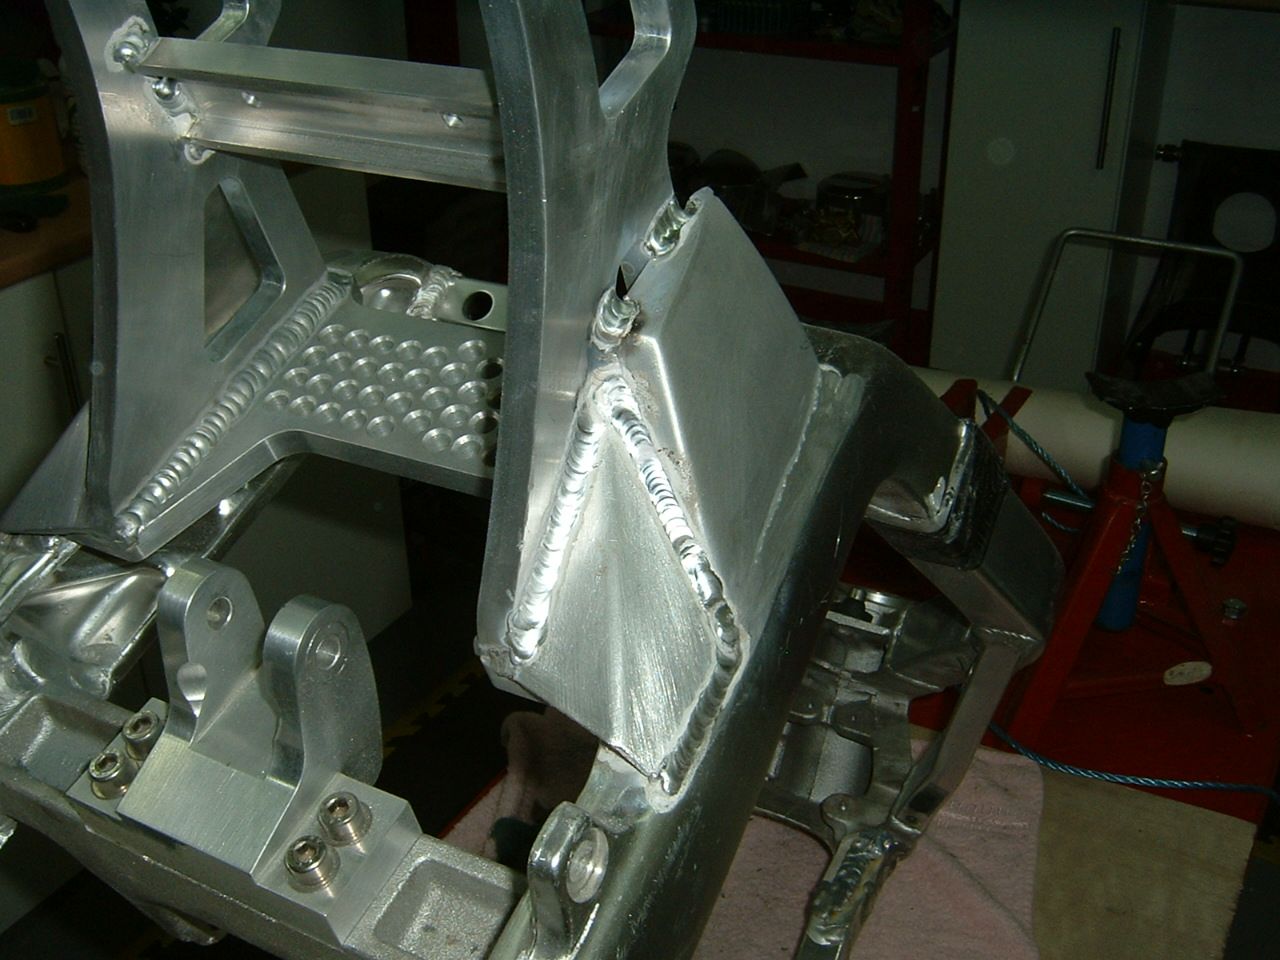 This took about 4 hours with a dremel and fine sanding and it still need a bit more work (fingers are sore so had to stop, lol) 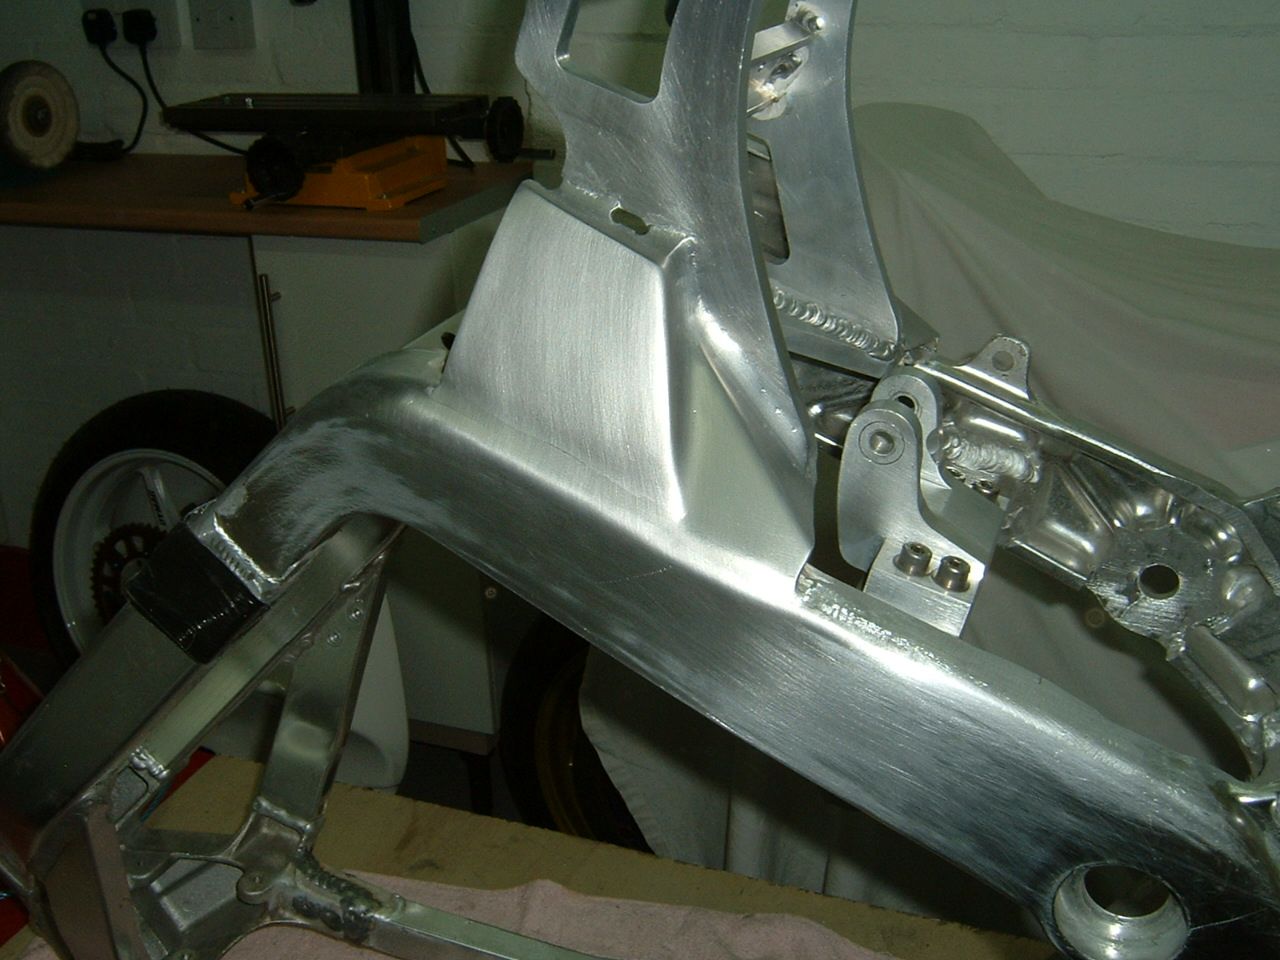 Here's how it's look, there will be a plate welded to the subframe underneath 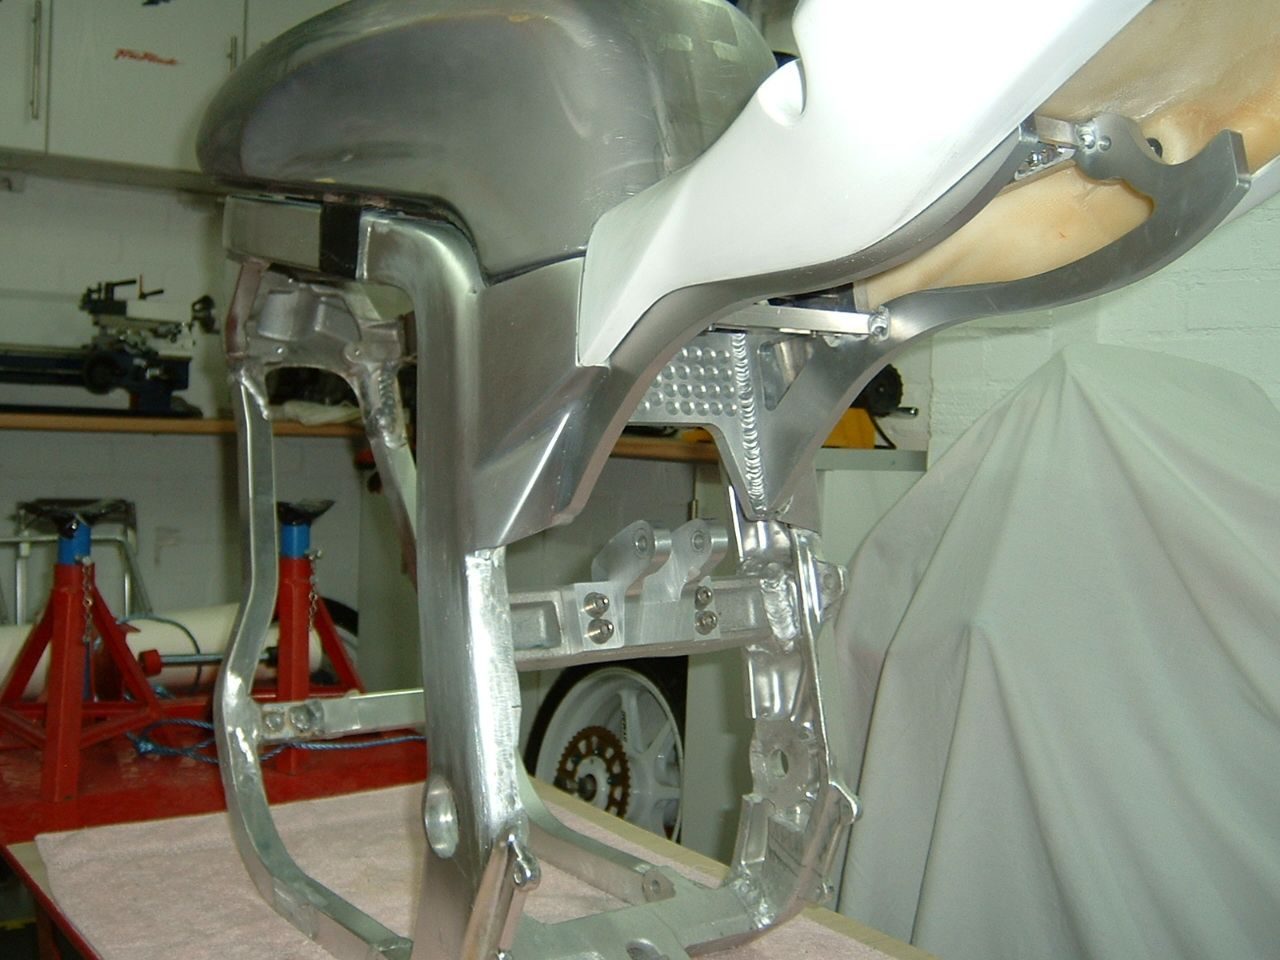 I'll fit the electrics box in the subframe out of sight tomorrow. Here's the magic leccy box I had made, this does everything instead of the loom, rectifier, regulator etc etc 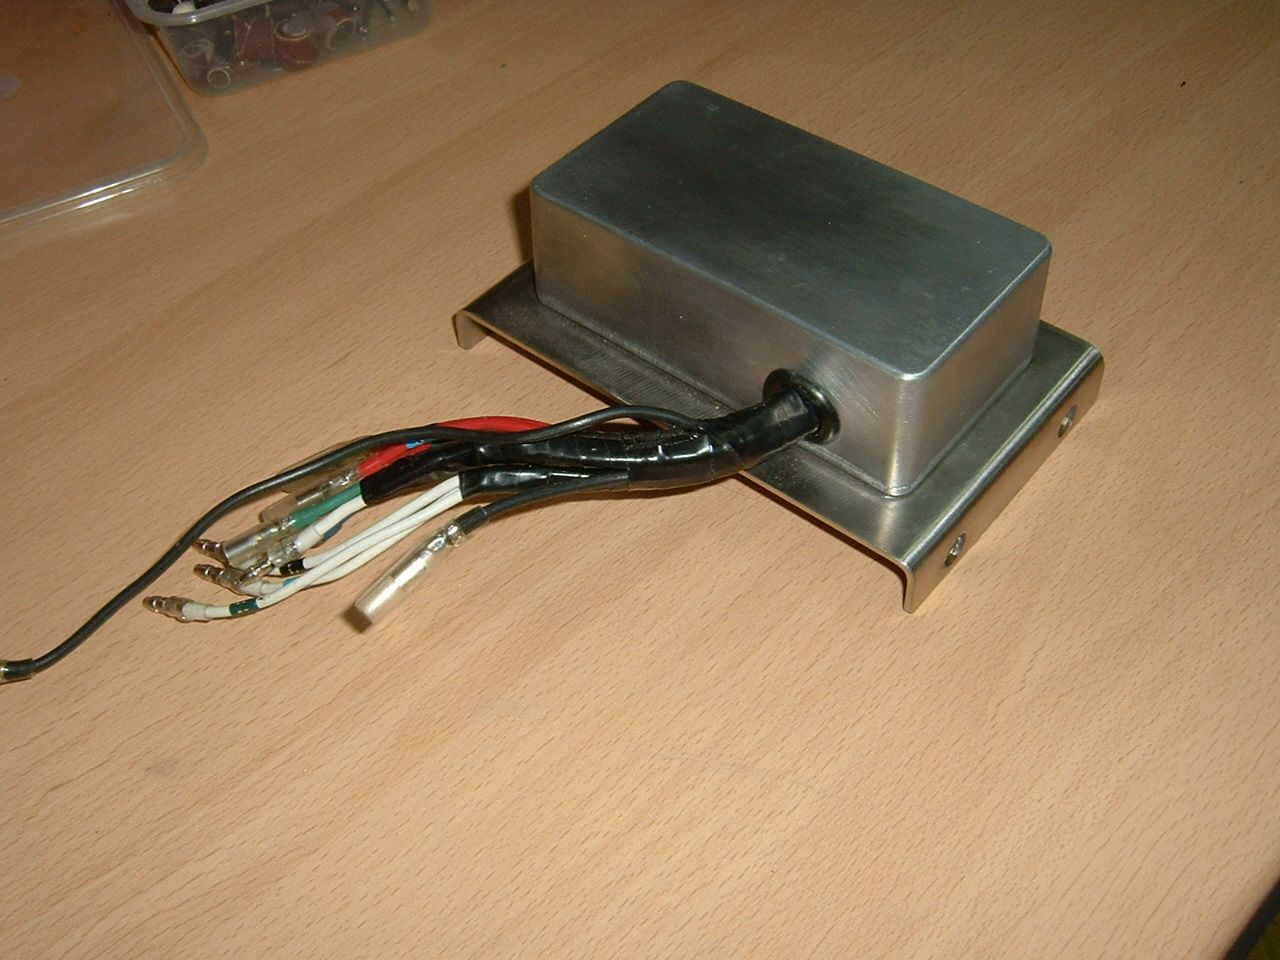 An here it is mounted in the subframe, I'll use counter sunk screws when I get some. 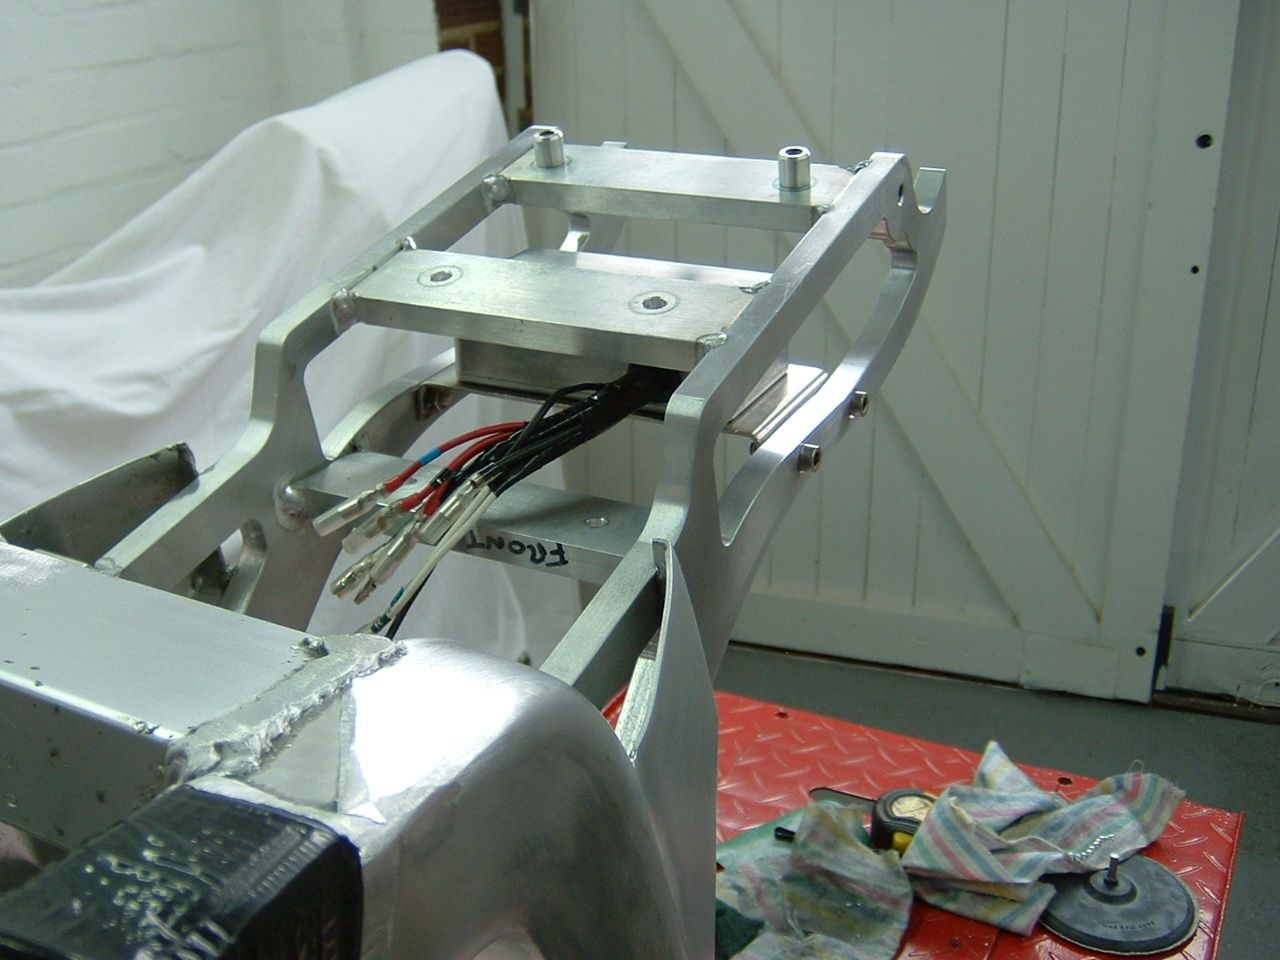 And the Talon off-set sprocket arrived so now the motor can be fitted, happy days. 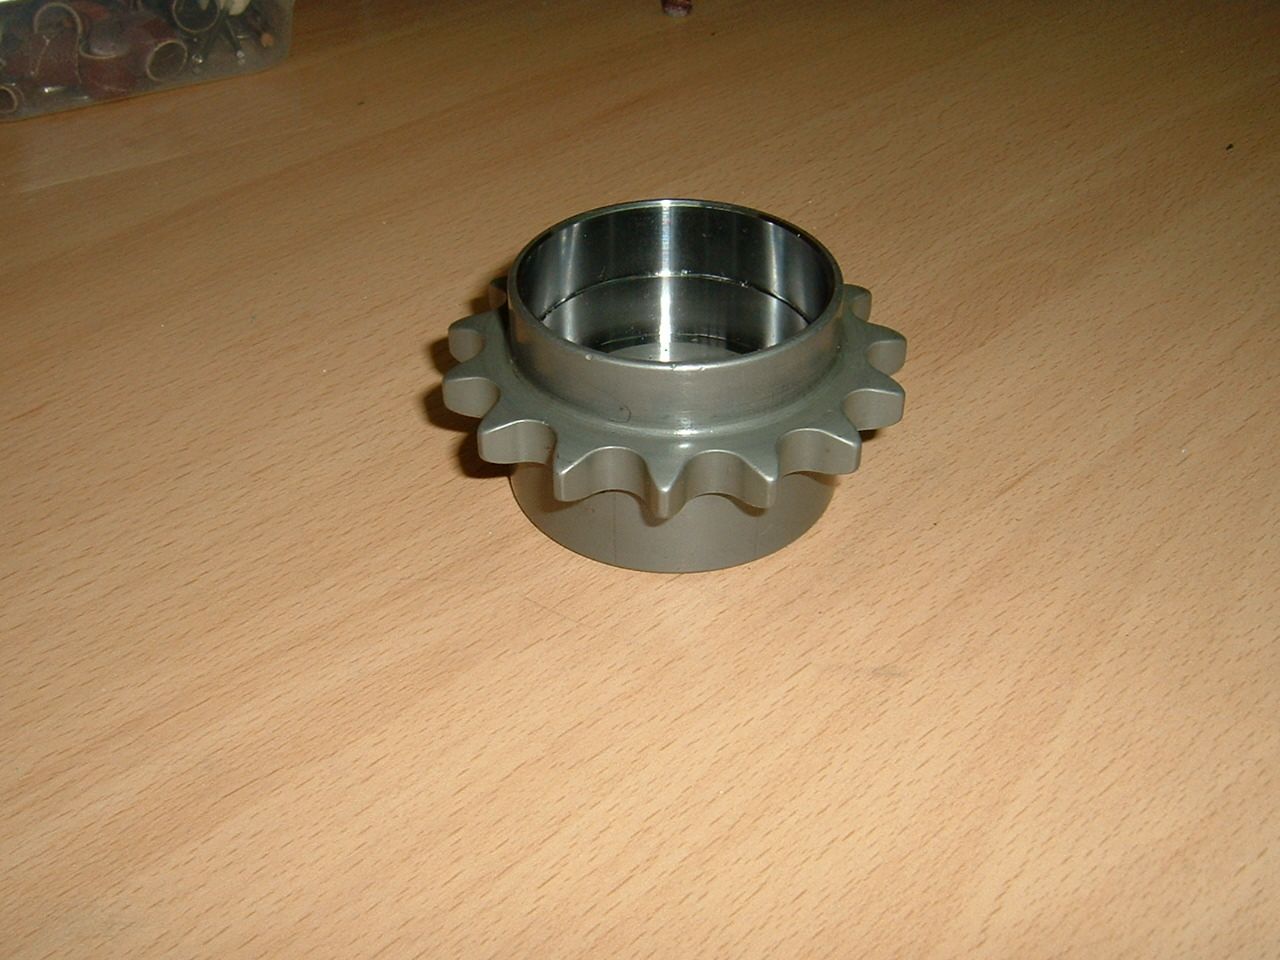 Got the motor in the frame and chain fitted, everything lined up good except the chain slider, the centre raised bit was 3mm out of line, I cut the raised bit off for now and I'll make a new one later. 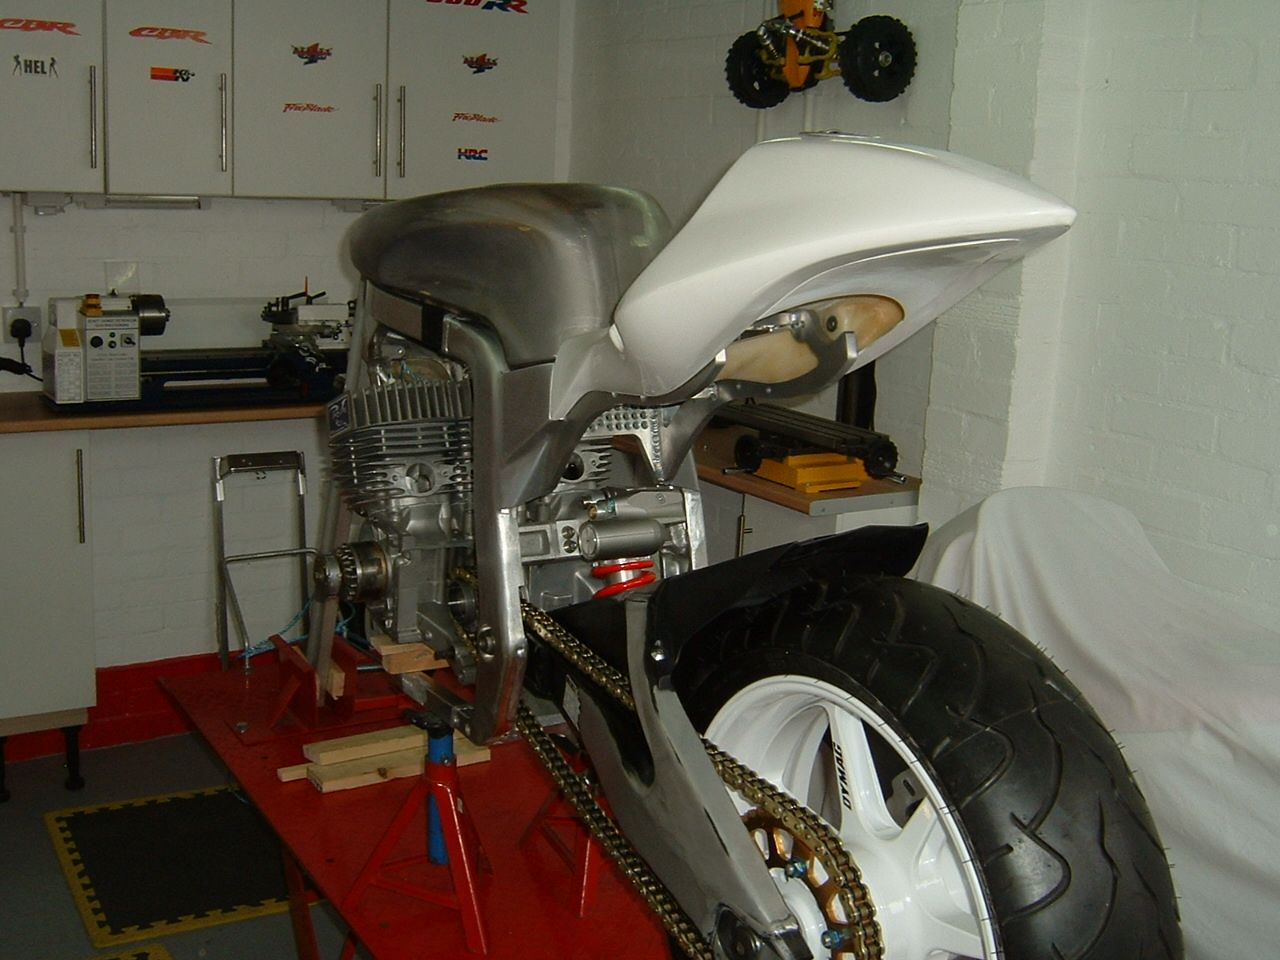 The motor is sitting dead centre in the frame, nice. 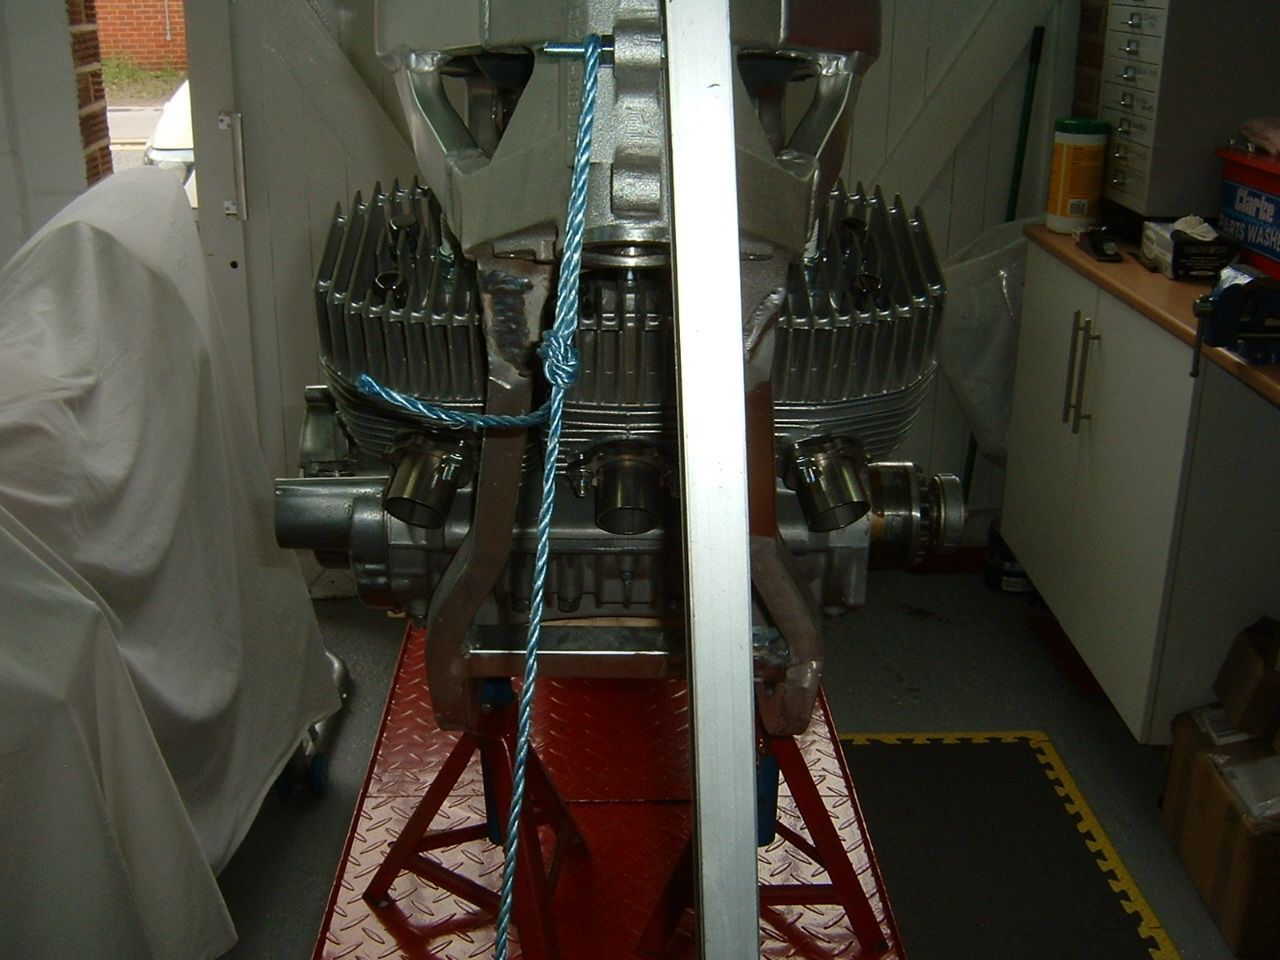 Just the engine mounts to do, I'm going to use two rubber bushes for each engine mount for a smoooooooooth ride, don't want tingling finger tips now do we. 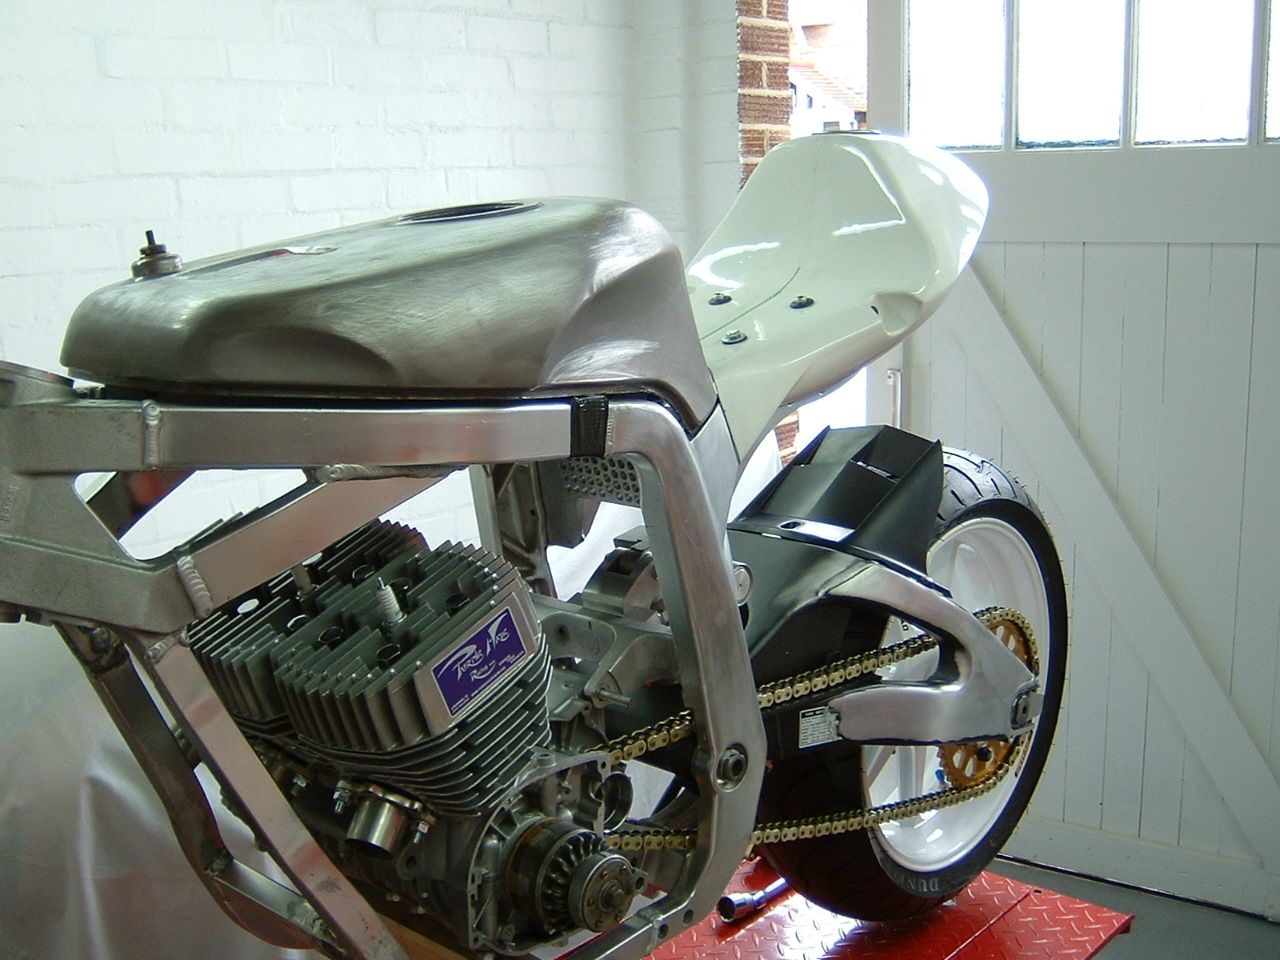 Once the engine mounts are done thats all the difficult fabrication work finished, I can chill out and bling it up a bit then. I had planned to just weld brackets to the frame and bolt the engine in, but after reading a few thread talking about sever vibration I've decided to double rubber bush all the mounting points, Might be a bit OTT but at least I'll know vibration won't be an issue when it's finished. These are from a Morris minor suspension and just the right size for the job 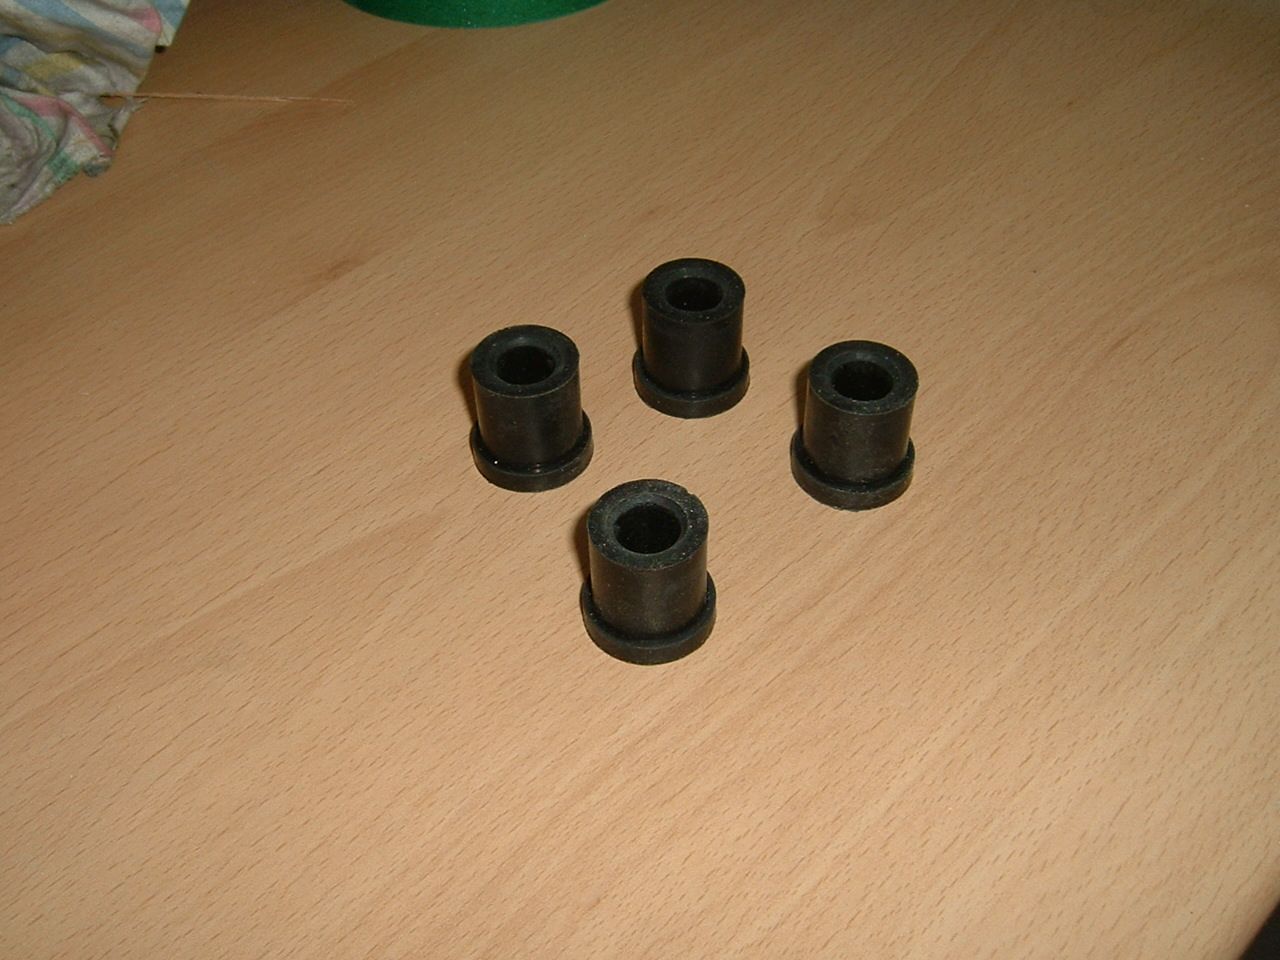 Bushes cut to size and spacers made 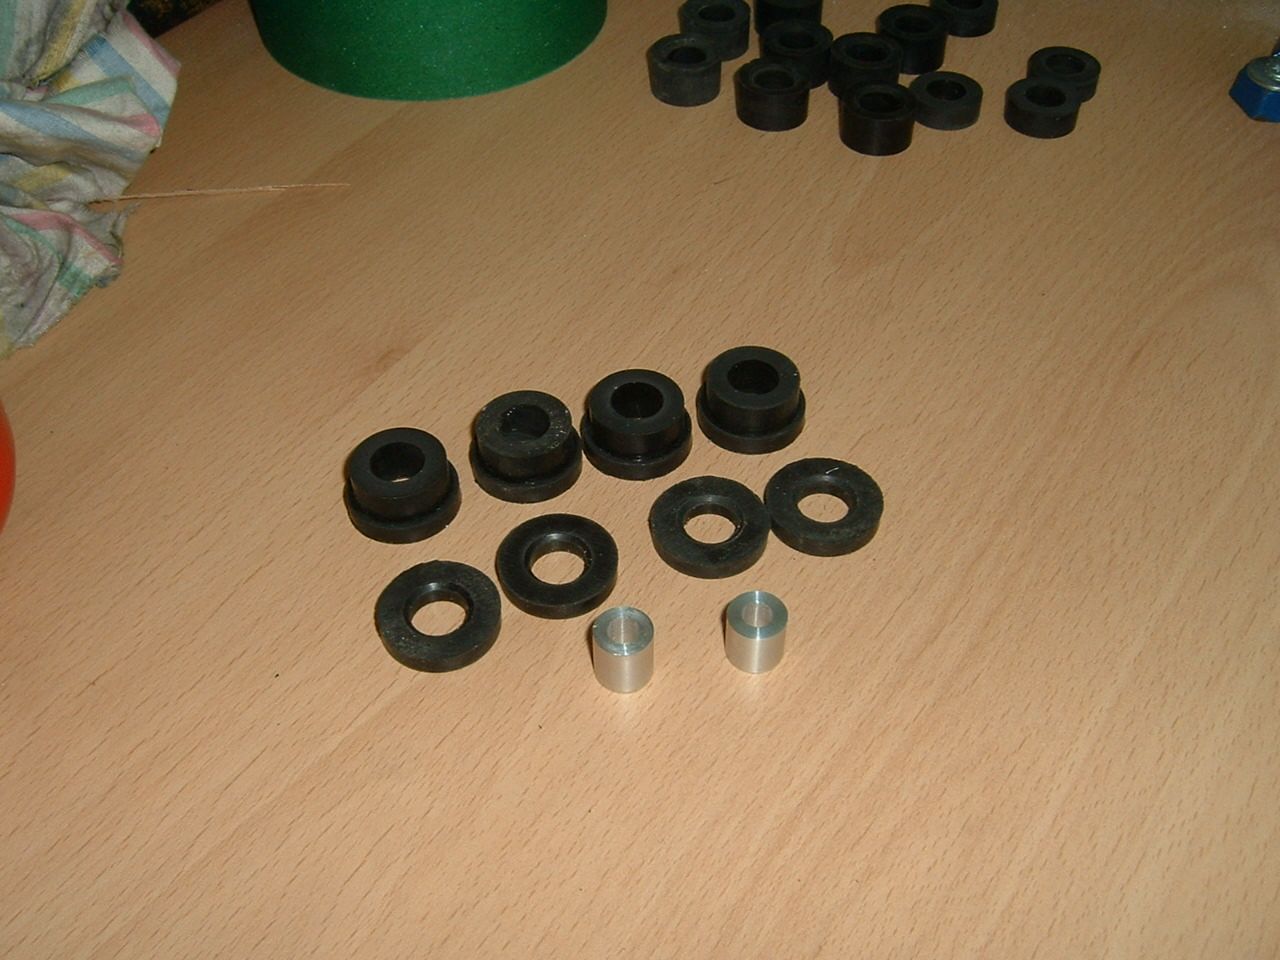 Here's the mounting plate with bushes 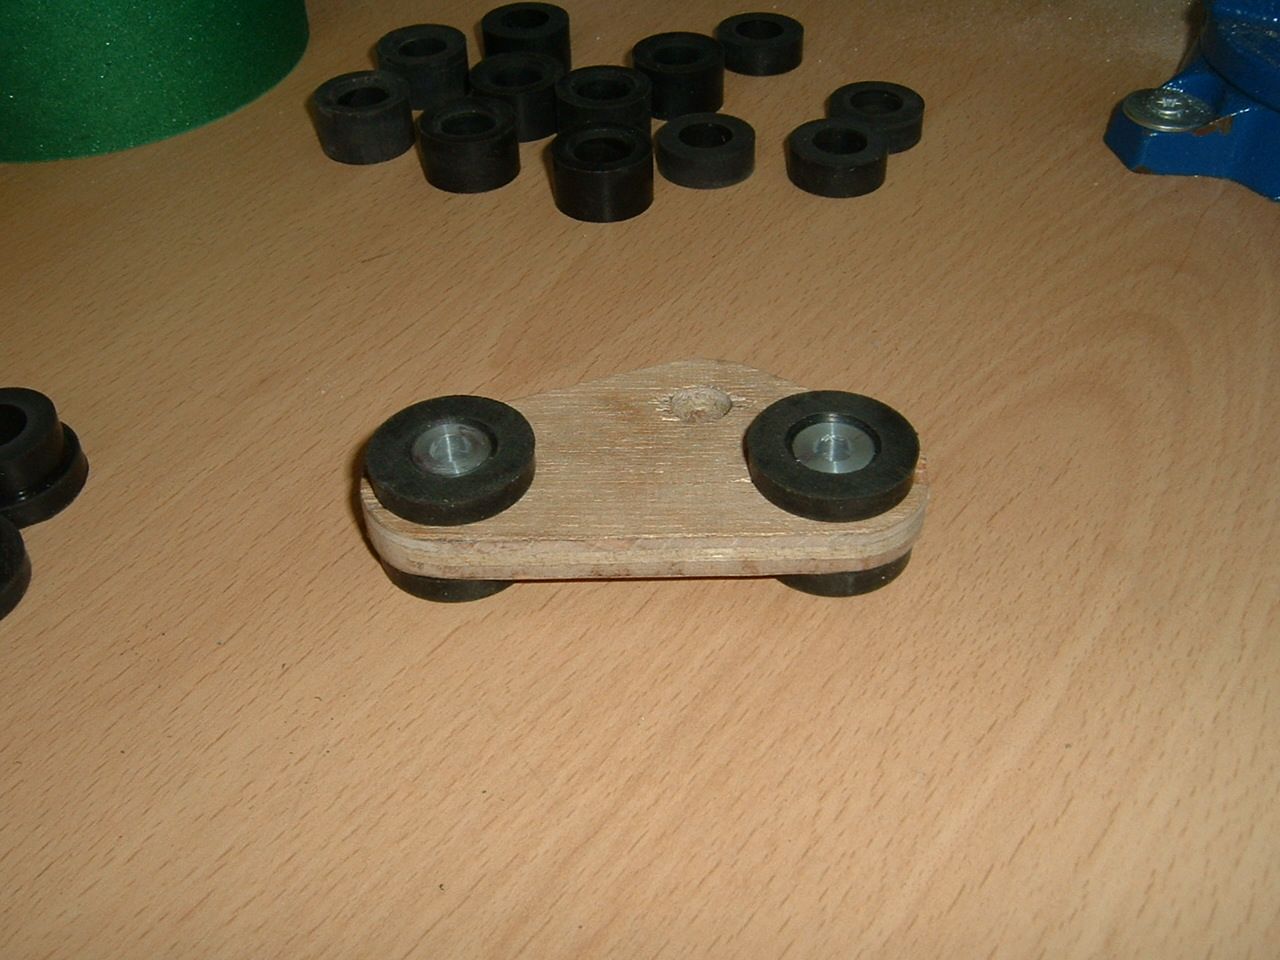 The side brackets made 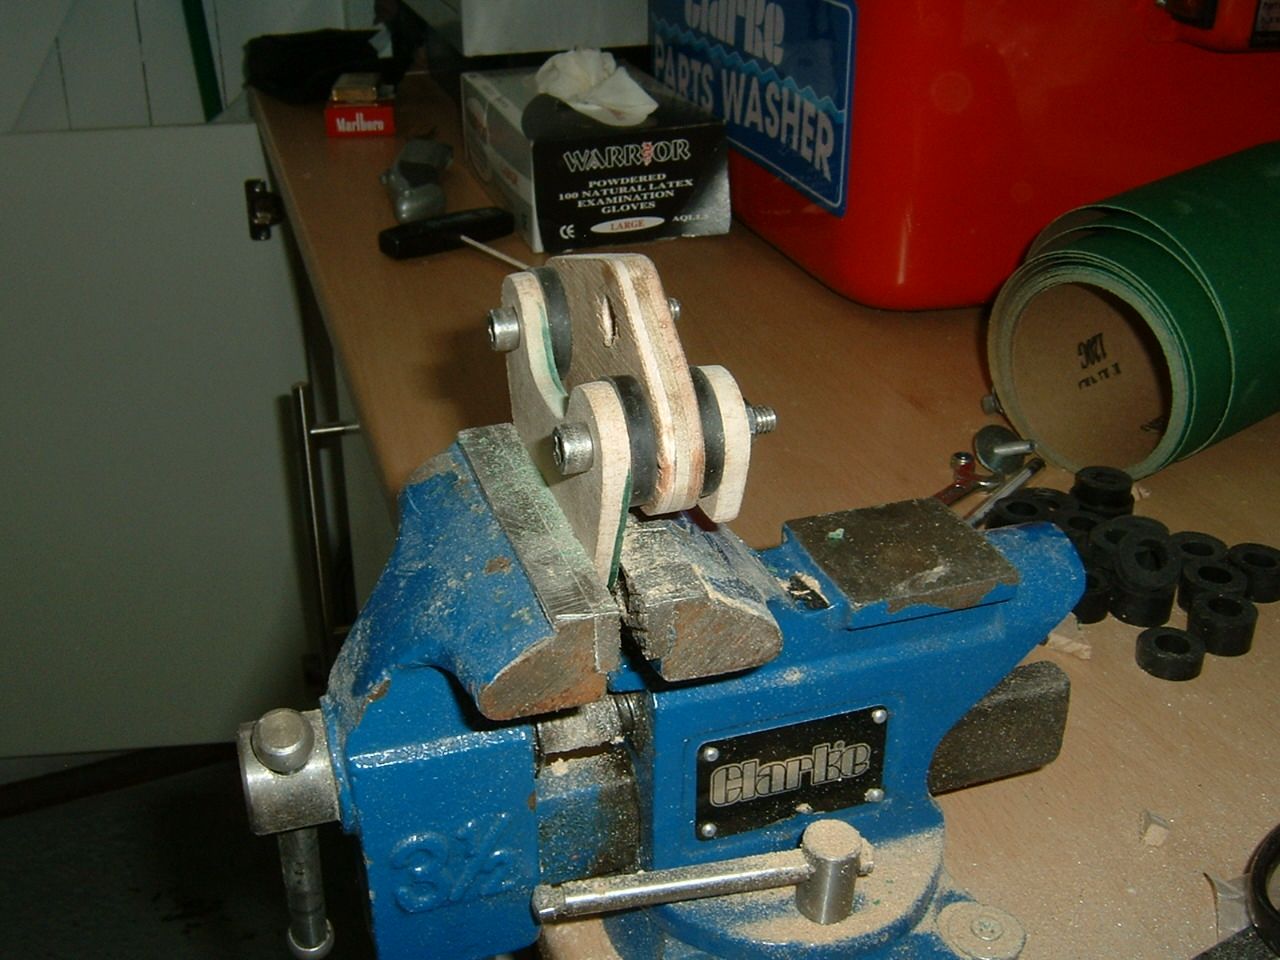 And fitted, the side brackets obviously get welded to the frame, it looks a bit silly in MDF but alloy should be nice. 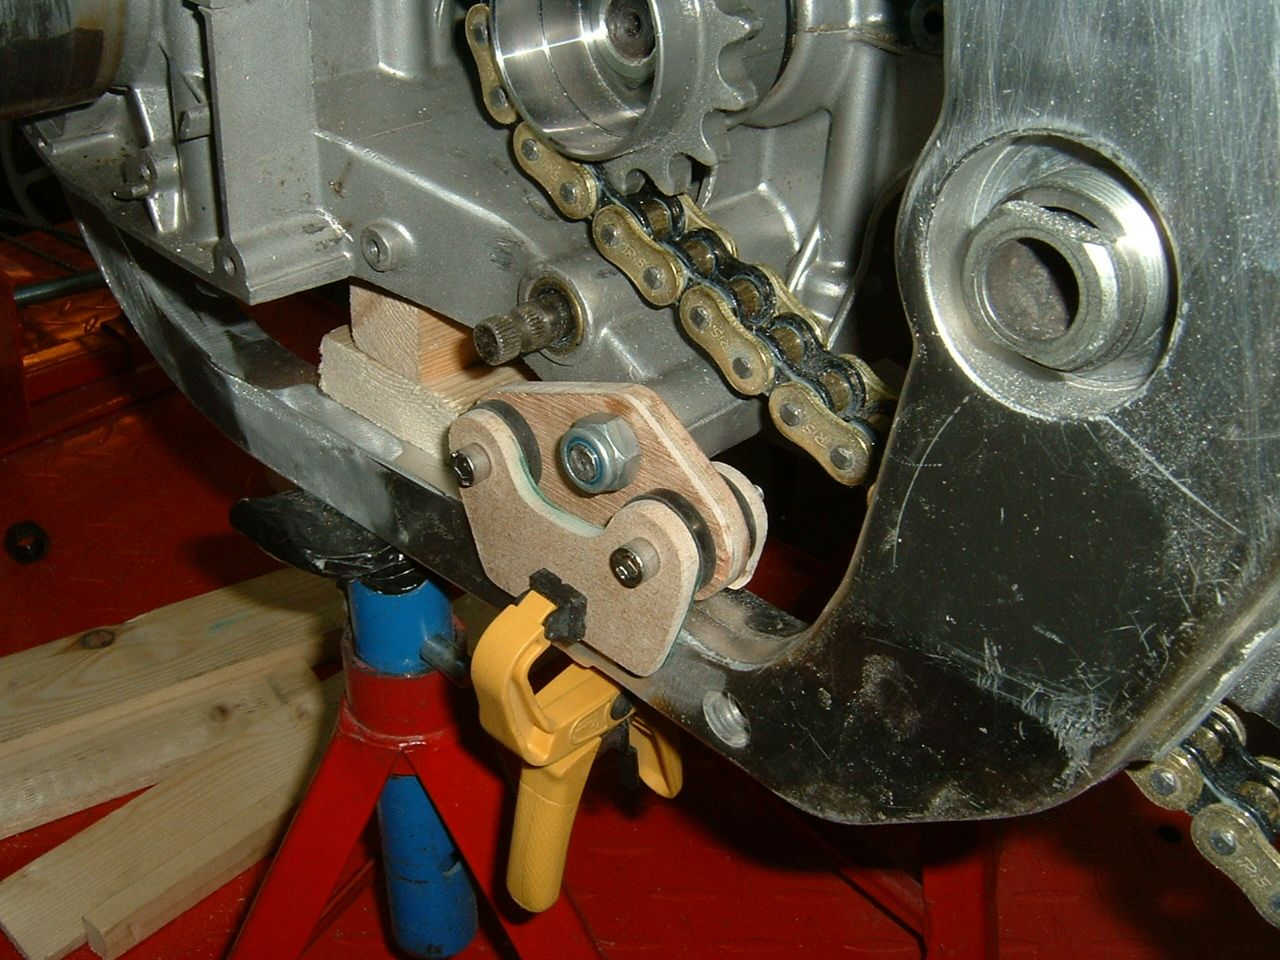 It's going to take all week after work to fabricate all the patterns and another 2ish weeks for the parts to be CNC'd but it's peace of mind that vibration won't be a problem.
|
|
| Haut |
|
|
|
cabbie
|
Sujet du message: Re: Kwikasfaki Publié: 19 Jan 2012, 22:34 |
|
Inscrit le: 19 Jan 2012, 20:34
Messages: 135
|
Little update: I finished off the engine mount templates and sent the drawings to my CNC man (he said he would get them done fast for me, nice man) While I'm waiting I'll get a few jobs out the way. Back brake, I'm using an R6 swing arm and Dymag wheel made for a gsxr 1100, I've made up spacers to align the sprocket on the left side, I got the caliper holder with the swing arm but the disc is way too large in diameter for it  I'll need to make the holder boss a little bigger too 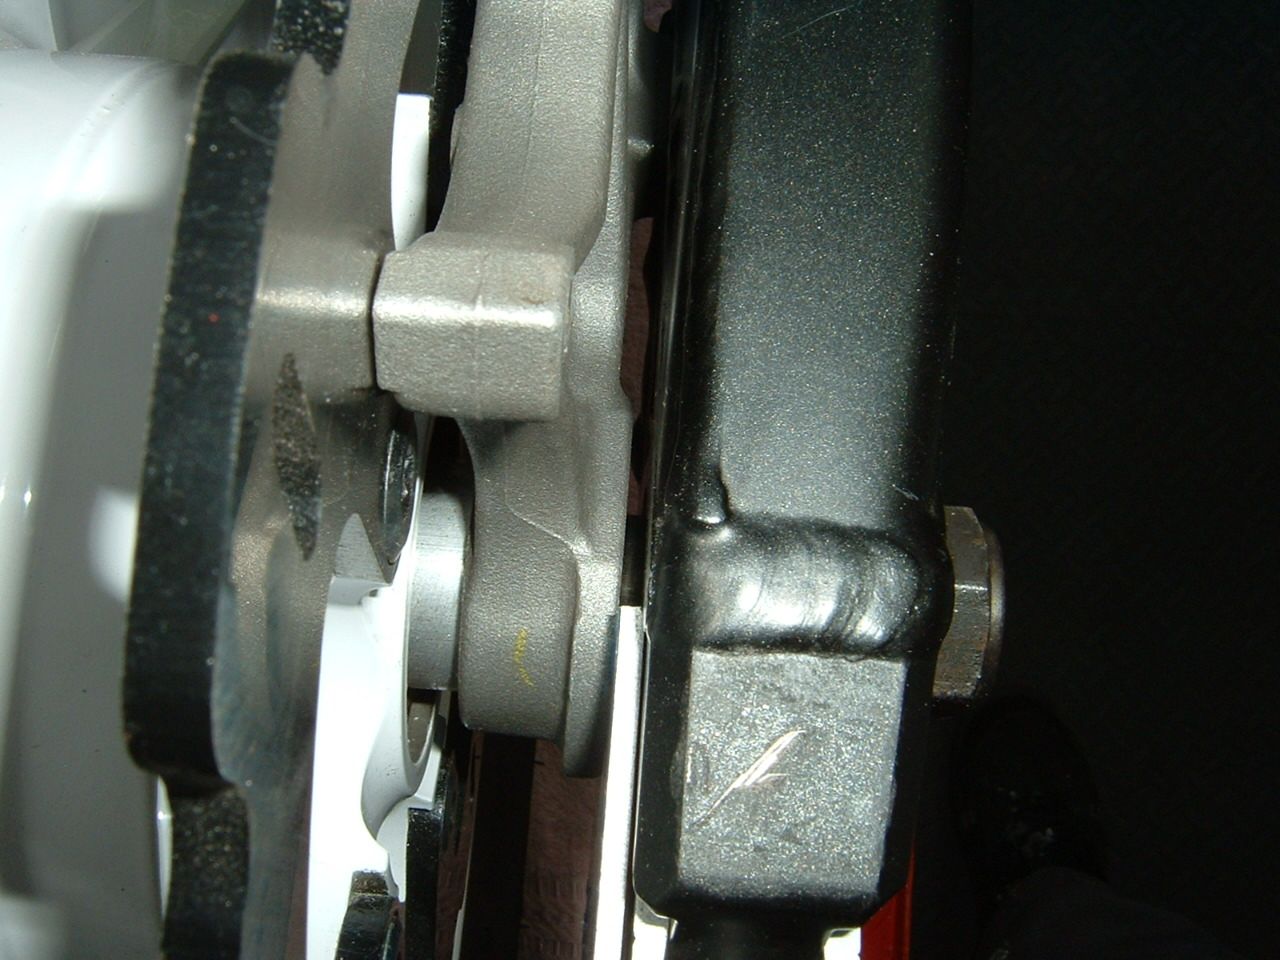 I want to use the little Brembo caliper also, some surgery is needed here 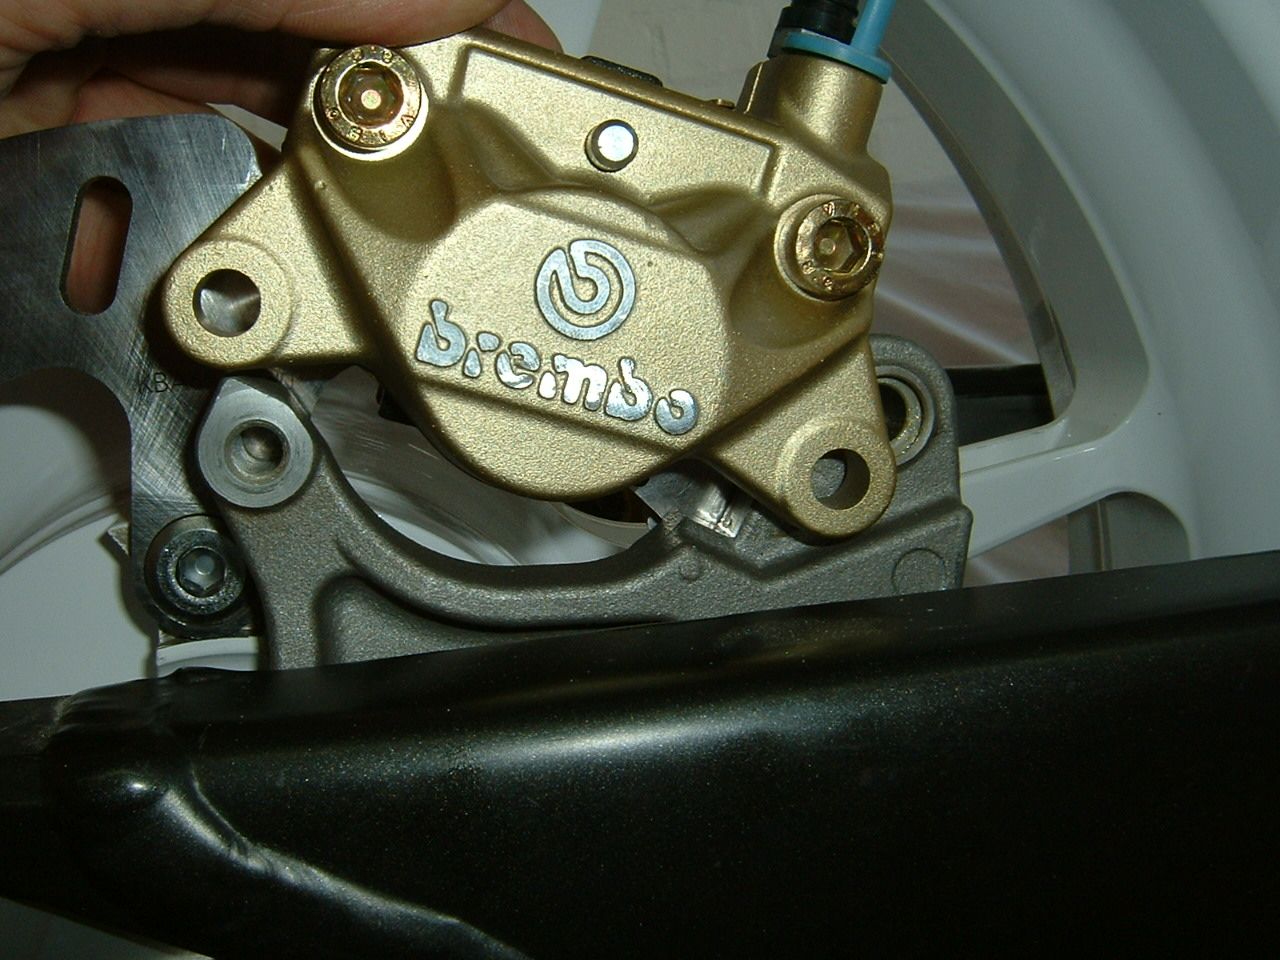 First job trim the holder and position the caliper then make a cardboard template of the new section to be fitted 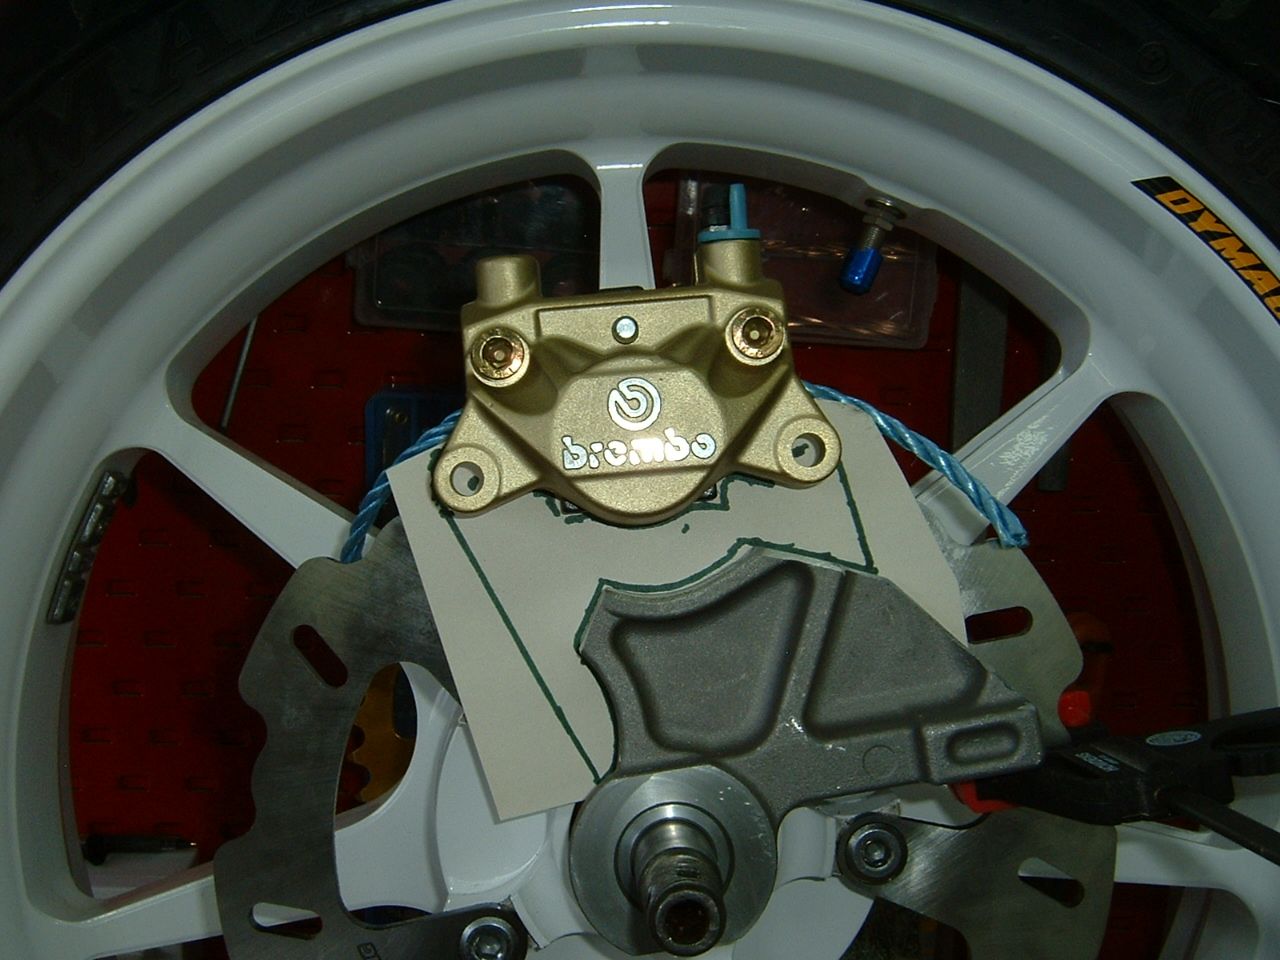 Next make an MDF template the correct thickness and check for fit, this looks perfect so I can now make the new section from ally and weld it in place, once done it'll be bead blasted to blend the new section in and look like one cast piece  Decided to get the seat base made: 5mm alloy plate cut to shape 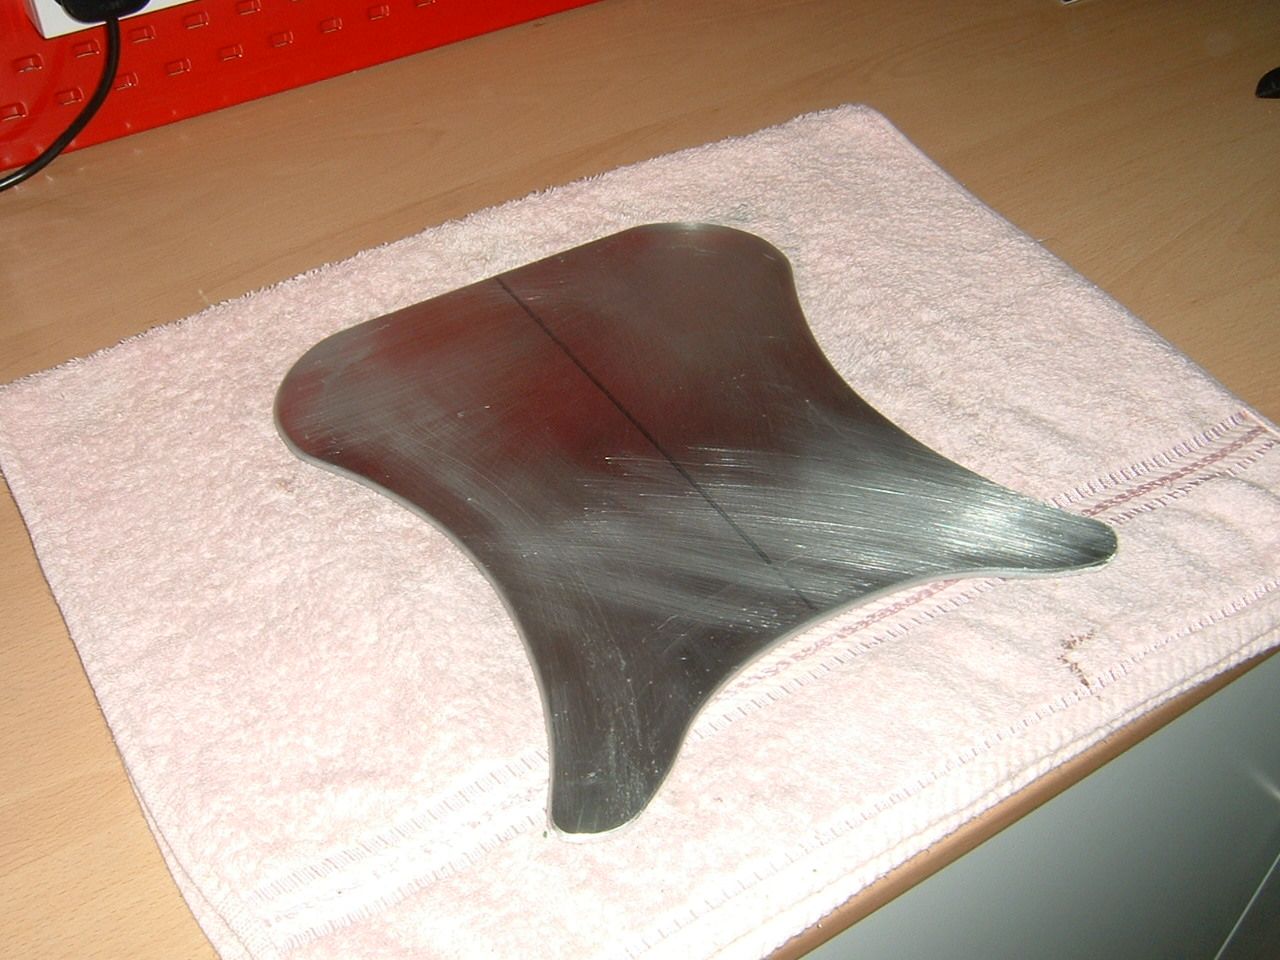 I've drilled it out to lighten it, fitted the spacer (I've just pressed them in for now and will get them welded next week) also put a fold in the back 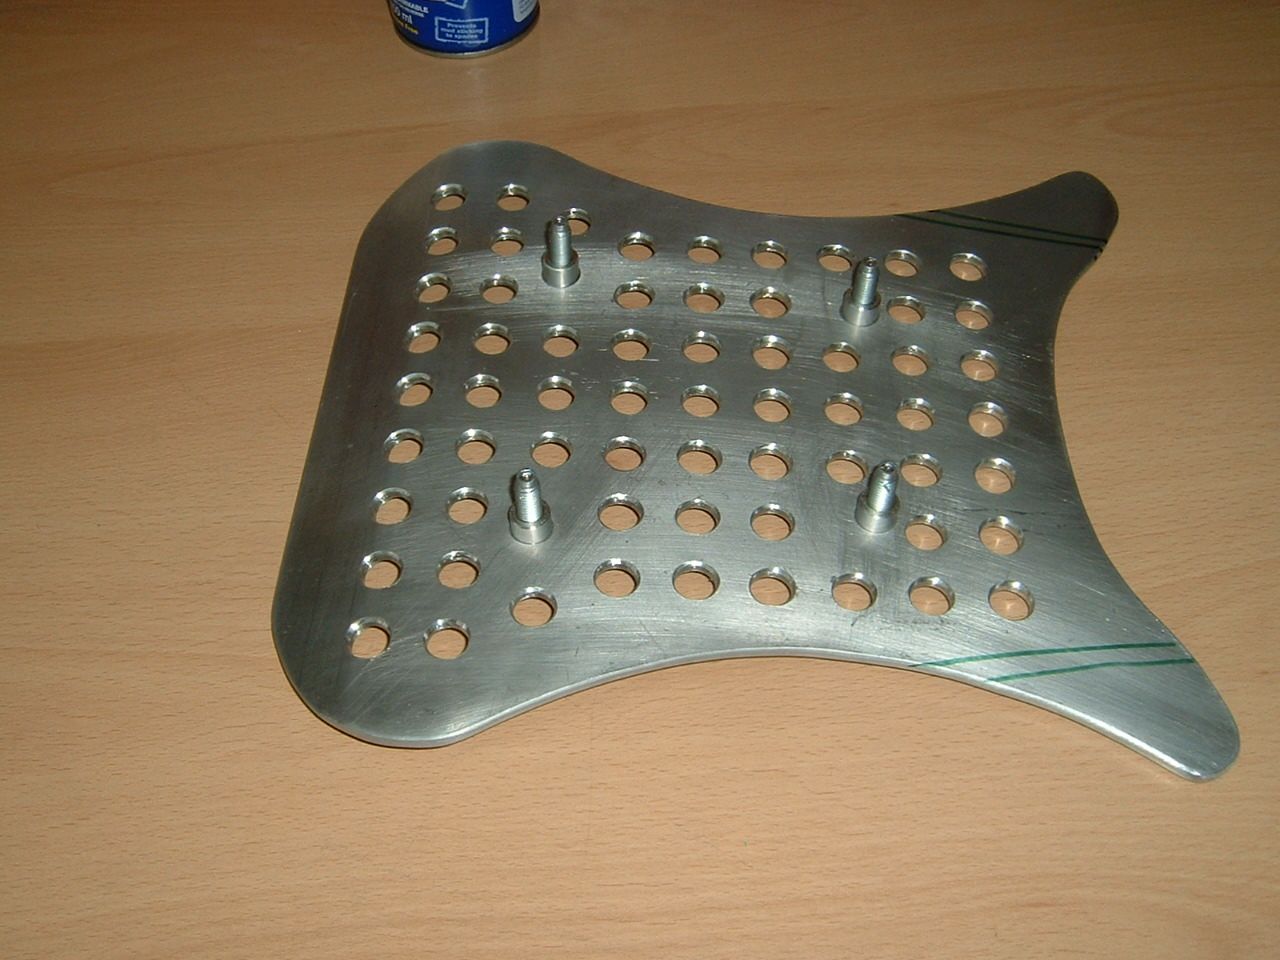 Checked for fit, not looking forward to folding the front edges, get this wrong and it's start again time! 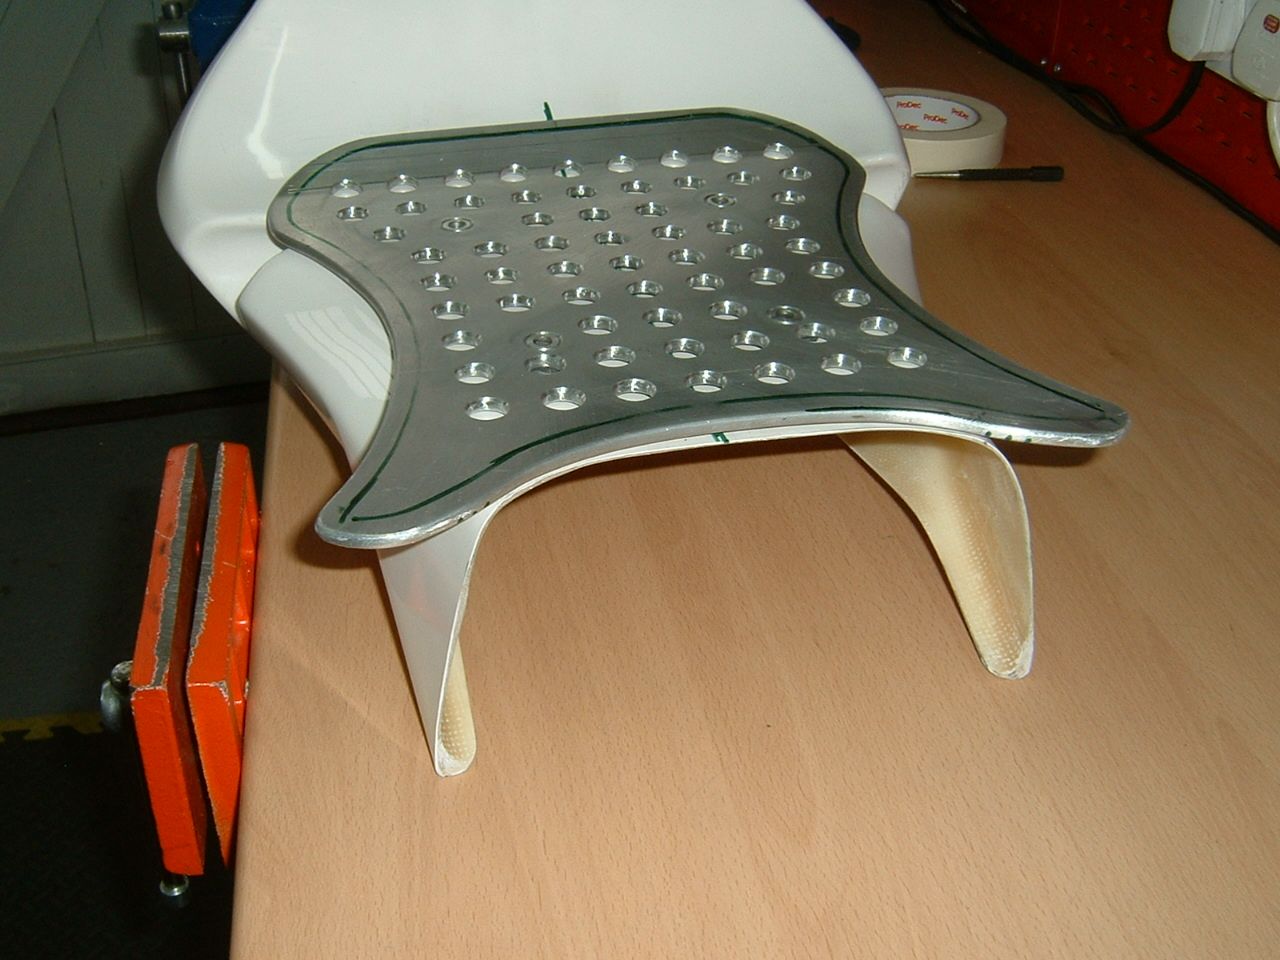 The front folds could have been slightly closer to the seat but I'm pleased with it as is 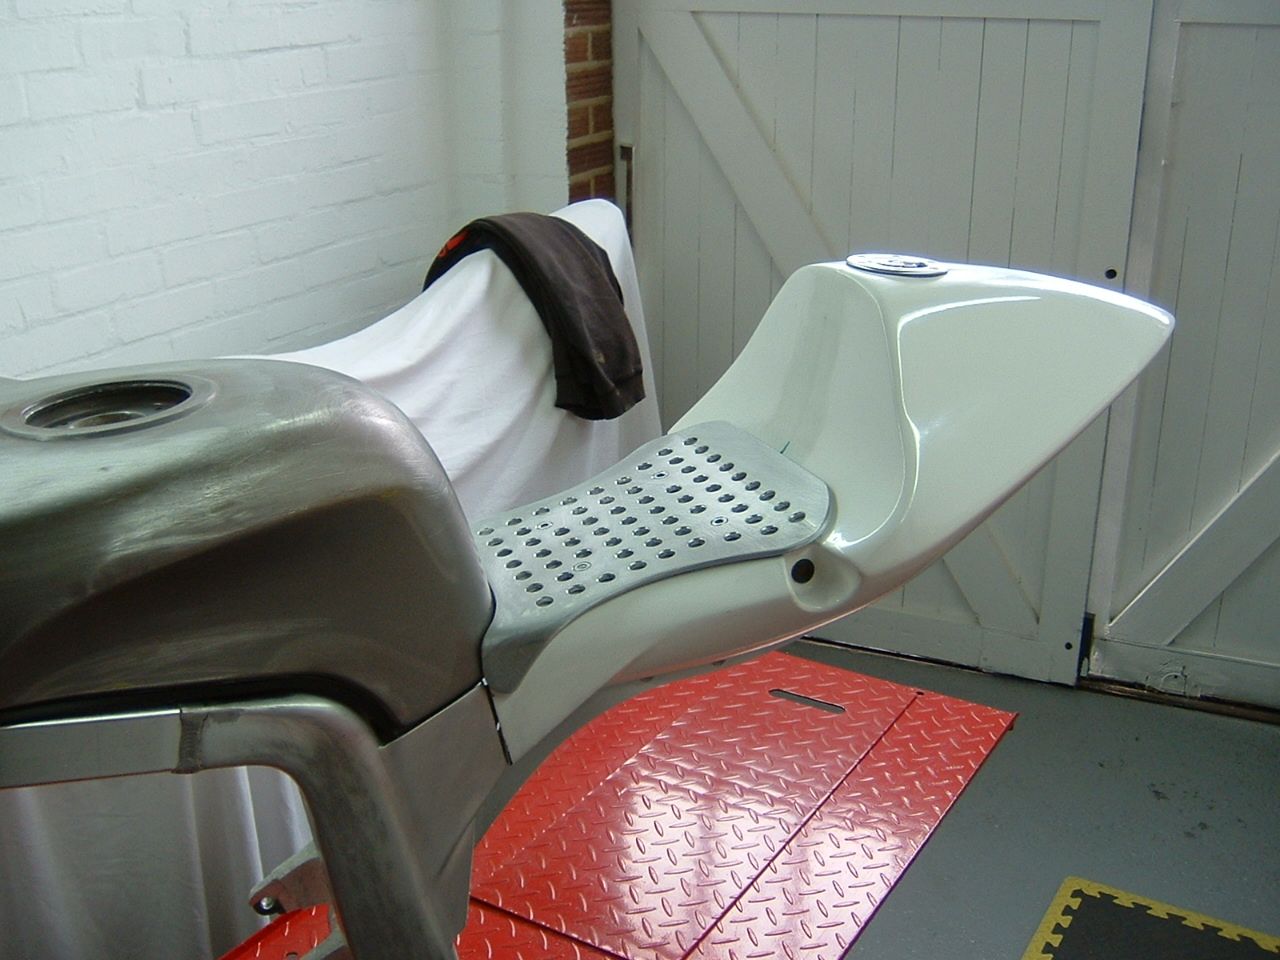 There's a gap between the fibreglass and seat base so my weight in on the subframe and not the fibreglass unit 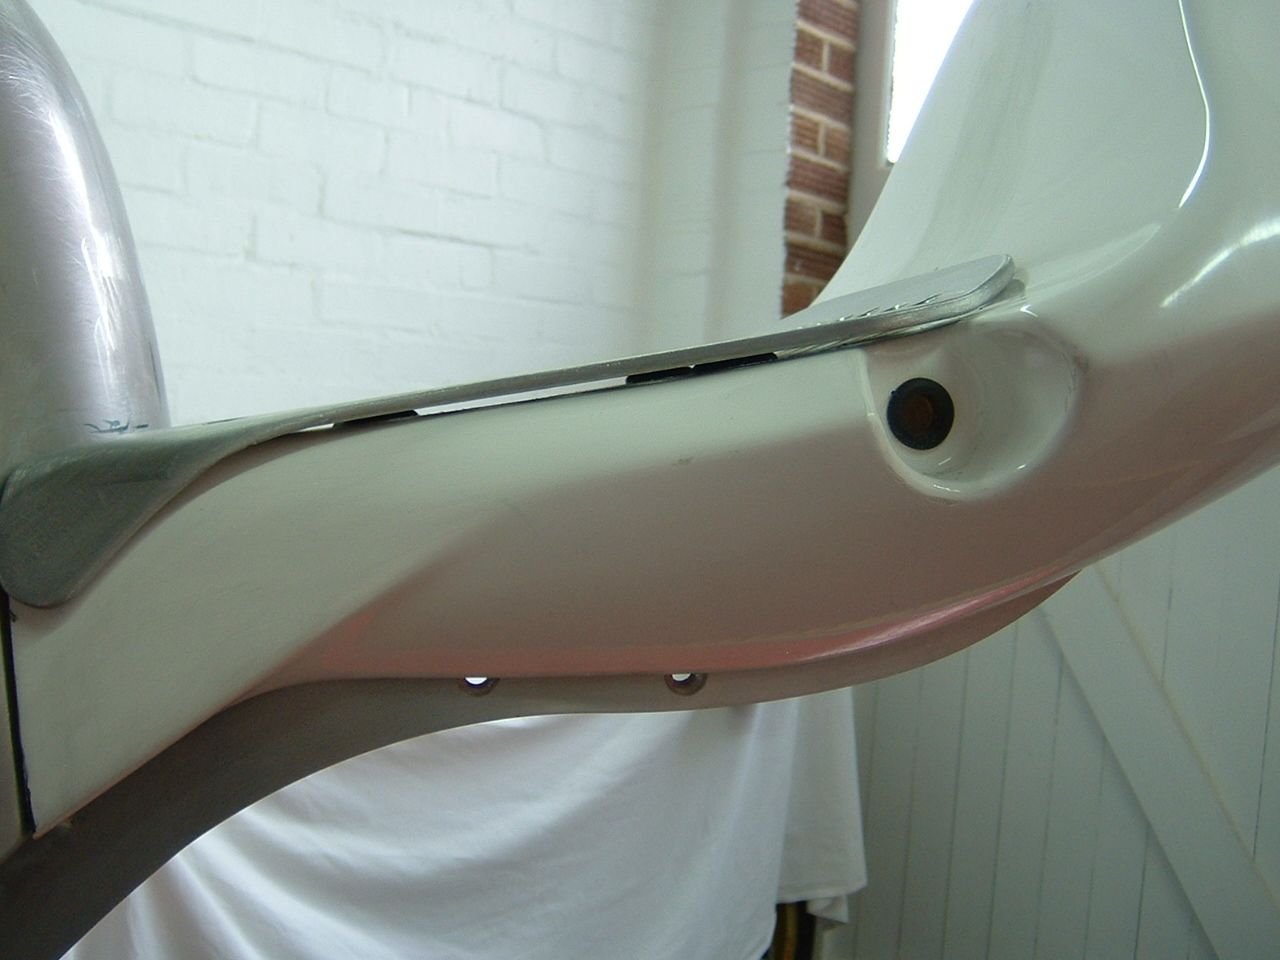 I'll be using 25mm hard foam and a red vinyl cover to finish.
|
|
| Haut |
|
|
|
cabbie
|
Sujet du message: Re: Kwikasfaki Publié: 19 Jan 2012, 22:36 |
|
Inscrit le: 19 Jan 2012, 20:34
Messages: 135
|
Been busy with the frame and swinger, It probable doesn't look like much but every visible weld has been ground down bellow surface level, re-welded and flattened, there is still a few hours work here but when finished the frame and swing arm will be smooth and weld free The workshop is 5mm deep in alloy fillings, lol 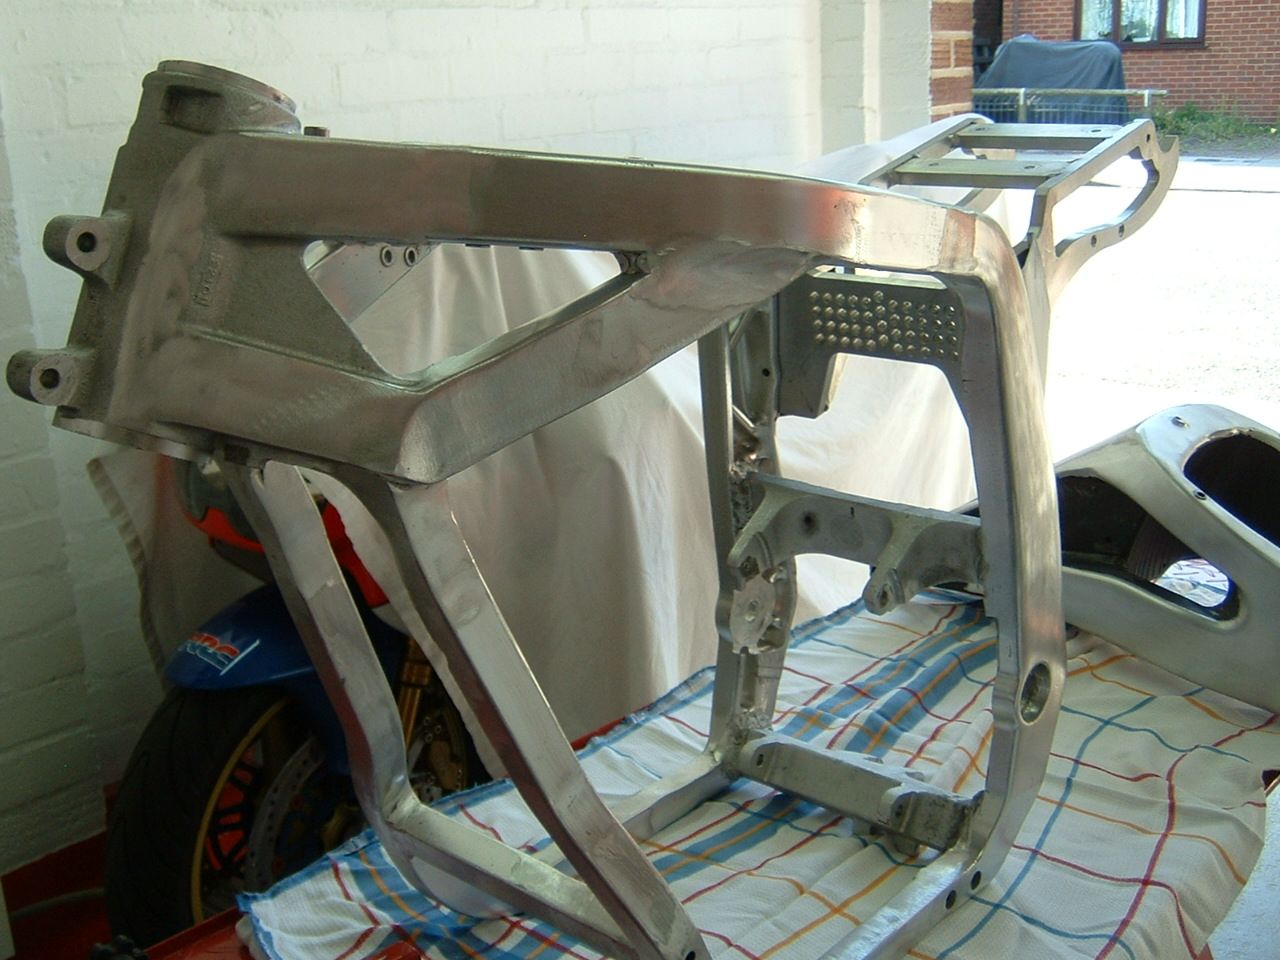 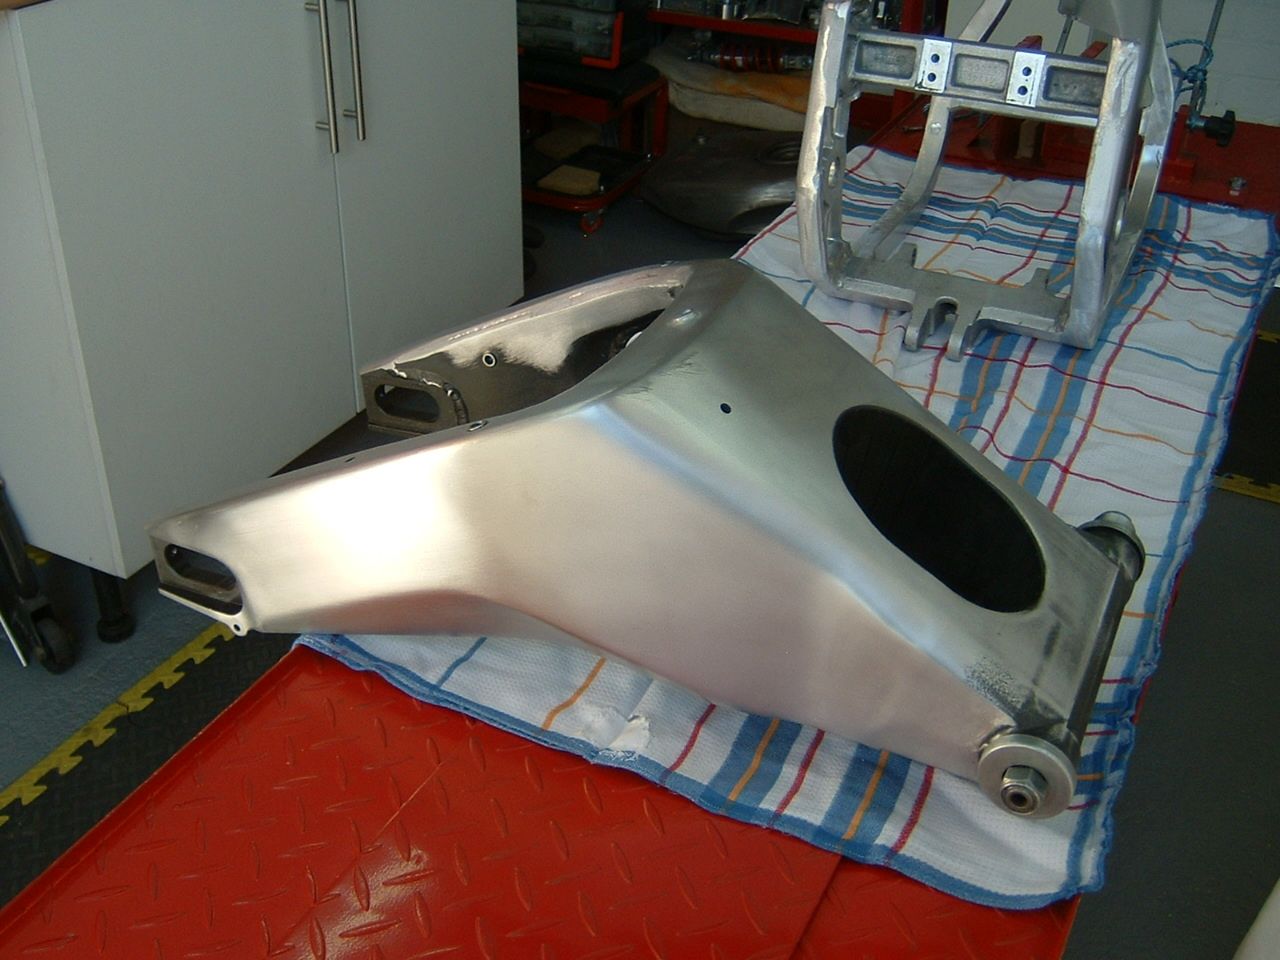 The reed boxes I had made and V-Force reeds arrived and also the clutch upgrade kit 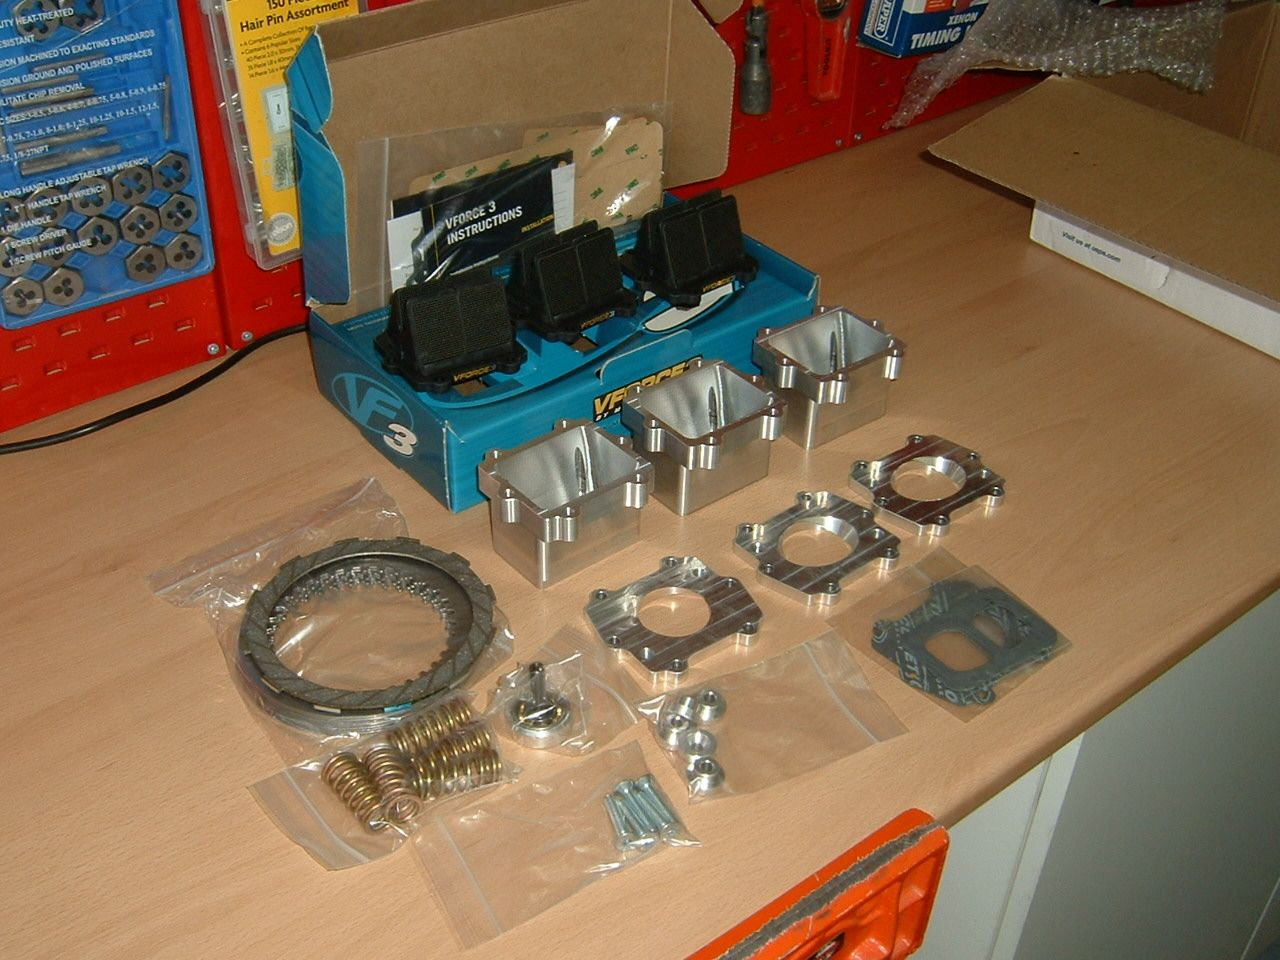 Here's the engine mounts I had CNC'd the outer brackets have been made much longer than I need so I can cut them in to match the frame exactly 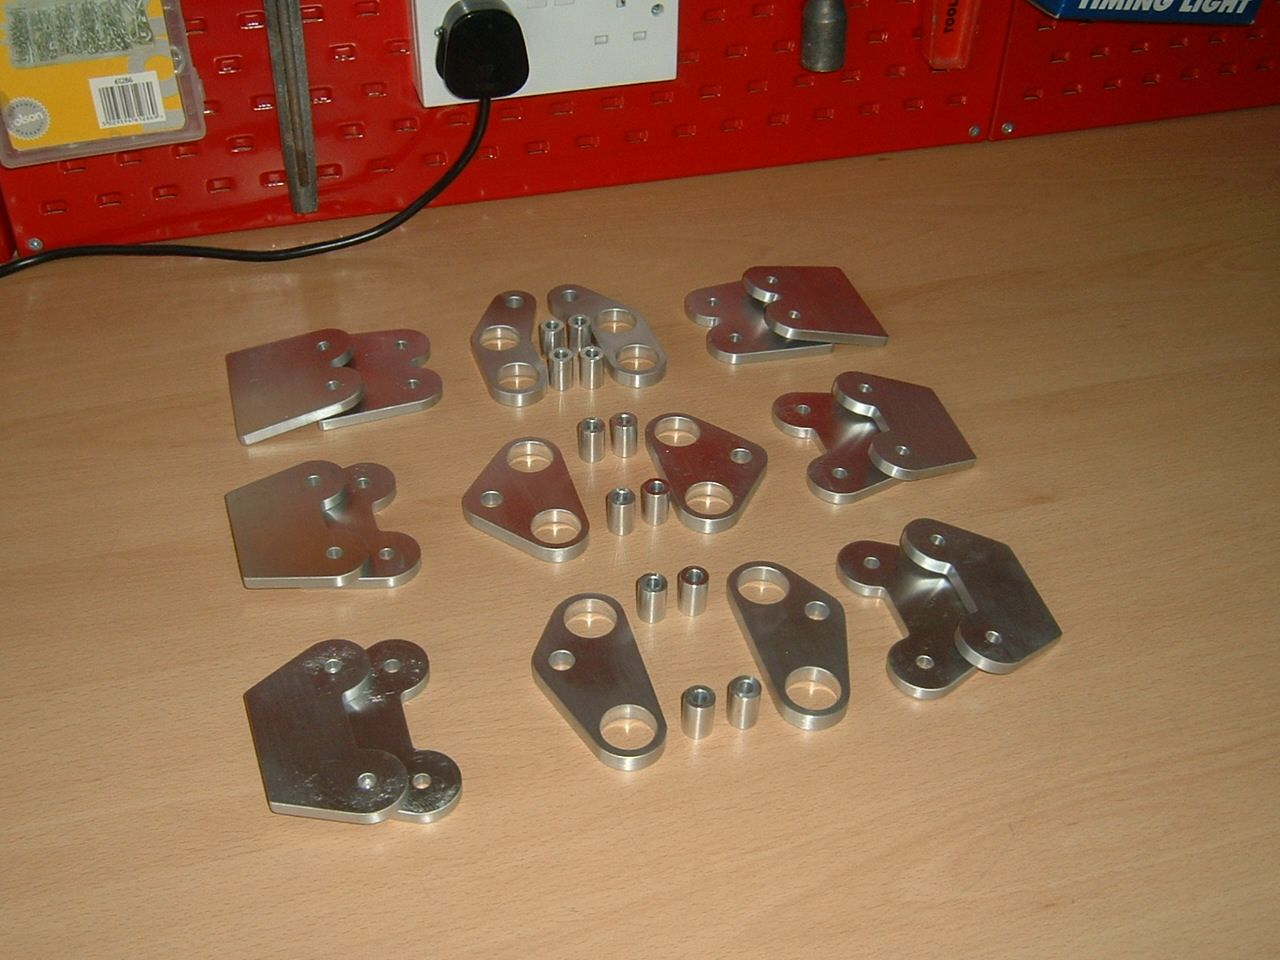 All the rubbers cut to length and fitted 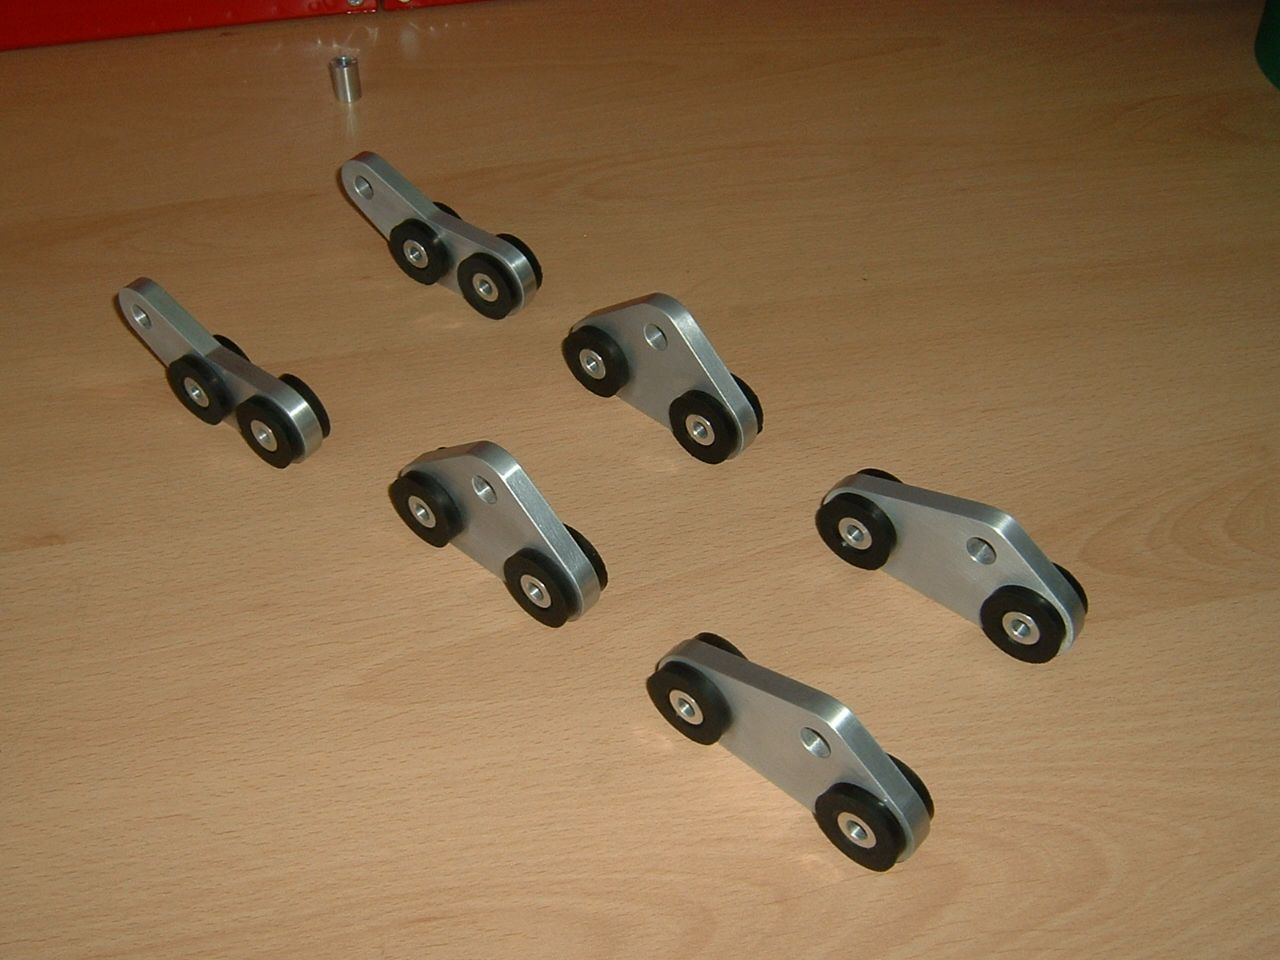 And bolted in place 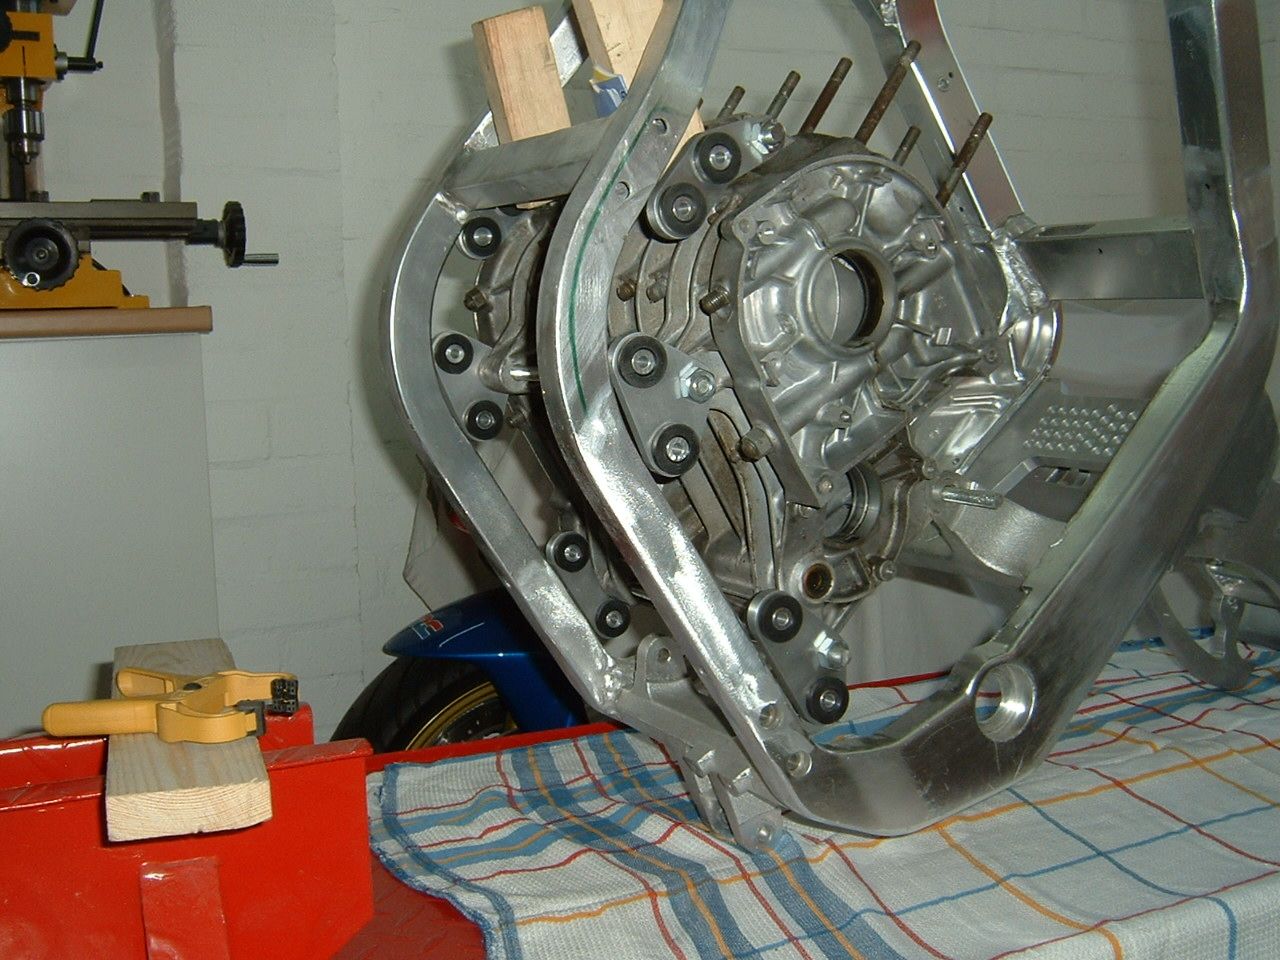 Side brackets cut to length and in place for welding tomorrow (yes I'll remove the rubbers before the complete welding is done) 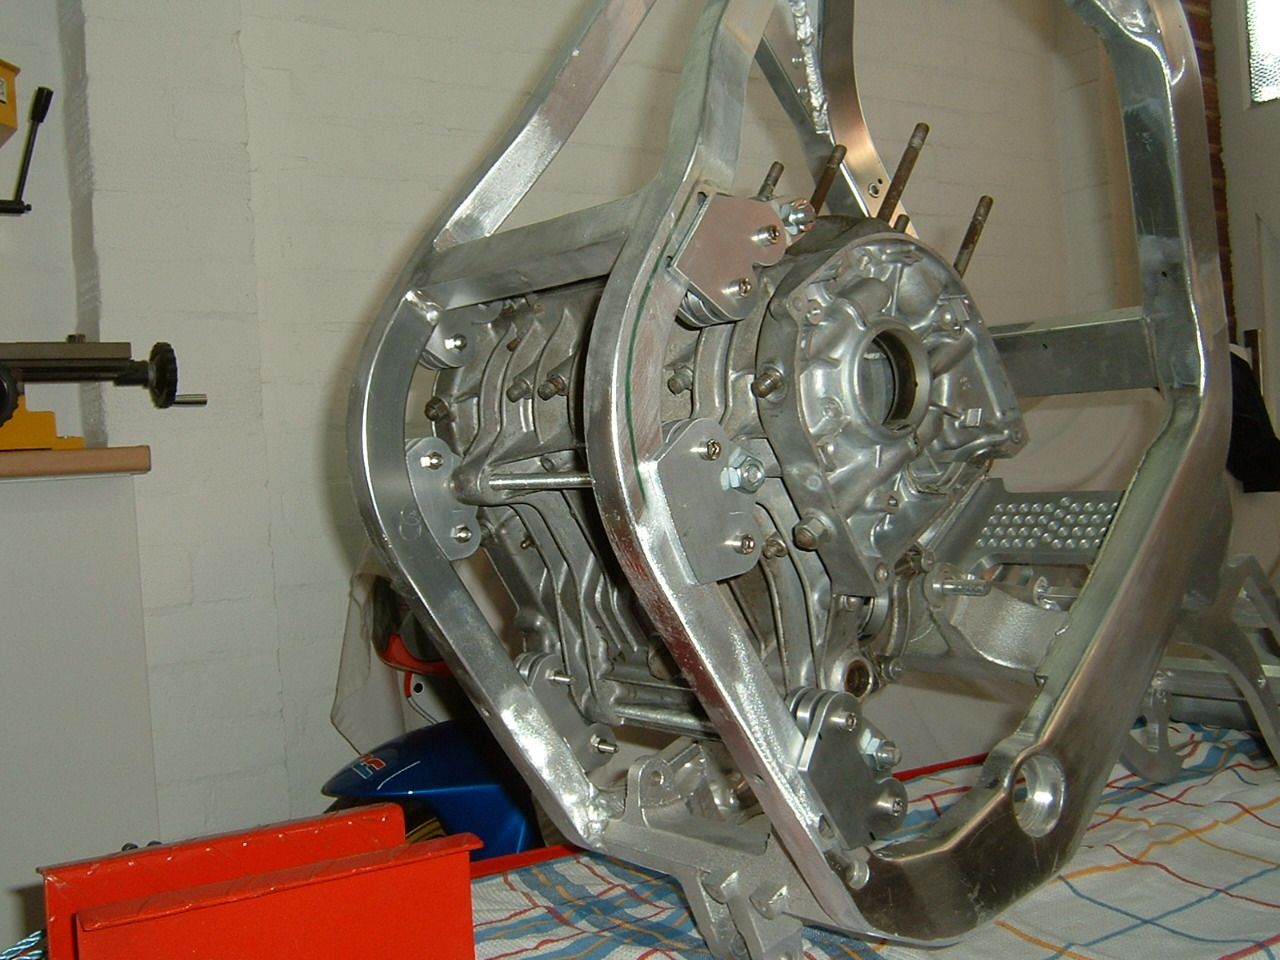 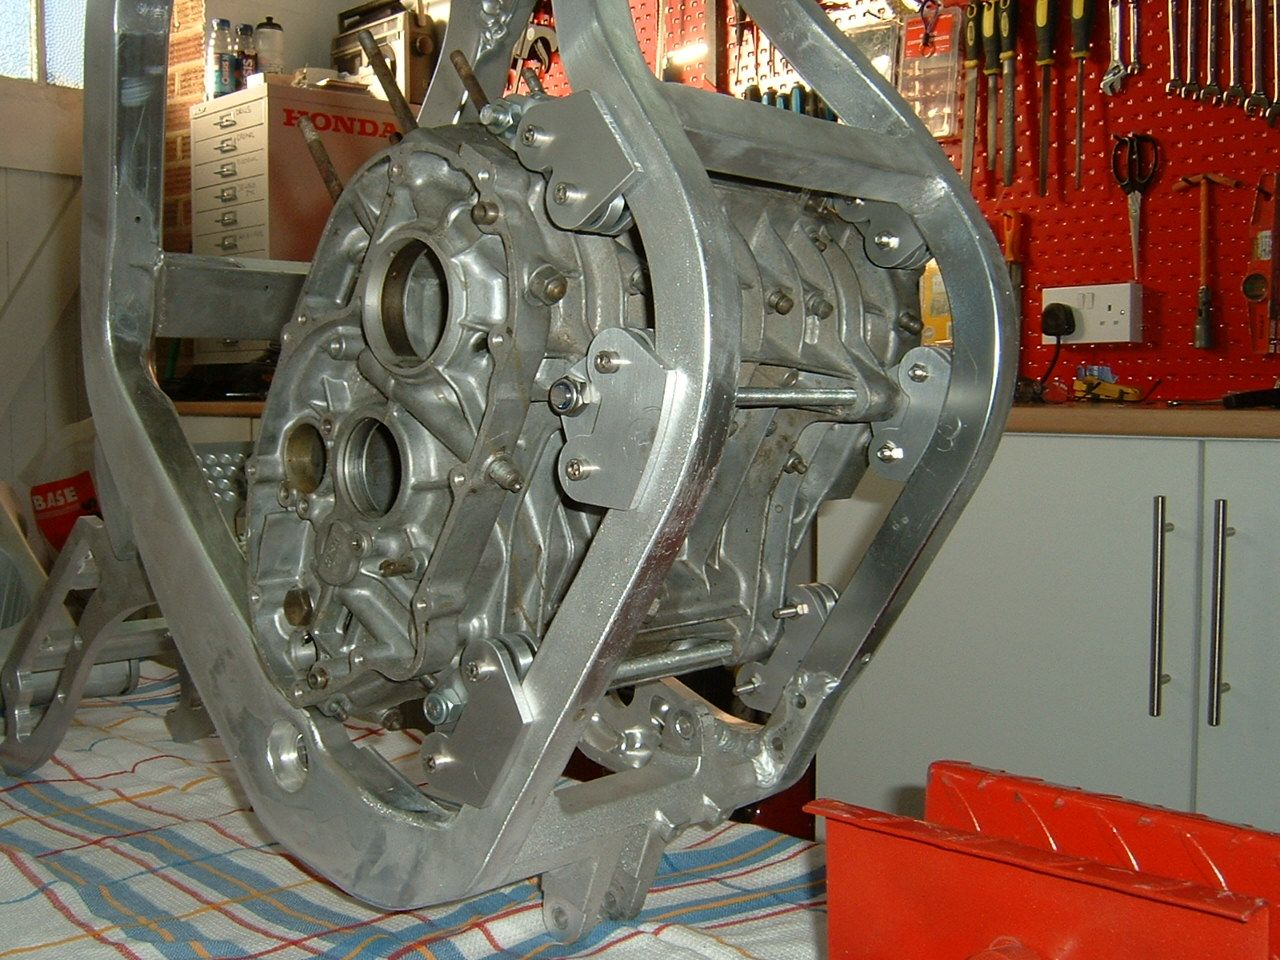 Finished rubbing down the swing arm and test fitted some carbon that arrived 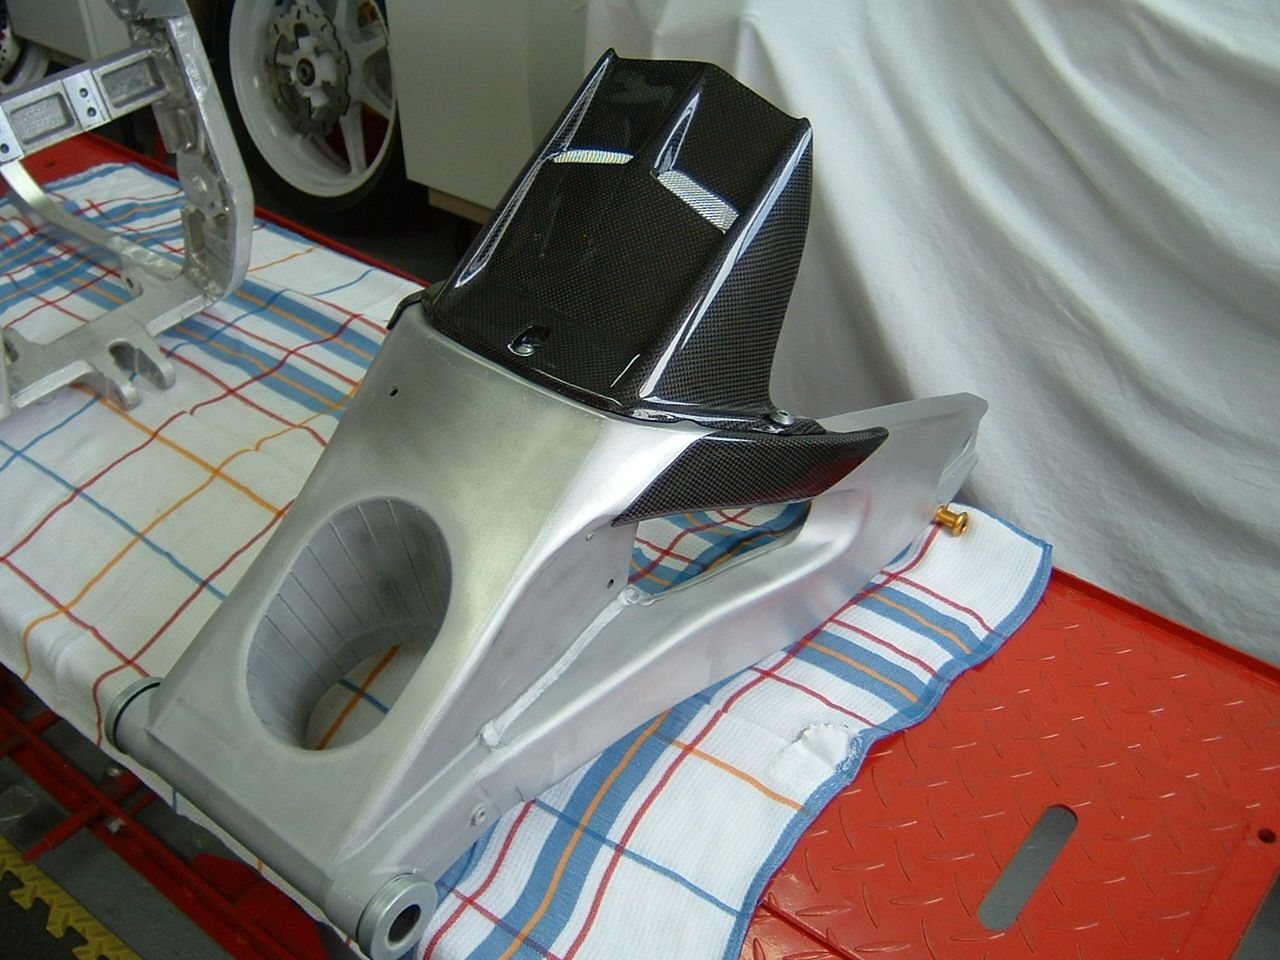  Got the mounts welded in place 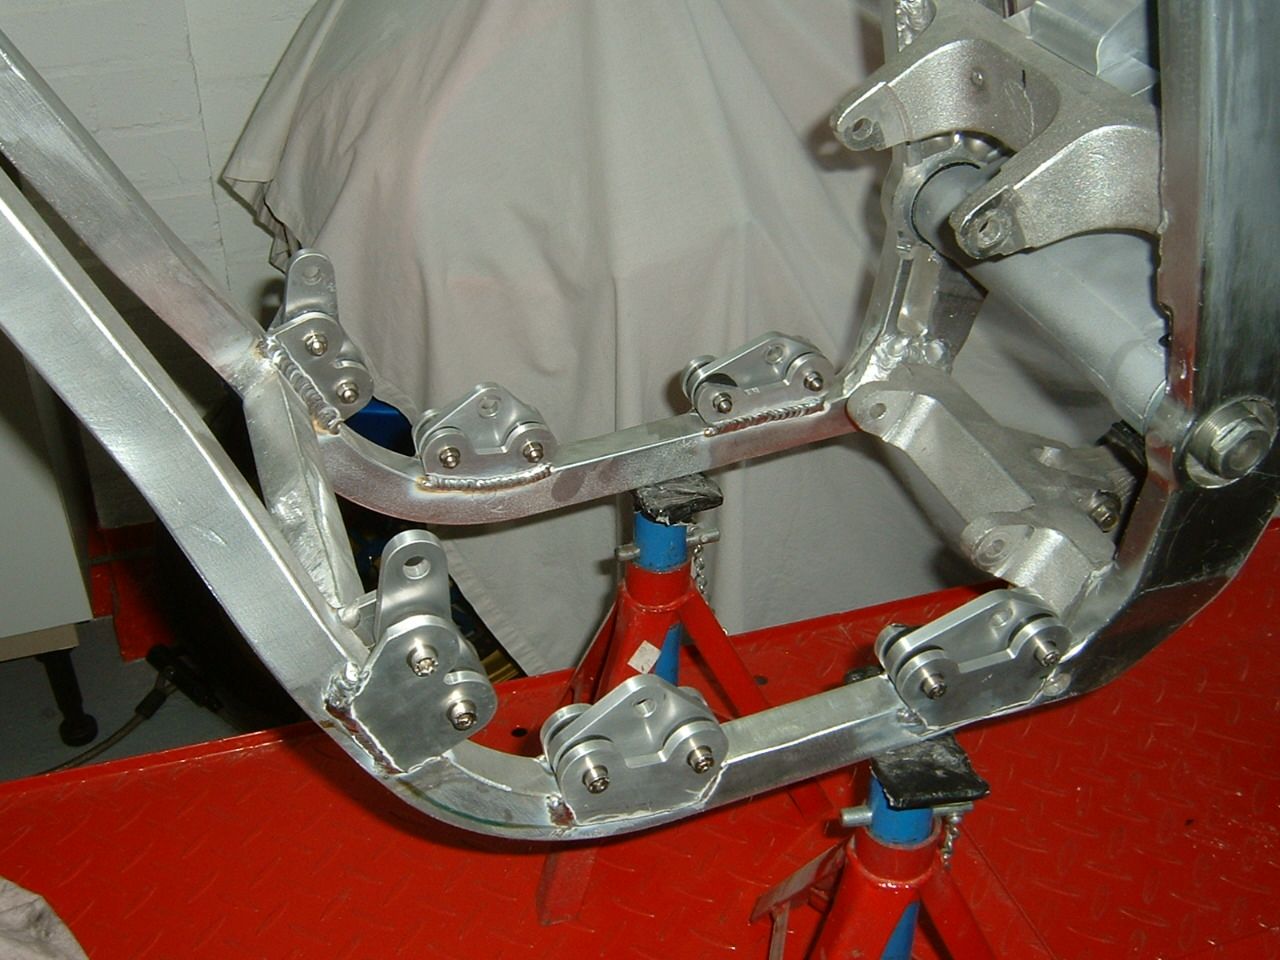 And engine fitted, nice 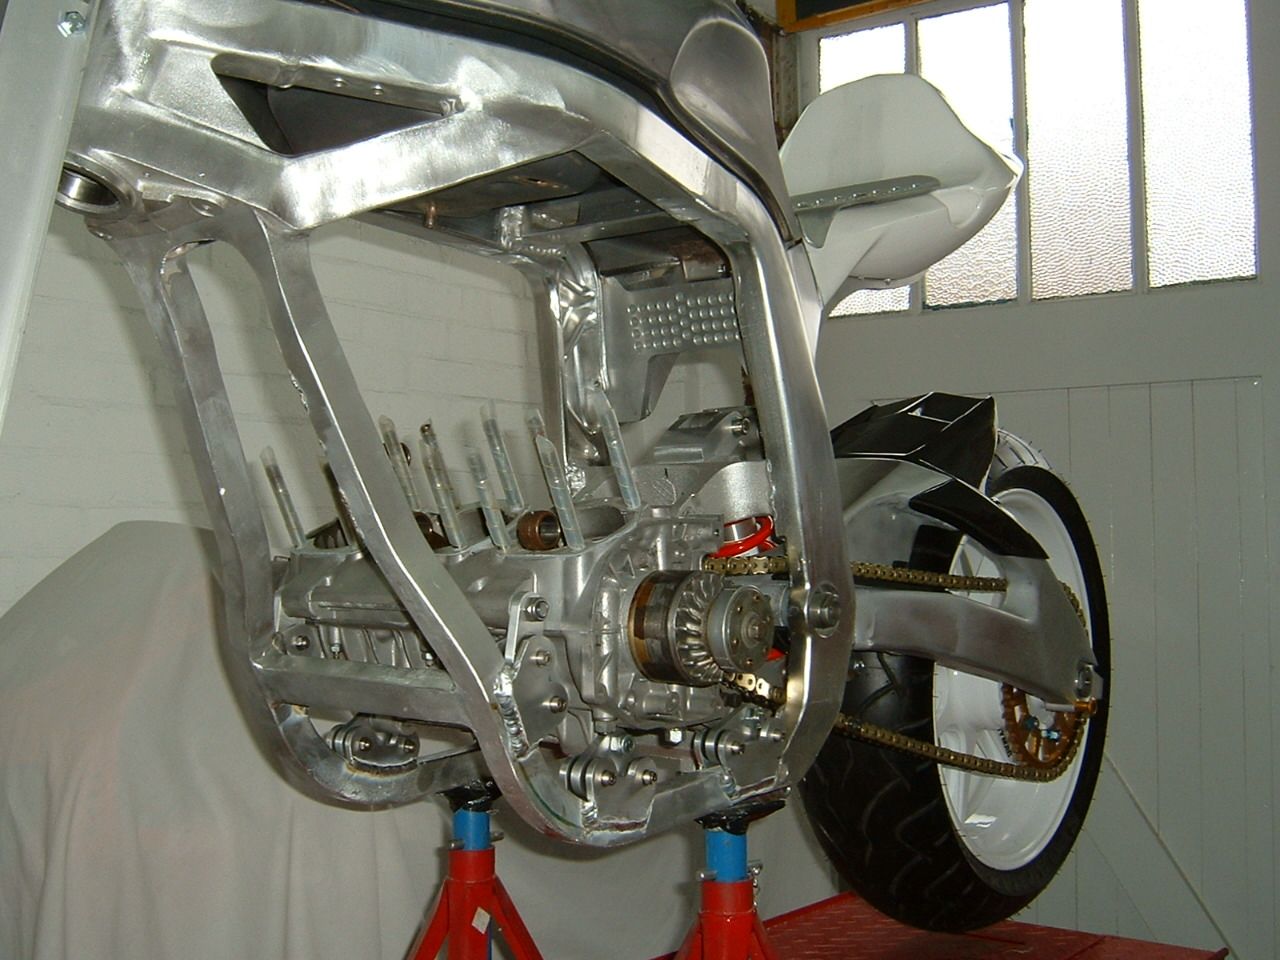 Thats about it now till the forks come back (next week firefox have promised, not impressed) I've als sent the cylinder away to Chris Richie for the reed boxes to be fitted.
|
|
| Haut |
|
|
|
cabbie
|
Sujet du message: Re: Kwikasfaki Publié: 19 Jan 2012, 22:37 |
|
Inscrit le: 19 Jan 2012, 20:34
Messages: 135
|
Made the seat side supports 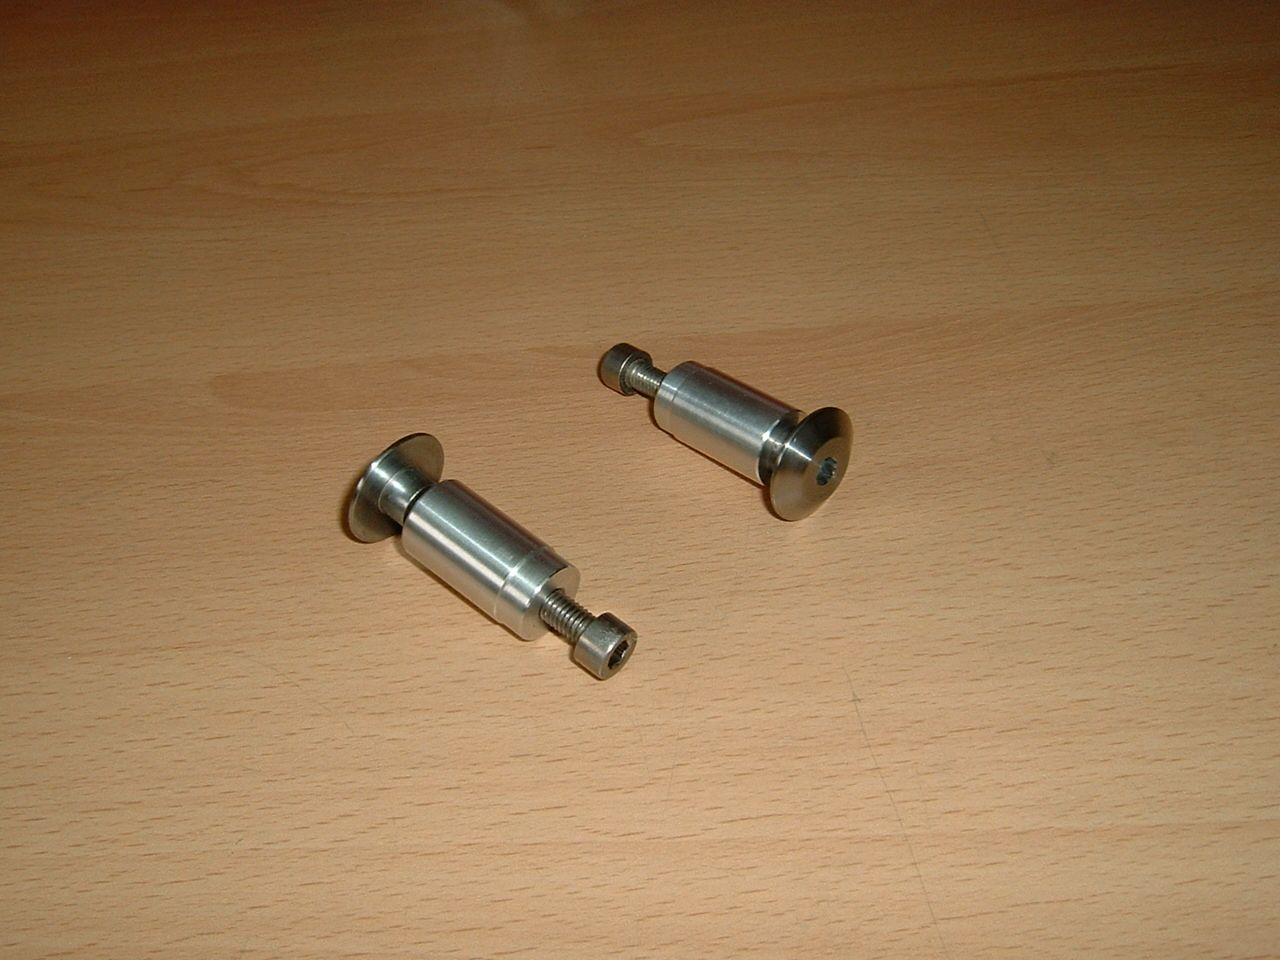 And fitted 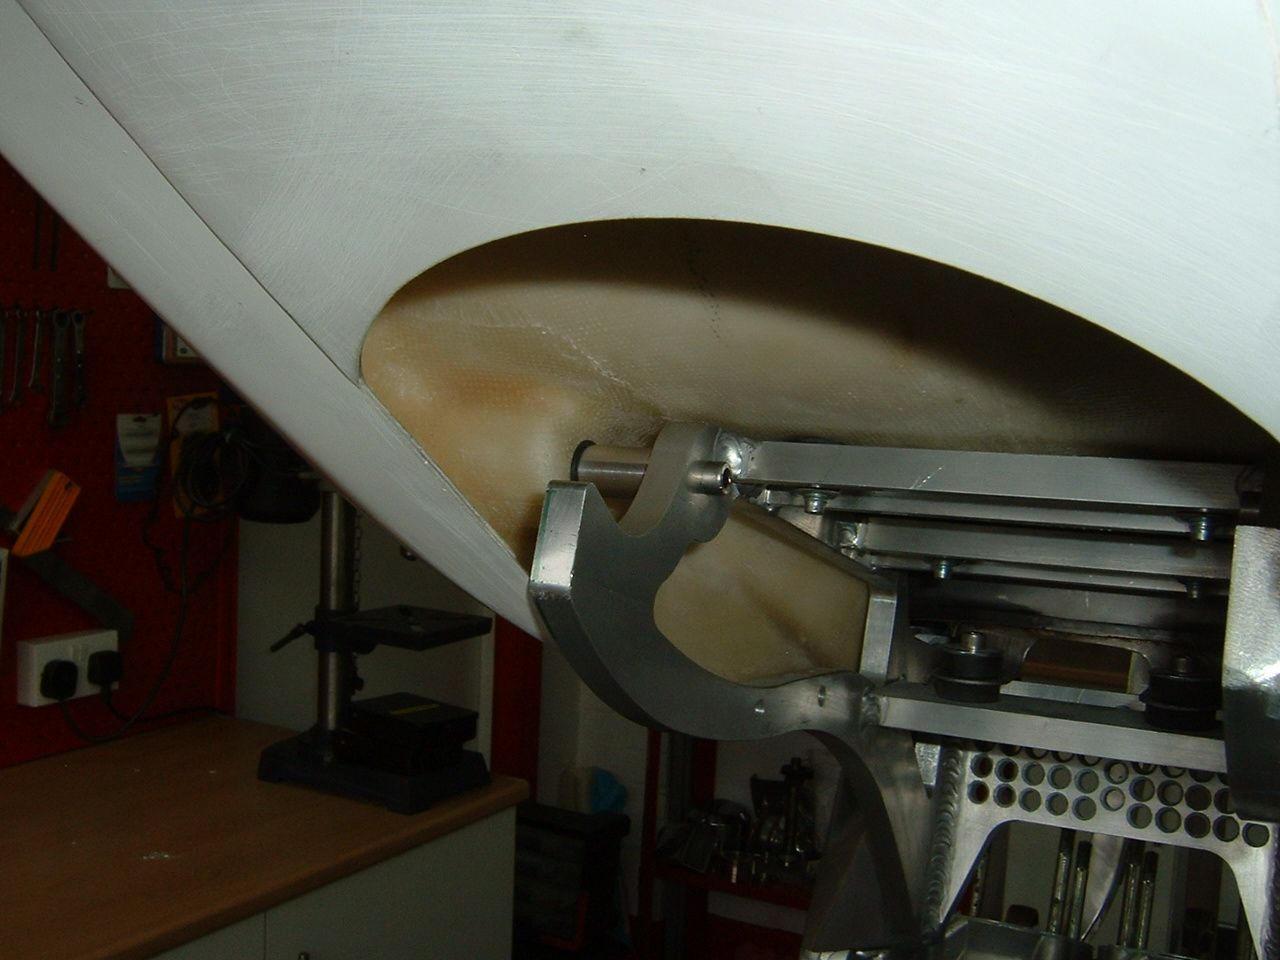 Next week I'll get the subframe bottom plate welded in. The next update is me attempting do something I've never done before, upholstery! I was going to send the seat base away to be done but as this calls for self tapping screws I doubt any upholsterer would do it. So, foam fitted and shaped 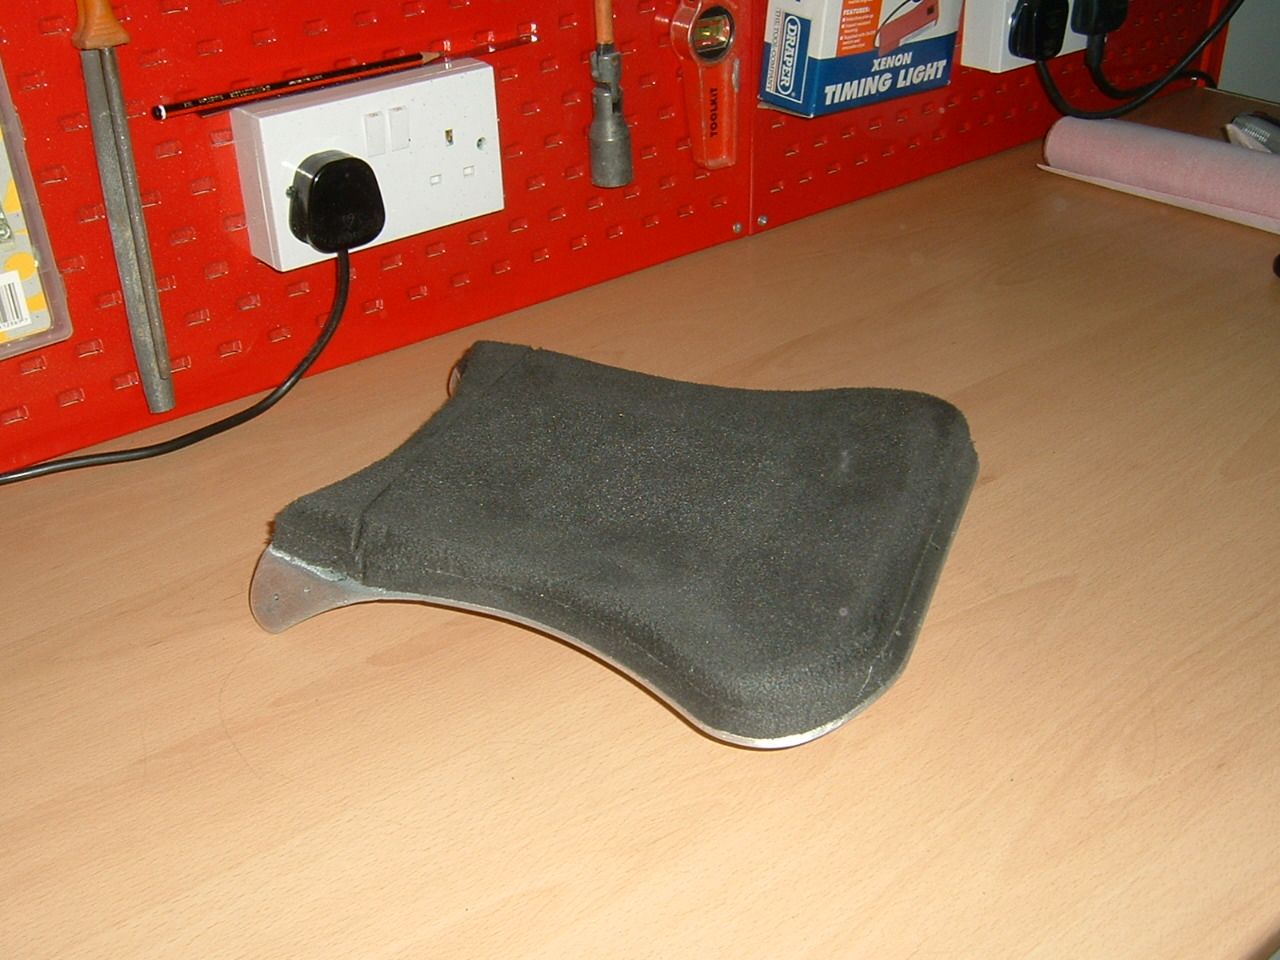 Fitting the vinyl  Damn fingers are sore but it's covered 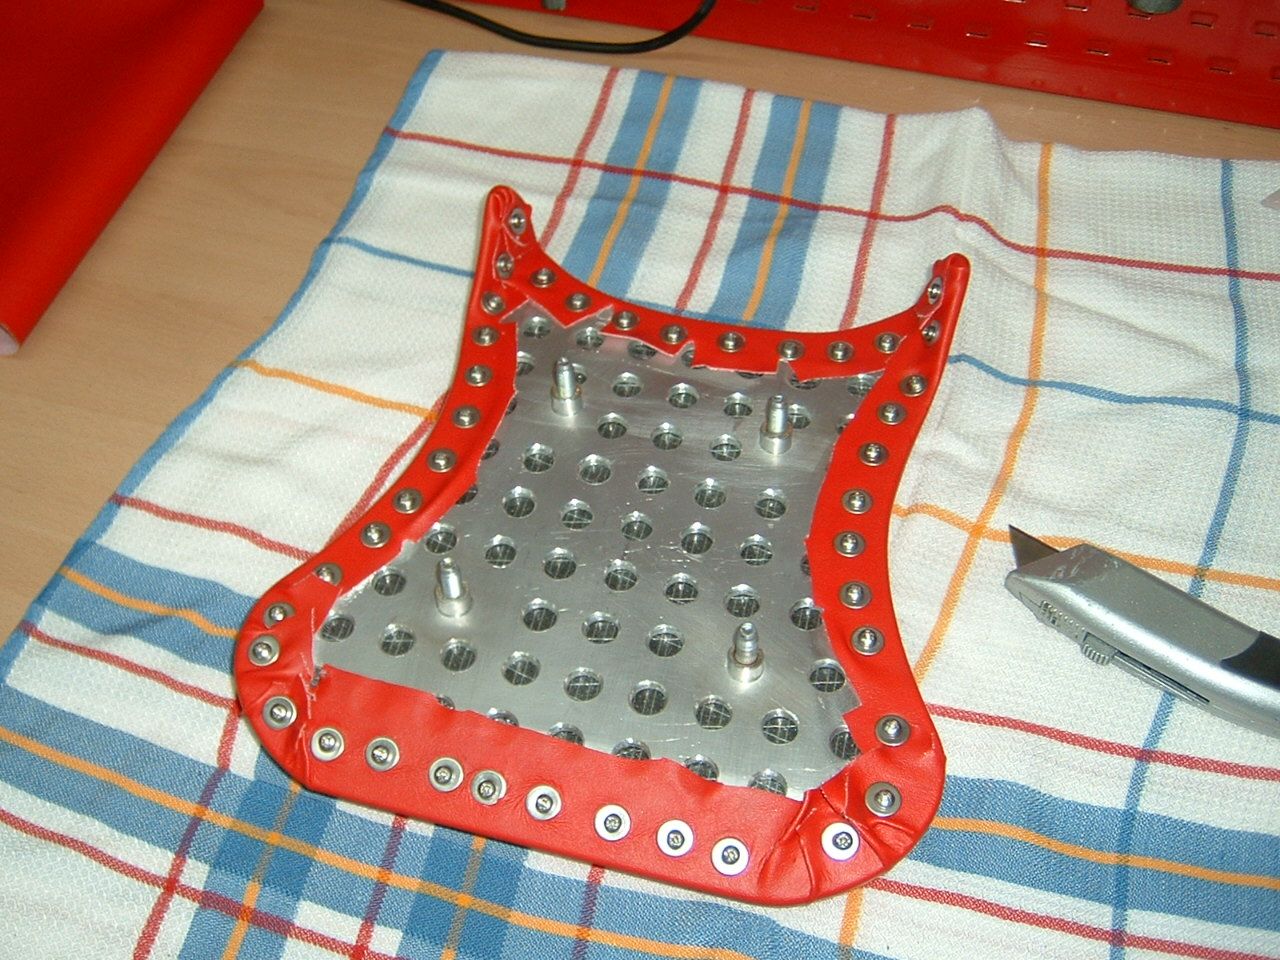 And the finished seat on the bike, came out well Me thinks. 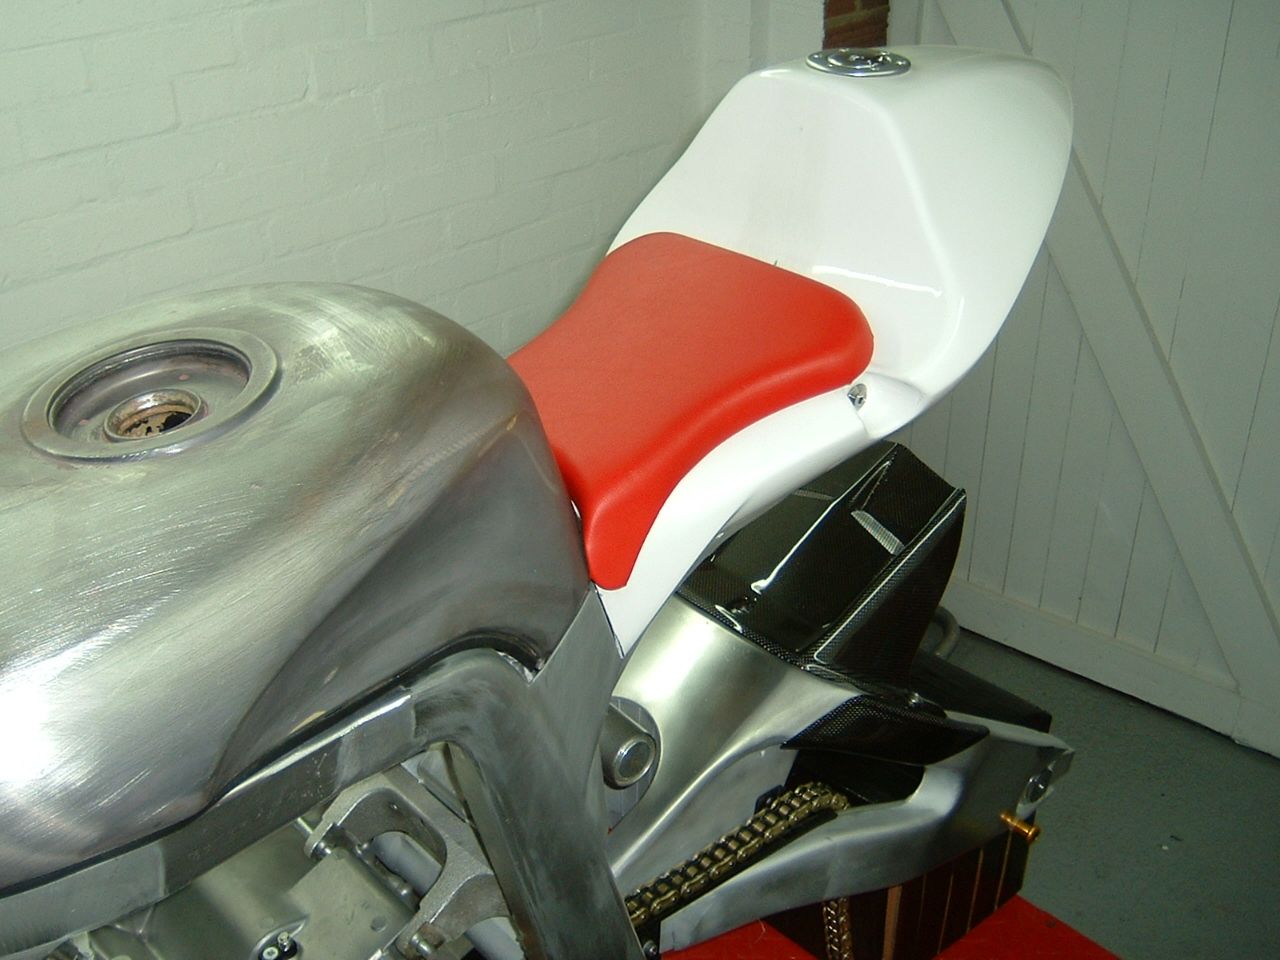 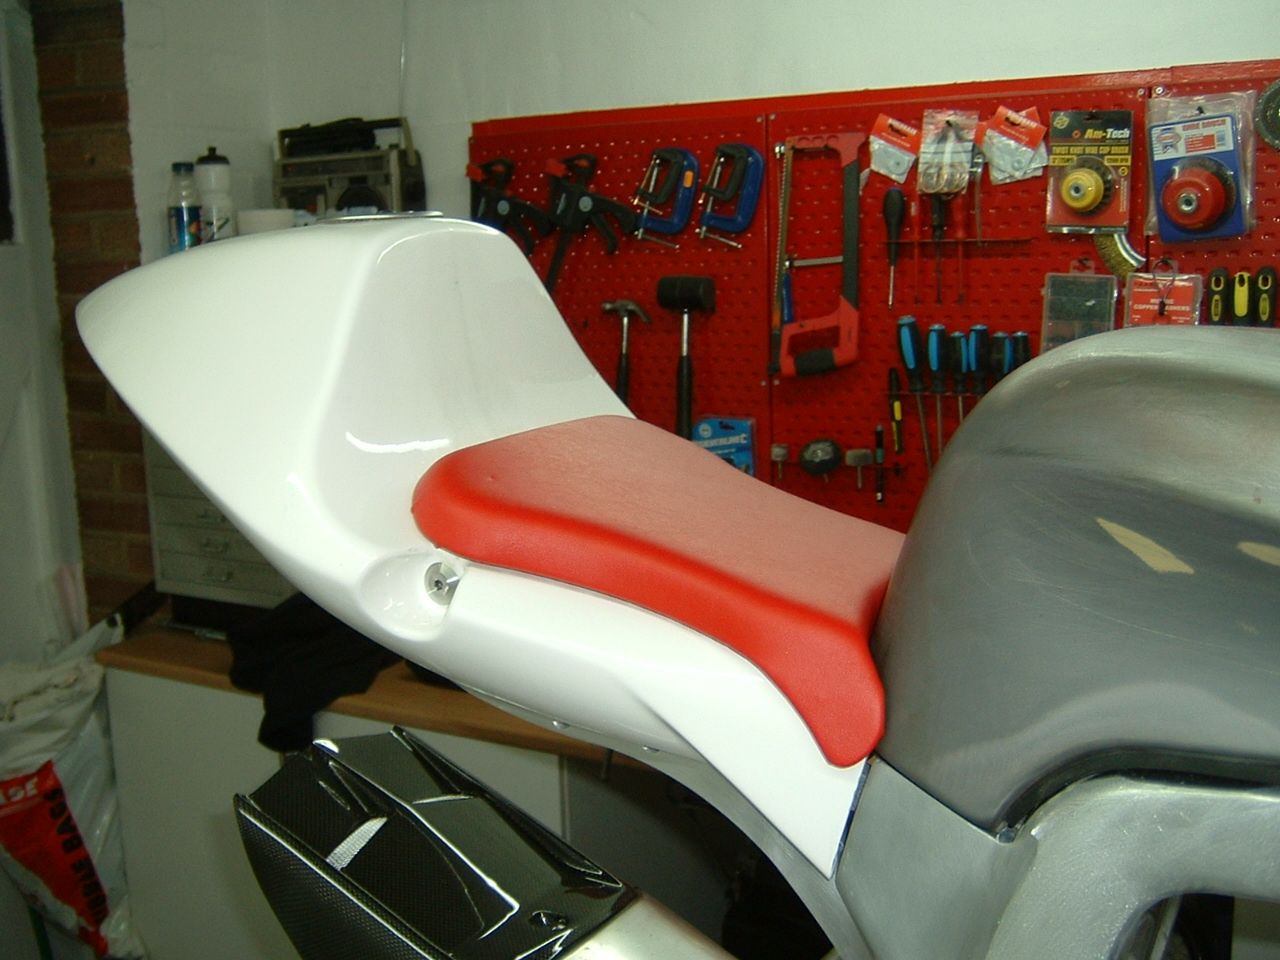 I've decided the yokes I bought for the project: Are a bit sad now so after some talks with the CNC dude I'm getting these 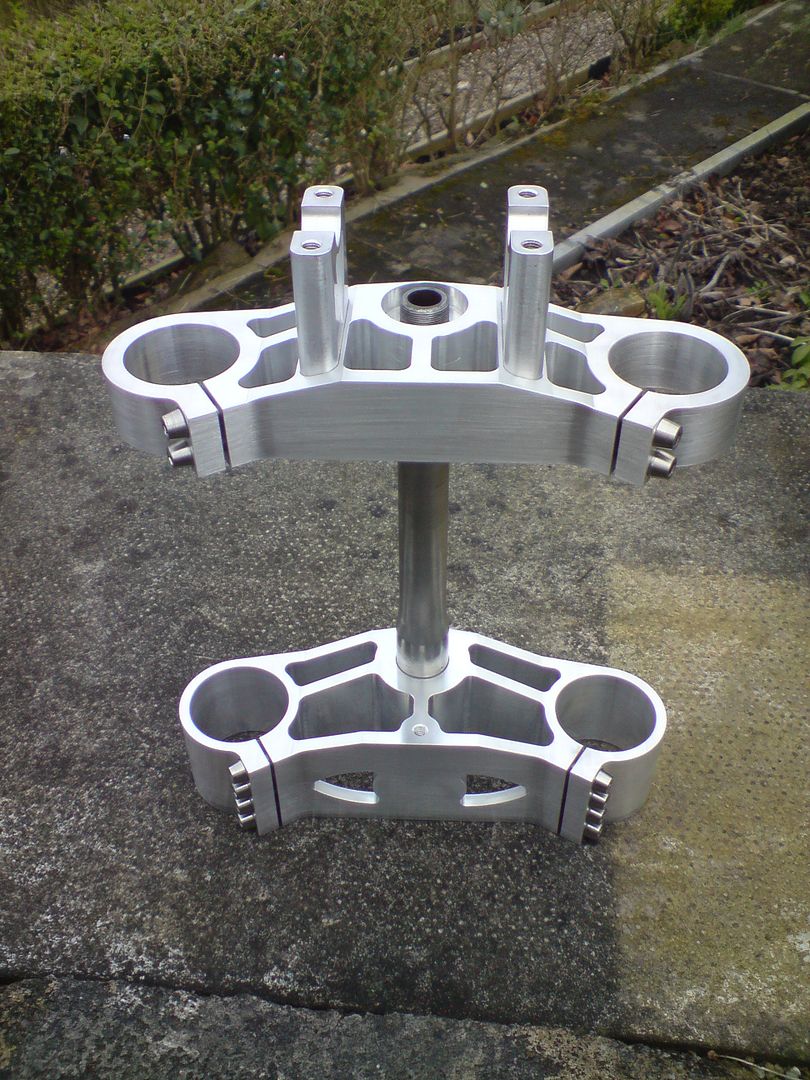
|
|
| Haut |
|
|
|
TomTomGO
|
Sujet du message: Re: Kwikasfaki Publié: 19 Jan 2012, 22:38 |
|
| Advanced Member |
 |
Inscrit le: 07 Déc 2011, 19:43
Messages: 840
Localisation: Bayonne
|
|
| Haut |
|
|
Qui est en ligne ? |
Utilisateur(s) parcourant actuellement ce forum : Aucun utilisateur inscrit et 6 invité(s) |
|
Vous ne pouvez pas publier de nouveaux sujets dans ce forum
Vous ne pouvez pas répondre aux sujets dans ce forum
Vous ne pouvez pas éditer vos messages dans ce forum
Vous ne pouvez pas supprimer vos messages dans ce forum
Vous ne pouvez pas insérer de pièces jointes dans ce forum
|
|
|


